
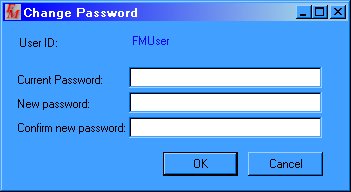
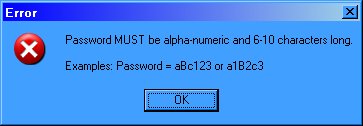
| New Login Procedure | Page 1
|
| Chart of Accounts | Page 3
|
| Adding New Account Number | Page 6
|
| Updating and Deleting Account Number | Page 6
|
| Vendor Maintenance | Page 7
|
| Adding New Vendor | Page 8
|
| Updating Vendor | Page 9
|
| Schedules | Page 10
|
| Adding a Schedule | Page 11
|
| Editing / Changing a Schedule | Page 12
|
| Close and Post Schedules | Page 13
|
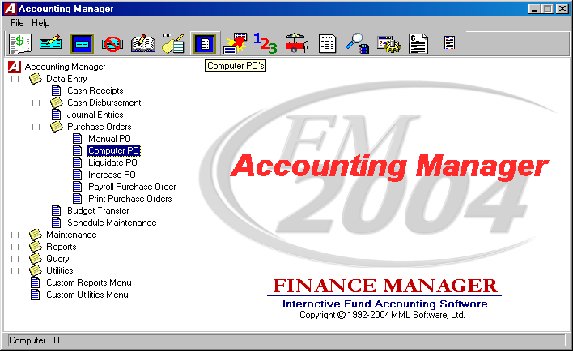
| Purchase Orders | Page 14
|
| Entering in Computer Generated PO | Page 15
|
| Account Distribution | Page 17
|
| Editing a Computer Generated PO | Page 17
|
| Removing a Computer Genereated PO | Page 18
|
| Printing and Posting Purchase Orders | Page 19
|
| Resetting Purchase Orders | Page 21
|
| Cancel or Partically Liquidating a PO | Page 22
|
| Increasing a Purchase Order | Page 23
|
| Adding New Account Number to Existing PO | Page 24
|
| Establishing Payroll Encumbrances (PO) | Page 25
|
| Cash Disbursements | Page 31
|
| Entering in Cash Disbursement | Page 33
|
| Entering in Manual Check | Page 35
|
| Printing and Posting Checks | Page 36
|
| Voiding Cash Disbursements | Page 39
|
| Cash Receipts | Page 42
|
| Entering a Cash Receipts | Page 42
|
| Editing a Cash Receipts | Page 44
|
| Removing a Cash Receipts | Page 45
|
| Printing a Cash Receipt | Page 46
|
| Journal Entries | Page 47
|
| Entering a Journal Entry | Page 47
|
| Editing a Journal Entry | Page 50
|
| Removing a Journal Entry | Page 50
|
| Budget Transfer | Page 51
|
| Entering a Budget Transfer | Page 52
|
| Editing a Budget Transfer | Page 53
|
| Removing a Budget Transfer | Page 53
|
|
|
|
| Payroll to General Ledger Distribution | Page 55
|
| Running Routine | Page 56
|
| Importing Payroll Expenditures | Page 57
|
| Posting the Payroll to GL Distribution | Page 58
|
| Trust and Agency Payment Processing | Page 65
|
| Processing Payments | Page 70
|
| Creating Cash Disbursements | Page 72
|
| Reports | Page 74
|
| Transaction Reports | Page 74
|
| Checks Waiting to Print | Page 74
|
| Cash Disbursements Schedules | Page 76
|
| Cash Warrants | Page 77
|
| Cash Receipts Schedules | Page 79
|
| Journal Entry Schedules | Page 80
|
| Budget Transfer Schedules | Page 81
|
| Vendor Payment History | Page 82
|
| Purchase Order Reports | Page 84
|
| Outstanding PO by Individual PO Number | Page 84
|
| Outstanding PO by Individual Vendor | Page 85
|
| Outstanding PO by Range of PO Numbers | Page 87
|
| Outstanding PO by Range of Vendors | Page 89
|
| Analysis Reports | Page 91
|
| Individual Account Transaction | Page 91
|
| Multiple Account Ranges | Page 93
|
| Financial Reports | Page 95
|
| Trial Balance | Page 95
|
| Trail Balance Diagnostic Report | Page 97
|
| Revenue Status | Page 99
|
| Appropriation Status | Page 101
|
| Cash Balance | Page 103
|
| Audit Reports | Page 107
|
| Vendor Name Change Report | Page 108
|
| Vendor Payment Limit Report | Page 112
|
| Permissions Report | Page 113
|
| Manual Check Review | Page 114
|
| Bank Reconciliation | Page 117
|


Parts of the Account Code
An account can be comprised of up to five parts: Fund, Function, Object, Location, and Program. In ACCOUNTING MANAGER, the size and role of each part can be determined by the user.
The Fund is the code representing the fund that the account is recorded in.
The Function is the basic account number that indicates what category the account is for. The function portion of the code should correspond to the New York State Uniform Chart of Accounts guidelines. You may, however, change the accounts to meet your specific needs. (Examples: Cash, Fund Balance, Real Property Taxes, Plant Maintenance, Instruction, etc.)
The Object indicates the type of transactions in the account. Object codes are predominantly used for appropriation codes (i.e., salaries, equipment, contractual expenses, supplies, etc.)
The Location indicates the building location within the municipal entity. This can be used for entities with multiple locations.
The Program indicates the specific program the account is used for. The program is usually used when there are several programs to be accounted for within one single function-object code. (Example: Federally funded projects to segregate expenditures by project.)
You may use as few or as many parts of the account code, depending upon your entity’s needs. The more detailed your reporting needs, the more parts you will want to use. Accounting Manager allows you to specify the length of each part of the account code for each fund. Refer to Fund Maintenance for further details.
The Chart of Accounts Master File contains the fund code, account code, account description, type, status, ST3 code, and Cash Account indicator for each account.
After selecting the Chart of Accounts option, the Account Maintenance window displays. The Account Maintenance window displays a listing of the contents of the Chart of Accounts Maintenance File. Account codes are listed in alpha-numerical order by code. Use this window to add, update, or delete an account code.
The Maintenance folders on the left-hand side of the window are used to navigate to other Accounting Master File Maintenance routines.
Account Maintenance Browser
The browser in the middle of the window contains a list of all existing account codes. The Account Maintenance browser displays the following information: Account, Name, Account Type, and Status. The viewer below the browser displays detailed information pertaining to the record highlighted in the browser. When this window is first accessed, account records are displayed in alpha-numerical order by code. To change the manner in which information is displayed in the browser, simply click once on the column title (Account, Name, etc). The column title is highlighted in yellow to indicate the selected sort option.
Data in a browser is normally sorted in either numerical ascending order or in alphabetical order. To reverse the order, that is to sort in numerical descending order or in reverse alphabetical order, click on the column title a second time.
You may restrict the browser to only show those account codes within a specified type and/or status. Use the Type field to restrict the browser to display only Appropriation accounts; only GL accounts; only Revenue accounts; or All accounts (Appropriation, GL and Revenue). In addition, you may further restrict the display by choosing a specific status from the Status drop-down field. You may restrict the browser to show only Active codes, only Inactive codes, or All codes (Active, Inactive, and Hidden). NOTE: The View drop-down menu at the top of the window also provides access to the Type and Status browser view fields.
The window allows you to search for a specific record based on the sorting method chosen. Immediately above and to the extreme right of the Account Maintenance browser is a search feature. The name of the Search field changes based on the column title that is highlighted. For example, if you are sorting by Account Code and you want to find a specific account record, enter that account code in the field ![]() and press the Search button
and press the Search button ![]() to begin the search process. The system highlights the appropriate record.
to begin the search process. The system highlights the appropriate record.
The navigation options can be accessed through the Navigation drop-down menu or through the buttons at the top of the window
.
These navigation buttons can be used to scroll through the records in the Account Maintenance browser.
| Field | Description |
| Fund | Enter the code (up to 4 characters) that uniquely identifies the fund. Example: A (General Fund). |
| Account | Type the account number, preceded by the Fund number. Example: A200. Be sure to follow the account code format defined for the fund in the Fund Maintenance File. |
| Name | Enter the description for the account code. Example: Cash in Bank. |
| Type | Indicate the account code type by entering the first letter of the type or choosing it from the drop-down menu. Valid types are:
G/L (General Ledger – type 1) Rev (Revenue – type 2) Appro (Appropriation – type 3) |
| Status | Indicate the account status by entering the first letter of the status or choosing it from the drop-down menu. Valid status codes are:
The customer status may be one of the following: Active – This status means that you want to actively use this account code during the Accounting data entry processes (i.e., Cash Receipts, Computer Checks, etc). Inactive – This status means that you are not going to use this account code for Accounting data entry purposes (i.e., Cash Receipts, etc.). Hidden – A hidden account record is one that you are no longer using, but you are retaining the code in the system rather than deleting it. You cannot use this code while performing Accounting data entry functions such as the Cash Receipt Entry process. Hidden accounts will not be included on reports such as the Appropriation Status Report. You may take the hidden flag off at any time that you wish to begin re-using the code. |
| Cash Acct/Type | Place a check in this checkbox if this account is considered a Cash Account.
If the Cash Acct checkbox is checked, the Type field is active. Indicate the type of transactions for which this cash account is used. Valid types are: Receipts - The cash account is used for Cash Receipt Entry purposes. Disburse – The cash account is used for Disbursement purposes (Computer Checks, Manual Checks). <Both> - The cash account is used for both Cash Receipt and Cash Disbursement Entry. |
| ST3 Code | Enter a valid State Consolidation Account code used to consolidate the account for New York State reporting purposes. Use the lookup to select from a listing of valid ST3 codes. The ST3 code tells ACCOUNTING MANAGER what State reporting code to classify the account to. This will ensure that any annual reports produced will conform to the state’s requirements. |
Adding a New Account Code Record
Follow the steps below to create a new code.
1. Press the Add ![]() button that displays in the maintenance toolbar at the top of the Account Maintenance window.
button that displays in the maintenance toolbar at the top of the Account Maintenance window.
2. Add all information associated with the account.
3. Press the Save ![]() button to lock in the new information.
button to lock in the new information.

Updating an Account Code Record
1. Highlight the appropriate account code in the browser and press the Update ![]() button that displays in the maintenance toolbar at the top of the Account Maintenance window.
button that displays in the maintenance toolbar at the top of the Account Maintenance window.
2. Change the name, status, and ST3 code as needed. When updating an account record, the fund, account, and type fields are not modifiable if transactions already exist for the account.
3. Press the Save ![]() button to lock in the revised information.
button to lock in the revised information.
Deleting an Account Code Record
NOTE: You may not delete any codes for accounts that have activity in the account history. For example, if detail transactions (i.e., cash receipts, cash disbursements, etc.) exist for an account, that account code cannot be deleted.
1. Highlight the appropriate account code in the browser and press the Delete ![]() button that displays in the maintenance toolbar at the top of the Account Maintenance window.
button that displays in the maintenance toolbar at the top of the Account Maintenance window.
2. Confirm that this is the correct record that you wish to delete. Press Yes to delete the record. Press No if you do not want to delete the record.
VENDOR MAINTENANCE

Adding a New Vendor Record
�
Select ![]() ADD icon from the Update Panel.
ADD icon from the Update Panel.
� Enter all information associated with the vendor. Enter in the Purchasing Address for the vendor.
�
Switch the Address drop-down menu to Payment and enter the vendor’s Payment address. Use the Copy from Purchasing Address button ![]() to COPY the purchasing address information into the Payment address information section.
to COPY the purchasing address information into the Payment address information section.
� Check the Name Switch checkbox if you want the vendor’s payment name to be reversed during the check printing process. Example, let’s say you type in the vendor’s name as Smith, John. If you check the Name Switch checkbox on the Vendor Payment Address window, the check stub will display the vendor name as Smith, John and the check document will display the vendor name as John Smith.
�
Press the SAVE ![]() icon to lock in the new information.
icon to lock in the new information.

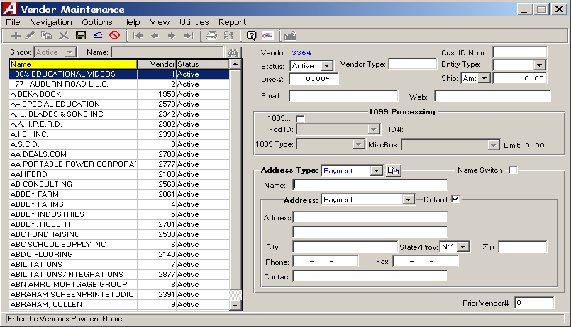
Updating a Vendor Record
�
Highlight the appropriate vendor record in the browser and press the UPDATE ![]() icon that displays in the maintenance toolbar at the top of the Vendor Maintenance window.
icon that displays in the maintenance toolbar at the top of the Vendor Maintenance window.
� Change any vendor information as needed. Update the Purchasing address for the vendor.
�
Press the SAVE ![]() icon to lock in the new information.
icon to lock in the new information.
�
Click the ![]() box in the upper right corner to return to the ACCOUNTING MANAGER main screen.
box in the upper right corner to return to the ACCOUNTING MANAGER main screen.
SCHEDULES
Open and Closed Schedules
Accounting Tips:
0 Although schedules may be used for any time period the users desire, it is recommended that schedules be used monthly, at most. Depending upon the size of the accounting operations of the entity, the user may require using schedules for smaller or longer time periods.
Monthly schedules, however, will ensure that transactions for the entire month are organized together and posted on a timely basis. Monthly procedures can simplify standard reporting and reconciliation to outside information.
Open schedules are generally for the current and most recent preceding period. All data entered in current schedules may be changed, edited, and corrected through the respective menus. The data entered in the current schedules remains active until the schedules are closed. When closed, all entries on the schedule are posted to their proper accounts in both the general ledger and the subsidiary ledger. A user may have an unlimited number of open schedules at any one time.
Closed schedules are schedules that have been closed by the user. Once closed, the data in a schedule CANNOT BE CHANGED. Any corrections for errors in prior, closed schedules must be recorded in the current period in an existing, open schedule, most commonly as a journal entry. Once closed, all account data is posted to the appropriate accounts. Closed schedules can be accessed for review on screen or printed at any time.
Schedule Maintenance

� Select the schedule type, Cash Receipts, Cash Disbursement, Purchase Orders, Journal Entries, or Budget Transfers.
�
Select ![]() ADD icon from the toolbar.
ADD icon from the toolbar.
� Enter the fund letter or click on the magnifying glass to view a list of available funds and press TAB.
Accounting Tips:
0 Although separate schedules are recommended for different funds, municipal entities with minimal transactions may record entries of the particular type (i.e. Cash Receipts) on a single schedule for all funds. Such multi-fund schedules should be labeled as fund A for General Fund.
� Enter a description for the schedule (i.e. July Cash receipts).
� Enter the opening date for the schedule and proposed closing date.
� Enter a � in the Mix Funds box to indicate if data entry items from multiple funds may be placed on this schedule.
� The schedule number is auto generated.
0 As with all data in ACCOUNTING MANAGER, the opening date of a schedule becomes a basis for all reporting purposes. All schedules should be opened as of the first date of the reporting period
After entering the new schedule, click ![]() SAVE icon to save the new entry and return to the Open Schedule listing screen.
SAVE icon to save the new entry and return to the Open Schedule listing screen.
� Select the individual schedule from the listing.
�
Click ![]() UPDATE icon from the toolbar.
UPDATE icon from the toolbar.
� Press TAB until desired information to be changed is highlighted.
�
Enter in the correct data and click ![]() SAVE icon. ACCOUNTING MANAGER will automatically replace the old data and return to the listing.
SAVE icon. ACCOUNTING MANAGER will automatically replace the old data and return to the listing.
Exiting the Schedule Function
Selecting ![]() EXIT from the top of the form will return the user to the ACCOUNTING MANAGER main screen.
EXIT from the top of the form will return the user to the ACCOUNTING MANAGER main screen.
Close and Post Schedules
� Select the open schedule to be closed from the listing.
� Enter date of the closing for the schedule. The default date will be the ending day of the month.
Accounting Tips:
0 As with all data in ACCOUNTING MANAGER, the closing date of the schedule becomes the basis for all reporting purposes. All schedules should be closed as of the last date of the reporting period.
0 If the schedule is not closed, as of the ending date of the period, general ledger detail accounts will not correspond to closed & posted balances.
� After selecting and dating the schedule, click CLOSE. ACCOUNTING MANAGER will ask you, "Are You Sure You Want To Close This Schedule?"
� Click "YES" to close the schedule.
� Click "NO" to leave the Schedule Open.
� Repeat the closing routine for each schedule to be closed.
Accounting Tips:
0 Once a schedule is closed it cannot be edited or changed. Only open schedules may be edited or changed.
Accounting Tips:
0 ACCOUNTING MANAGER will allow the user to only close one schedule at a time. This safeguard prevents the user from erroneously closing an open schedule.
Purchase Orders
Accounting Tips:
0 What is an Encumbrance?
0 An encumbrance is a temporary budgetary entry, which encumbers, or sets aside, a portion of a budget to satisfy an incoming obligation for a specific purpose. These encumbered funds are used in the purchasing process to maintain appropriations within a budget. They are used to pay an obligation to be received in the future for an order placed by the entity.
Computer Generated Purchase Orders
Selecting a Schedule

Enter a Computer Generated Purchase Order
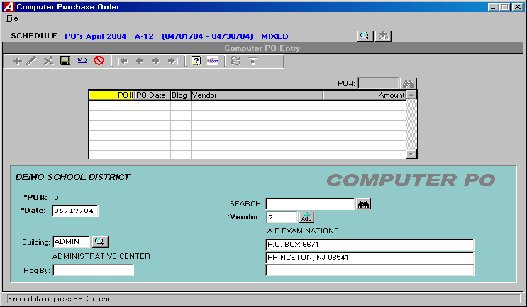
�
Click ![]() ADD icon on tool bar.
ADD icon on tool bar.
� Enter the entry date and press TAB.
Accounting Tips:
0 Computer Generated Purchase Order may be dated for the entry date to simplify the review process. Once printed, the printing date will represent the date the order or commitment to purchase goods and services is made. Proper dating of the purchase orders will result in accurate comparison to budget reports.
� Enter the vendor number or click the magnifying glass to see an alphabetical listing of all vendors. (You can also add a new vendor here by clicking on the +ADD button.)
� Enter the Building code to designate a place of delivery, if necessary. (Please refer to File Maintenance: Buildings)
� Enter the name of the contact, or "ATTN:" person to appear on the purchase order, in the "Req. By:" box.
�
Click the ![]() SAVE icon to proceed to the Items Entry screen.
SAVE icon to proceed to the Items Entry screen.
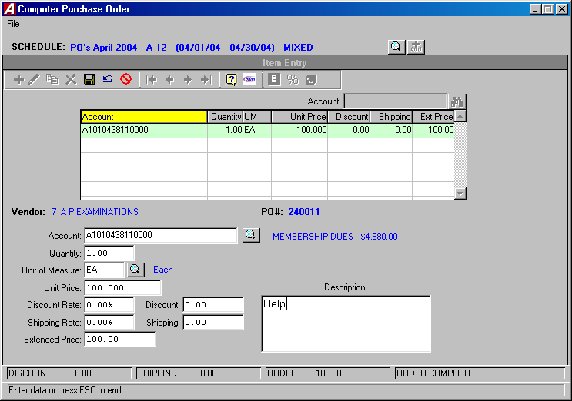
� Enter the first appropriation account to be encumbered and press TAB, click the magnifying glass to view all available accounts. All appropriation account code look up tables include a display of the applicable unencumbered balance while in the pre-select mode.
� Enter the quantity to be ordered and press TAB. For a single item with no unit price, enter a quantity of zero (0).
� If the quantity was given, enter the per unit price for the goods/services and press TAB.
� If no quantity was given, enter the extended price for the goods/services and press TAB.
� If there are insufficient funds in the selected appropriation account, ACCOUNTING MANAGER will prompt the user if you want to override the transaction.
� Enter the description of the item of good/services to be ordered and press TAB.
�
Click ![]() SAVE icon to save the new entries.
SAVE icon to save the new entries.
� Enter additional items in the same manner.
Accounting Tips:
0 ACCOUNTING MANAGER automatically credits the reserve for the encumbrance account in the General Fund. No additional journal entry is necessary to record the encumbrance.
If you need to add more purchase orders to this schedule you must go back to the Purchase Order Entry Screen. Once all Purchase Orders and their item entries are complete you can exit the Computer Generated PO Routine.
Editing/Changing a Computer Generated Purchase Order
To Edit/Change the description part of a computer generated purchase order
� Select the individual purchase order from the schedule listing.
�
Click the ![]() UPDATE icon on the toolbar.
UPDATE icon on the toolbar.
� Press TAB until the information to be changed is highlighted.
�
Enter in the correct data and click ![]() SAVE icon. ACCOUNTING MANAGER will automatically replace the old data.
SAVE icon. ACCOUNTING MANAGER will automatically replace the old data.
To Edit/Change the detail item descriptions of a computer generated purchase order
� Select the individual purchase order from the schedule listing.
� Click on Item button on the toolbar.
� Select the item line to be changed.
�
Click the ![]() UPDATE icon on the toolbar.
UPDATE icon on the toolbar.
� Press TAB until the desired information to be changed is highlighted.
�
Enter in the correct data and click ![]() SAVE icon. ACCOUNTING MANAGER will automatically replace the old data and return to the item listing.
SAVE icon. ACCOUNTING MANAGER will automatically replace the old data and return to the item listing.
Removing a Computer Generated Purchase Order
� Select the individual purchase order from the schedule listing.
� Click on the Item button on the toolbar.
� Select the detail line to delete.
�
Click the ![]() DELETE icon on the toolbar.
DELETE icon on the toolbar.
� ACCOUNTING MANAGER will ask you, "Are you sure you want to delete this item?"
� Click "YES" to remove the detail line.
� Click on the Purchase Order button on the toolbar.
� Select the purchase order to be deleted.
� Click the Delete button on the toolbar.
� ACCOUNTING MANAGER will ask you, "Delete this PO?"
� Click "YES" to remove the purchase order.
PRINTING AND POSTING PURCHASE ORDERS

� Select the schedule from which to print by clicking on Magnifying glass icon and selecting desired schedule.
� Enter the date to be printed on the purchase orders.
� If you wish to print a selected POs Click on Print Only Selected POs.
� The starting Purchase Order Number defaults to the next available number. The system keeps track of the next available number by fiscal year. You cannot re-use a PO number or use a number that is less than the default number. Click Print button on toolbar to print the purchase orders.
� The Purchase Order’s will print to the screen in a report viewer window for you to browse through to make sure they are accurate. Click on the Print button on the toolbar to print.
You cannot leave the Print Purchase Order Screen until you either Print the PO’s or Re-set the printing cycle. You will receive the error message:

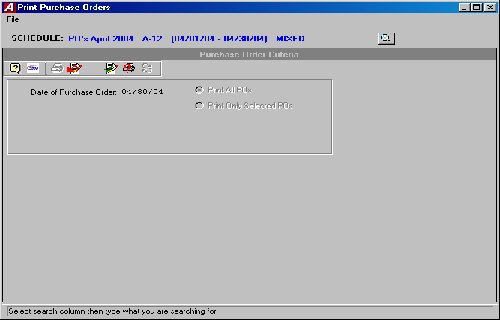

� Answering "YES" will post all encumbrance data to the appropriate files. During posting, all account code detail data will be summarized into a single entry per account code. Be sure to wait until all purchase orders have printed to respond to this question.
Resetting Purchase Orders
�
Click on the ![]() RESET icon if you need to reset the print job in order to change the color of paper to print the last copy of the Purchase Orders on OR if you have a paper jam.
RESET icon if you need to reset the print job in order to change the color of paper to print the last copy of the Purchase Orders on OR if you have a paper jam.
Cancel or Partially Liquidate a Purchase Order
�
Select the schedule from which to print by clicking on Magnifying glass icon and selecting desired schedule.
Selecting a Purchase Order
�
Enter the purchase order number.
�
Enter the effective date of the cancellation or liquidation and click on the run icon.
Canceling a Purchase Order
Partially Liquidating a Purchase Order
�
Enter the PO number and liquidation date.
�
Click on the �
Select Partially Liquidate PO
�
If there is more than one account code on the PO, ACCOUNTING MANAGER will display each account code on the purchase order. The user must distribute the total amount to be liquidated to the account codes.
�
Enter the amount to be liquidated and click "OK".
�
Repeat for each desired account code.
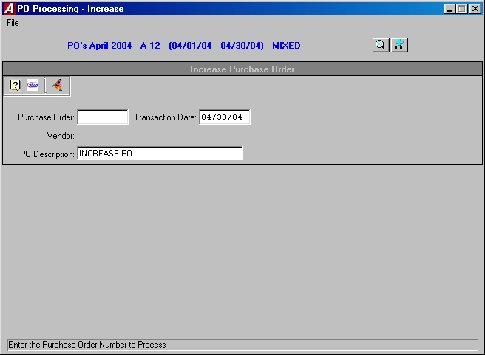
Selecting a Schedule
�
Select the schedule from which to print by clicking on Magnifying glass icon and selecting desired schedule.
�
Enter the purchase order number or click the magnifying glass to view a list of purchase orders.
�
Enter the effective date of the increase and click "OK".
�
Enter an explanation for the increase.
�
Click on the
Increasing Amount to Existing Account on the Purchase Order
�
Select the �
Enter the amount of increase and click
Adding a New Account to the Purchase Order
�
Select the �
Enter the appropriation account to be added and press TAB (select F6 or double click the textbox to view all available accounts).
�
Enter the amount of increase and click ACCOUNTING MANAGER will maintain a running total of the increase at the bottom of the screen.
CASH DISBURSEMENTS
�
Manual Checks
�
Computer Checks
�
Void Checks
�
Print Disbursement Checks
�
Payroll to General Ledger Distribution
�
Trust and Agency Payment Processing
�
Reimbursement Payments Menu
Computer Generated Checks
�
Select �
Enter the purchase order number, if applicable, or leave blank for a direct payment and press TAB.
�
Enter the Check date and press TAB.
Accounting Tips:
0
The date of the cash disbursement is the basis ACCOUNTING MANAGER uses in preparing all disbursement warrants and reports. All checks should be dated for the date of the actual cash disbursement/warrant and should appropriately correspond with the current cash disbursement schedule.
�
Enter the net payment amount and press TAB.
�
Enter the vendor number. Click the
Accounting Tips:
0
ACCOUNTING MANAGER requires a vendor be assigned to each cash disbursement. This assignment aids in maintaining accurate vendor files for both internal and external reporting.
�
Click the �
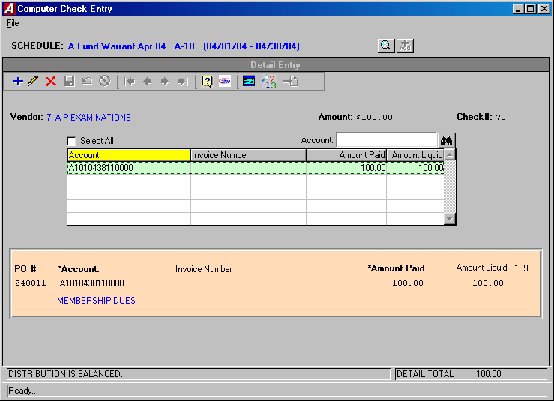
If a Purchase Order was selected on the information screen the accounts from that PO will automatically appear, click on the update button to add invoice number. If not click the Add button on the toolbar.
�
Enter the first account to be debited or expensed and press TAB (press F6 or double click in the textbox to view all available accounts, ACCOUNTING MANAGER will ask for the type of account and fund letter).
�
Enter the invoice/reference number and press TAB. A warning will be displayed if this is a duplicate invoice number for this vendor.
For general ledger/revenue accounts to be debited
�
Enter the dollar amount to be debited and click
For appropriation accounts to be expensed
�
Enter the amount to be expensed and click �
If insufficient funds are available, the system will prompt if OK to overspend.
�
If a purchase order is to be liquidated, enter the dollar amount to be liquidated and click the Save button.
�
Enter additional debits/expenses in the same manner.
Accounting Tips:
0
ACCOUNTING MANAGER automatically credits the default cash account for the respective fund (i.e. A200 – General Fund Cash is credited for the total of General Fund expenditures/debits). No separate credit entry to the cash account is necessary.
1
After entering the final cash disbursement of the batch, click SAVE to save the entries and return to the cash disbursements listing.
�
Click the �
Enter the manual check number and press TAB .
�
Enter the check date and press TAB.
�
Enter the total amount of the check and press TAB.
�
Enter the vendor number or press the Binoculars to display a listing of all vendors. If the vendor is not in the list you can add a new vendor by pressing the �
Enter the description for the disbursement and click
�
Select If it is a direct pay ( no purchase order)
�
Enter the first account to be debited or expensed and press TAB (Press F6 or double click the text box to view a listing of all available accounts).
�
Enter the dollar amount to be paid
If a purchase order is being paid
�
Enter the first purchase order number being paid.
�
Enter the first account to be debited or expensed and press TAB (Press F6 or double click the text box to view a listing of all available accounts. If a purchase order number was entered you can press F8 to display all accounts listed on that purchase order).
�
Enter the dollar amount to be paid
If a purchase order is being liquidated
�
Enter the dollar amount to be liquidated and press TAB.
�
If the selected account code was not encumbered on the original purchase order, ACCOUNTING MANAGER will indicate that no liquidation may take place.
�
Enter the dollar amount being paid and press TAB. ACCOUNTING MANAGER will make the respective debit or expense entry for the select account.
�
Enter the invoice/reference number and press TAB. A warning will be displayed if this is a duplicate invoice number for this vendor.
Printing and Posting Checks
�
Click on .
�
Enter the date to be printed on the checks and press TAB.
�
Enter the check entry date range to be printed and press TAB.
Accounting Tips:
0
The ability to select a date entry range provides the user the ability to print a smaller subset of the selected schedule/warrant. This will allow users to maintain multiple warrants, based upon the date the checks were printed, within each schedule.
�
Enter the check number of the first check in the printer. The actual check number will replace the temporary check numbers that were originally assigned by ACCOUNTING MANAGER when the cash disbursement information was entered onto the current schedule.
�
If printing all unprinted checks in schedule select Print All Checks. If printing selected checks only click on Print selected checks.
�
Click the
Accounting Tips:
0
The user should load the blank computer checks into the desired printer prior to selecting the Print Checks routine.
�
ACCOUNTING MANAGER will validate the current check run to ensure they have been properly prepared. If any errors exist, the user will be prompted to correct the error before printing.
�
Selected to re-run All or a Range and press TAB.
�
If a range, enter the number range to re-run and press TAB.
�
Click "YES" to re-run the selected range.
�
Read the check posting message that appears on screen.
�
Click "YES" to post the payroll checks.
�
Click "NO" to leave the routine and not post the payroll checks.
Voiding Cash Disbursements
�
Select the Void Checks option in the Cash Disbursement menu of Data Entry.
�
Select a schedule
�
Enter the check number and the check’s original issue date and press TAB.
�
ACCOUNTING MANAGER will display the check information and ask if this is the check to be voided.
�
Enter the date (this is the date that you are voiding the check NOT the date the check was written).
�
Select an open warrant to place the void check record.
�
Click "OK" to void the check.
�
ACCOUNTING MANAGER will ask "ARE YOU SURE?"
�
Click "YES" to void the check.
�
Click the
Cash Receipts
�
Select an open schedule to record the cash receipts in by clicking on the magnifying glass icon or click on the add icon to add a new schedule.
�
Click the ADD button on the toolbar.
�
ACCOUNTING MANAGER will automatically enter the Cash Receipt number, the user can accept this number or enter an unused cash receipt number and press TAB (for entering a batch of cash receipts, simply enter the first cash receipt number, ACCOUNTING MANAGER will automatically enter the subsequent cash receipt numbers).
�
Enter the Cash Receipt date and press TAB.
Accounting Tips:
0The date of the cash receipt is the basis ACCOUNTING MANAGER uses in preparing all relevant reports. All cash receipts should be dated for the date of the actual cash receipt, and not for the date of entry into the computer system.
�
Select "YES" or "NO" to invoke the customer tracking feature. If yes, enter the customer number or click the magnifying glass to select from a list of available customers. If the customer in not in the list you can add a new customer by clicking the add button
�
Enter the amount of the Cash Receipt and press tab.
�
Enter the description and click SAVE to lock in the record and move to the Detail tab.
�
Enter the first account to be debited and press TAB (Press F6 or double click the entry box to display a listing of available accounts).
�
Enter the first dollar amount to be debited and click Save button. Enter additional debits in the same manner.
�
Enter the first account to be credited and press TAB twice (Press F6 or double click the entry box to display a listing of available accounts).
�
Enter the first dollar amount to be credited and click Save button.
Accounting Tips:
0 The New York State Comptroller prescribes the use of control accounts in this case the 980 Revenue Control Account – in making entries. The control account requirement may be changed.
Accounting Tips:
0 ACCOUNTING MANAGER will indicate if the entry is out-of-balance by the totals bar at the right of the screen. If the entry is in balance, all three totals will indicate $0.00 and Distribution Balanced will be displayed. If the entry is out-of-balance, the totals will indicate the dollar amount. Positive amounts indicate excessive debits while negative amounts indicate excessive credits. The receipt must be in balance or all detail lines must be deleted before user may exit the screen.
�
Select the schedule the cash receipt resides in by clicking on the magnifying glass icon.
�
Scroll to find receipt to update. Click the UPDATE button.
�
Press TAB until the information to be changed is highlighted.
�
Enter the correct data and click SAVE.
�
To update detail information, click on detail button on the toolbar.
�
Select the detail line from the detail listing and click UPDATE.
�
Click the account or amount you want to change and enter the new information and click SAVE.
�
Select the individual Cash Receipt from the listing.
�
Click on Detail button. Select the Detail line you want to delete.
�
Click the DELETE button on the toolbar.
�
ACCOUNTING MANAGER will ask you, "OK to delete the selected detail record?"
�
Click "YES" to remove the detail line.
�
Click "NO" to keep the detail line.
�
Repeat until all detail lines are removed
�
Select the individual Cash Receipt from the listing.
�
Click the DELETE button on the toolbar.
�
ACCOUNTING MANAGER will ask , "Delete this receipt?"
�
Click "YES" to remove the receipt.
�
Click "NO" to keep the receipt.
Accounting Tips:
0
Removing a cash receipt in ACCOUNTING MANAGER must be accomplished in these two series of steps. This safeguards accidental erasure of the entire cash receipt data in the cash receipt process.
�
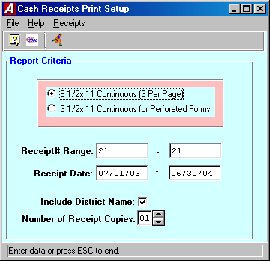
Select the print size for the receipts.
�
Enter the receipt range or accept the default.
�
Enter the date range or accept the default.
�
Enter the number of copies of each receipt.
�
Click "OK to run the report and send it to the report viewer. Review the report for errors. When the report is ready to print click the print icon from the menu bar.
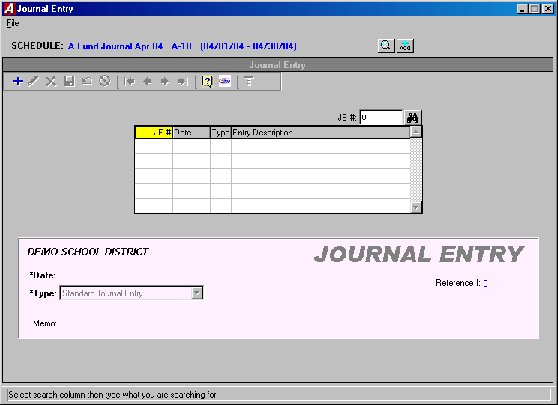
Journal Entries
�
Click the ADD button on the toolbar.
�
A JE reference number is automatically assigned.
�
Enter the journal entry date.
Accounting Tip:
0
As with all data in ACCOUNTING MANAGER, the date of the journal entry is the basis for all reporting purposes. All journal entries should be dated for and correspond with the schedule it is being entered on.
�
Select the type from the drop down list. The user must choose from between a Standard, Budgetary, or Opening entry.
Types of Journal Entries:
�
Enter in a description for the entry and click SAVE.
�
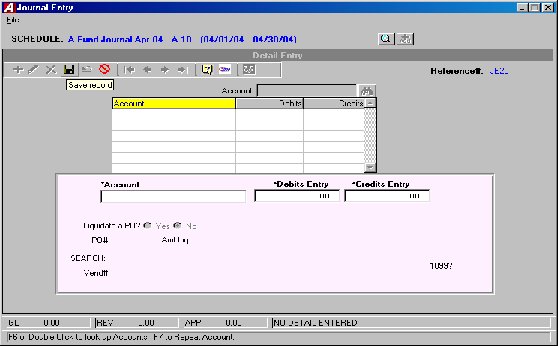
ACCOUNTING MANAGER default to add mode for adding the first account.
�
Enter the first account to be debited (Press F6 or double click the textbox to view a list of all available accounts).
�
Enter the first dollar amount to be debited and press TAB. ACCOUNTING MANAGER will ask for a vendor number for any posting to subsidiary appropriation accounts. Click the Save button.
�
Enter additional debits in the same manner.
�
Enter the first account to be credited and press TAB twice, until the credit column is highlighted.
�
Enter the first dollar amount to be credited and click the Save button.
�
Enter additional credits in the same manner.
Accounting Tips:
0
ACCOUNTING MANAGER will indicate if the entry is out-of-balance by the totals bar at the bottom of the screen. If the entry is in balance, all three totals will indicate $0.00 and Distribution Balanced will be displayed. If the entry is out-of-balance, the totals will indicate the dollar amount. Positive amounts indicate excessive debits while negative amounts indicate excessive credits. User will not be able to exit screen unless JE is in balance or no detail lines exist.
�
Select the individual journal entry from the schedule listing.
To change the Information Part of a Journal Entry
�
Click the UPDATE button on the toolbar to change the information part of the journal entry.
�
Press TAB until the desired information to be changed is highlighted.
�
Enter in the correct data and click SAVE.
�
Click the DETAIL button on the toolbar to change the account detail of the journal entry.
�
Select the account line from the detail listing.
�
Select UPDATE from the update panel.
�
Press TAB until the information to be changed is selected.
�
Enter in the correct data and click SAVE. JE must be in balance to leave screen.
Removing a Journal Entry
Detail
�
Select the individual journal entry from the schedule listing.
�
Click the DETAIL button; select the detail line to be deleted.
�
Click DELETE on the toolbar.
�
ACCOUNTING MANAGER will ask you, "Ok to delete the selected detail record?"
�
Click "YES" to remove the detail line.
�
Click "NO" to keep the detail line.
�
Repeat until all accounting detail lines are removed.
�
Click the JE button on the toolbar to return to information screen.
Journal Entry
�
Click DELETE on the toolbar.
�
ACCOUNTING MANAGER will ask you, "Delete this entry?"
�
Click "YES" to remove the journal entry.
�
Click "NO" to keep the journal entry.
�
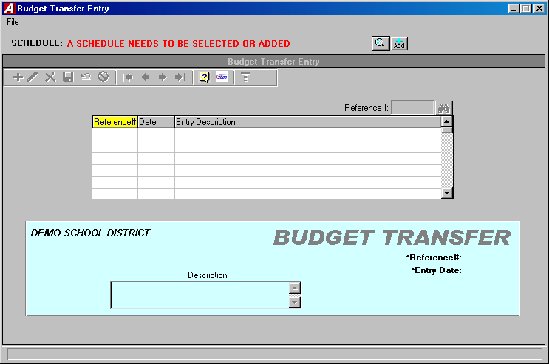
Click the Add button on the toolbar.
�
Enter the budget transfer date and press TAB.
Accounting Tips:
0 As with all data in ACCOUNTING MANAGER, the date of the budget transfer is the basis for all reporting purposes. All transfers should be dated for and correspond with the schedule it is being enter on.
�
Enter an explanation of the budget transfer and click SAVE.
�
Enter the account that funds will be transferred out of and press TAB (press F6 or double click the textbox to view a listing of all available appropriation accounts).
�
Enter the dollar amount of funds to be transferred out and click the Save button.
�
Enter the account that funds will be transferred into and press TAB twice.
�
Enter the dollar amount to be transferred in and click the Save button.
�
Enter additional transfers by repeating the procedure.
�
If the description setting is turned on then enter the desired description and click SAVE (for more information, please refer to SYSTEM MANAGER, System Parameters).
Accounting Tips:
0
ACCOUNTING MANAGER will indicate if the entry is out-of-balance by the transfer total at the bottom of the screen. If the entry is in balance, the total will equal $0.00. If the entry is out-of-balance, the total will indicate the dollar amount. A positive amount indicates excessive "transfers out" while a negative amount indicates excessive "transfers in".
�
Select the schedule the transfer resides in.
�
Select the transfer to edit from the list and click the Update button on the toolbar.
�
Press TAB until the information to be changed is highlighted.
�
Enter the correct data and click SAVE the save button.
�
Click the DETAIL button on the toolbar.
�
Select the item line to be changed.
�
Press TAB until the desired field to be changed is highlighted.
�
Enter the correct data and click the SAVE button.
�
Select the transfer to edit from the list and click the Detail button on the toolbar.
�
Select the detail line to be deleted.
�
Click the DELETE button on the toolbar.
�
ACCOUNTING MANAGER will ask you "Ok to delete the selected detail record?’
�
Click "YES" to remove the line.
�
Click "NO" to keep it.
�
Repeat steps for all detail lines if deleting entire transfer. Click the Budget Transfer button on the toolbar.
Budget Transfer
�
Click the DELETE button on the toolbar.
�
ACCOUNTING MANAGER will ask you "Delete the transfer?"
�
Click "YES" to remove the budget transfer.
�
Click "NO" to keep the budget transfer.
Accounting Tips:
0 Removing a budget transfer in ACCOUNTING MANAGER must be accomplished in these two series of steps. This safeguards against accidental erasure of the entire budget transfer.
After Checks - Payroll Transaction Journal (Summary)
FICA\Medicare Report
TRUST AND AGENCY PAYMENT PROCESSING
Purpose of the Trust and Agency Payment Processing Routine
Important Note When Preparing to Use Automated Trust and Agency Processing
Using the Automated Trust and Agency Processing Routine
Initial Setup
Updating Default Trust and Agency Codes for first-time use:
Adding Other Trust and Agency Codes
Manually adding Trust and Agency Codes from the Maintenance folder:
Processing Payments
Generate Payments
Review Payments
To Edit the Current Disbursements:
1. Highlight the deduction record in the browser that you wish to update and press the Update button.
Amount – The current payroll amount set to be disbursed
Unpaid Bal – The amount of money which was held from previous payroll(s)
Hold – A check box allowing the user to manually mark a deduction to be held from the current disbursements and to be carried forward as an unpaid balance
Creating the Cash Disbursements
Finishing Up – Running Cash Disbursement Schedule
Recording the Receipt of Trust and Agency Accounts
REPORTS
�
Select the schedule from the listing. You may change the sorting method by clicking on the column heading or further restrict your listing by using the search feature to jump to a specific record.
�
Enter the starting and ending date range to restrict the report to checks entered between the specified ranges. Leave the default starting and ending date to include all unprinted checks from the selected schedule.
�
Specify the report method as either Summary or Detail. The Summary report includes the check number, PO number (if applicable), check entry date, vendor number, vendor name, and check amount. The Detail report includes check number, check entry date, vendor number, vendor name, PO number (if applicable), account distribution information for each check, invoice number, amount paid, and amount liquidated. The last page of the Detail report provides the total expensed and total liquidated by account and fund.
Accounting Tips:
1
When entering in disbursements – if more than one invoice number and amount is entered in on a single cash disbursement, then select detail instead of summary. This will list all invoices for the vendor instead of a total amount for the vendor.
�
Check the Switch Name checkbox if you want to switch the manner in which the vendor name is displayed. For example, if the vendor’s name is switched on the check document (i.e., Vendor First Name followed by Vendor Last Name), you may want to switch the name on the report to show Vendor Last Name followed by Vendor First Name.
�
Click the RUN �
After the report is generated, select one of the following report destinations: Preview (screen), Default Printer, File, or Microsoft Excel.
�
Select the type of Schedule, Open or Closed from the drop down list.
�
Select the schedule from the listing. You may select more than one schedule by using the mouse and Shift or Control key. If necessary, you can change the sorting method by clicking on the column heading or further restrict your listing by using the search feature to jump to a specific record, or check the Select All check box to select all schedules in the browser.
�
Select the type of warrant report - Summary or Detail.
�
The Summary Warrant shows the totals for each disbursement entry, the warrant total and the vendor portion total.
�
The Detail Warrant shows the account distribution for each entry, the totals for each disbursement, the amount liquidated, the warrant total, and the vendor portion total.
�
If you select Summary, you have the option to include the check description and the payroll entries on the report.
�
If you select Detail, you have the option to include the check description, payroll entries, account description, and additional check explanation. Accounting Tips:
2
When entering in disbursements – if more than one invoice number and amount is entered in on a single cash disbursement, then select detail instead of summary. This will list all invoices for the vendor instead of a total amount for the vendor.
�
Click the RUN �
After the report is generated, select one of the following report destinations: Preview (screen), Default Printer, File, or Microsoft Excel.
�
Indicate the sorting method by setting the radio button to either by Vendor Number or Vendor Name.
�
Enter the vendor name or number starting and ending range or click the magnifying glass to select from a list of all vendors. To report on one vendor only, enter the same number or name in the starting and ending range fields.
�
Enter the desired fund range or click the magnifying glass to select from a list of all funds. To report on one fund only, enter the same fund number in the starting and ending range fields.
�
Enter the desired purchase order range. To report on one purchase order only, enter the same PO number in the starting and ending range fields.
�
Enter the desired date range in MM/DD/YY format. Check the Prior Year checkbox if you want the report to reflect payment detail for the prior year. The system changes the date range to the prior fiscal year date range.
�
Set the radio button to Yes if you wish to include vendors that have no detail for the selected reporting range. If you do not wish to include vendors that have no detail for the specified reporting range, set the radio button to No.
�
Set the radio button to Yes if you want the pages separated by vendor. Set the radio button to No if you do not want the pages separated by vendor.
�
Click the RUN �
After the report is generated, select one of the following report destinations: Preview (screen), Default Printer, File, or Microsoft Excel.
�
The Vendor Payment History report provides a listing of cash disbursements for the selected vendor(s). The report includes the vendor number, vendor name, check number, check date, invoice number, purchase order number, amount paid, check description, and check total. Check totals are provided for each vendor. The last page of the report contains a grand total amount paid for all selected vendors.
�
Enter the desired date range in MM/DD/YY format OR Check the Prior Year checkbox if you want the report to reflect purchase order detail for the prior year. The system changes the date range to the prior fiscal year date range.
�
Enter the purchase order number. The system defaults the vendor name associated with the specified purchase order number.
�
Click the RUN �
After the report is generated, select one of the following report destinations: Preview (screen), Default Printer, File, or Microsoft Excel.
�
The Purchase Order Detail Report provides the following detailed information for each purchase order: vendor number, vendor name, building, PO contact name, purchase order type (manual or computer), PO description, account code, schedule number, date, invoice number, check number, amount placed, amount liquidated, and amount expensed. The report concludes with the grand total amount placed, liquidated, and expensed as well as the total purchase order outstanding amount.
�
Enter the desired date range in MM/DD/YY format OR Check the Prior Year checkbox if you want the report to reflect purchase order information for the prior year. The system changes the date range to the prior fiscal year date range.
�
Enter the vendor number or use the lookup to select from a listing of valid vendor numbers. The system defaults the vendor name associated with the selected vendor number OR enters the vendor name or uses the lookup to select from a listing of valid vendor names. The system defaults the vendor number associated wit the selected vendor name.
�
If you want to generate a report of only open (outstanding) purchase orders for the selected vendor, set the List Open Purchases Only radio button to YES. If you want the report to include all purchase orders for the selected vendor, set the List Open Purchases Only radio button to NO.
�
Click the RUN �
After the report is generated, select one of the following report destinations: Preview (screen), Default Printer, File, or Microsoft Excel.
�
The Purchase Orders for Vendor Report provides the following information for the selected vendor: purchase order number, purchase order date, schedule number, PO amount placed, PO amount liquidated, and outstanding amount. The report concludes with the PO grand total amount placed, liquidated, and outstanding for the vendor.
�
Enter the desired fund range or click the magnifying glass to select from a list of all funds. To report on one fund only, enter the same fund number in the starting and ending range fields.
�
Enter the desired date range in MM/DD/YY format OR check the Prior Year checkbox if you want the report to reflect purchase order detail for the prior year. The system changes the date range to the prior fiscal year date range.
�
Enter the starting and ending purchase order numbers. To report on one purchase order only, enter the same number in the Starting and Ending Purchase Order Range fields.
�
If you want to generate a report of only open (outstanding) purchase orders, set the Status of Purchase Orders radio button to OPEN. If you want the report to include all purchase orders, set the Status of Purchase Orders radio button to ALL.
�
Set the radio button to YES if you want the last page of the report to include account distribution totals by account and fund. The distribution shows the account distribution totals, including the total placed, total liquidated, and remaining amounts OR set the radio button to NO if you do not want the last page of the report to include account distribution totals by account and fund.
�
Click the RUN �
After the report is generated, select one of the following report destinations: Preview (screen), Default Printer, File, or Microsoft Excel.
�
The Purchase Order Listing provides the following information for each purchase order: purchase order number, date, vendor name and number, account code, amount placed, amount liquidated, and amount outstanding. Totals are provided for each purchase order. Fund Totals and Report Totals are also provided. If you chose to Include Account Distribution, the report concludes with totals by account and fund, including the grand total amount placed, liquidated, and remaining.
�
Indicate the manner in which purchase order information is to be displayed on the report, either by vendor number or name.
�
To sort purchase orders in vendor number order, set the Arrange Vendors By radio button to Number. Then enter the starting and ending vendor number range. Use the lookup to search for a vendor number. To report on purchase orders for one vendor only, enter the same vendor number in the starting and ending range fields.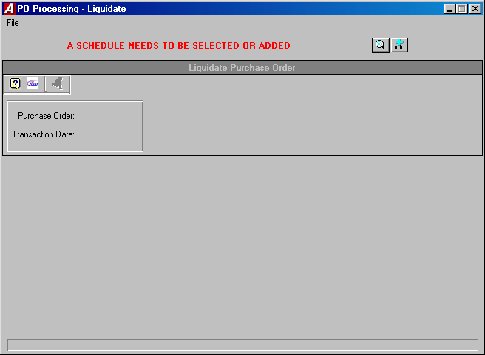
Selecting a Schedule
Selecting a Purchase Order
Canceling a Purchase Order
The screen will default to Cancel Complete PO. Click the red arrow to continue. A pop up box will appear asking if the user wants to cancel the entire amount. Selecting "YES" will cancel the entire purchase order. Selecting "NO" will escape from the routine and return the user to the initial prompt.
Partially Liquidating a Purchase Order![]() RUN icon.
RUN icon.
Increasing a Purchase Order
Increasing a Purchase Order
In addition to issuing, canceling, and partially liquidating purchase orders, ACCOUNTING MANAGER also increases purchase orders, either in one of the existing account codes on the purchase order or on an entirely new account. To increase an existing purchase order, select Increase PO from the Data Entry/Purchase Order menu.
Selecting a Schedule
Selecting a Purchase Order
ACCOUNTING MANAGER will display the purchase order data on screen for the purchase order number entered.
![]() RUN icon to continue.
RUN icon to continue.

Increasing Amount to Existing Account on the Purchase Order![]() UPDATE icon.
UPDATE icon.
![]() SAVE icon.
SAVE icon.
ACCOUNTING MANAGER will maintain a running total of the increase at the bottom of the screen.
When all changes are complete click on the ![]() CONFIRM PO INCREASE icon.
CONFIRM PO INCREASE icon.
Adding a New Account to the Purchase Order![]() ADD icon.
ADD icon.
![]() SAVE icon.
SAVE icon.
When all changes are complete click on the ![]() CONFIRM PO INCREASE icon.
CONFIRM PO INCREASE icon.
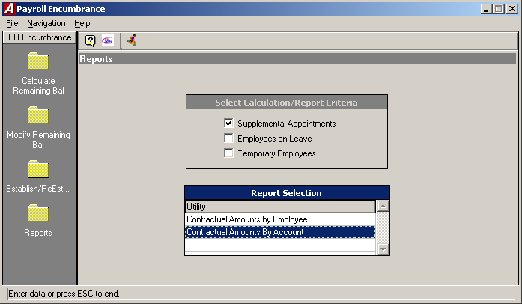
ESTABLISHING PAYROLL ENCUMBRANCES
PAYROLL PURCHASE ORDER
How can I encumber my salaries to be paid from Payroll?
�
FM2004 has an automated routine which will allow a user (with the appropriate permissions) to establish an encumbrance for remaining payroll salary amounts (Contractual, Annualized and Supplemental). This is done by creating a PO that not only will be liquidated anytime an expenditure against one of these encumbrances is made and distributed to Accounting (via the Payroll to General Ledger routine), but can also be re-established to account for changes in salaries.
Critical Note
: Before proceeding with the payroll encumbrance procedure, ALL payrolls for the current fiscal year MUST be distributed to Accounting via the Payroll to General Ledger procedure in Accounting Manager. Failure to distribute all payrolls may cause appropriation accounts to show inflated unencumbered balance amounts. This is caused from the Payroll PO routine calculating remaining amounts in the Payroll module which have been decreased by payrolls that may not have already been expensed and/or liquidated through the Payroll to General Ledger routine.
Steps to Creating a Payroll Encumbrance:
To proceed with creating a payroll purchase order, proceed to the Accounting Manager module. From the Data Entry area of the menu-tree, choose Purchase Orders and proceed to the Payroll Purchase Order routine.
The following is a list of basic steps involved to Establish/Re-establish a Payroll Encumbrance:
1
.
Reports
- Print the Contractual Amounts by Account and/or Contractual Amounts by Employee (see attached samples) to verify remaining Contractual, Annualized and/or Supplemental amounts to be paid. This is done by choosing the Reports folder on the lower left side of the Routine Selection box and then selecting the appropriate report you wish to print in the Report Selection box. Be sure to choose the criteria from the Select Calculation/Report Criteria box that you wish to be used in calculating the report. These include whether or not to include Supplemental Appointments (versus only Contractual and Annualized), Employees on Leave and Temporary Employees (versus only Active employees).
2
.
Calculate Remaining Balances
–
This step will establish what the remaining amounts to be paid are (based on Criteria chosen in the Remaining Balances Criteria box) by calculating remaining salaries from Payroll Manager.
3
.
Modify Remaining Balances
– This area will allow you to view/change the remaining amounts that were created in Step 2, prior to establishing or reestablishing the PO.
Note:
Changes made here may be undone after re-establishing the payroll encumbrance since every time the Calculate Remaining Balances routine is run, the system is calculating remaining amounts based on ACTUAL payroll salaries and does not include these changes made.

4
.
Establish/Reestablish Purchase Order
(You MUST calculate remaining balances prior to running this routine)

�
When running this Establish/ReEstablish procedure, you MUST select a schedule for the encumbrances to be recorded in and enter an effective date. The effective date should be a date on or after the last payroll distributed.
a) Establish Purchase Order - If there currently is not a Payroll Purchase Order being used, the Establish/Reestablish PO routine will prompt for a PO# to record the encumbrances against. Since this usually is not a physical PO, try choosing a number that is meaningful, but does not duplicate any PO numbers already on the system.
b) ReEstablish Purchase Order - If there is currently a Payroll Purchase Order being used, the Establish/ReEstablish PO routine will NOT prompt for a PO#, but will simply compare the current amounts established to the current PO balances by account and make any adjustments (Increases or Liquidations) to the Purchase Order that may be necessary. Remember, for the routine to recognize any changes since the original inception of the current payroll PO, the Calculate Remaining Balances routine MUST first be run.
�
Once a Purchase order has been established, the system will automatically fill the PO number into the Purchase Order# field on the Set Payroll Parameters screen
![]()
Other Notes:
�
After encumbering payroll, when you distribute a payroll into accounting, the Payroll to GL routine will automatically liquidate the encumbrance by the amount of the expense distributed, up to the amount currently encumbered
�
The payroll PO is treated just like a normal purchase order which can be liquidated through the cancel/partial liquidation routine
�
At fiscal year end, the payroll PO must be canceled (fully liquidated), and the number removed from the Set Payroll Parameters screen until a PO (with a different number) is established in the new fiscal year
Sample Reports
Contractual Amounts by Account:
07/20/04 DEMO SCHOOL DISTRICT PAGE 1
***********************************************************************************************************************
REMAINING CONTRACTUAL BALANCES BY ACCOUNT
ACCOUNT EMPLOYEE EMP # TYPE EARNING LIMIT PAID REMAINING
***********************************************************************************************************************
A 1240.150-33-0000 ADMINISTRATOR, JILL A 8 ADM12 Contract 160,000.00 6,153.85 153,846.15
--------------- --------------- ---------------
ACCOUNT TOTAL 160,000.00 6,153.85 153,846.15
A 1310.150-22-0000 ADMINISTRATOR, ALAN 12 ADM12 Contract 125,000.00 4,807.69 120,192.31
--------------- --------------- ---------------
ACCOUNT TOTAL 125,000.00 4,807.69 120,192.31
A 1310.160-22-0000 PAYROLL, SUSAN 13 CON12 Contract 34,500.00 1,326.92 33,173.08
--------------- --------------- ---------------
ACCOUNT TOTAL 34,500.00 1,326.92 33,173.08
A 1620.160-44-0000 MAINTENANCE, MAN 15 MAINT Contract 37,500.00 1,442.31 36,057.69
--------------- --------------- ---------------
ACCOUNT TOTAL 37,500.00 1,442.31 36,057.69
A 2020.160-33-0000 HUDSON, ROCK 5 FS Contract 28,500.00 0.00 28,500.00
--------------- --------------- ---------------
ACCOUNT TOTAL 28,500.00 0.00 28,500.00
A 2110.120-66-0000 TEACHER, JOHN T 2 TCH26 Contract 61,773.00 0.00 61,773.00
TEACHER, SAMANTHA 10 TCH21 Contract 69,932.00 0.00 69,932.00
--------------- --------------- ---------------
ACCOUNT TOTAL 131,705.00 0.00 131,705.00
Contractual Amounts by Employee:
07/20/04 DEMO SCHOOL DISTRICT PAGE 1
***********************************************************************************************************************
REMAINING CONTRACTUAL BALANCES BY EMPLOYEE
EMPLOYEE NAME EMP # TYPE EARNING ACCOUNT LIMIT PAID REMAINING
***********************************************************************************************************************
ADMINISTRATOR, ALAN 12 ADM12 Contract A1310150220000 125,000.00 4,807.69 120,192.31
--------------- --------------- ---------------
125,000.00 4,807.69 120,192.31
ADMINISTRATOR, JILL A 8 ADM12 Contract A1240150330000 160,000.00 6,153.85 153,846.15
CASH DISBURSEMENTS
This segment should be used for entering data, recording of manual checks, the preparation and printing of computer-generated checks, the distribution of payroll expenses and the creation of expense warrants. To enter the cash disbursement function,
select Data Entry then Cash Disbursements
from the ACCOUNTING MANAGER main screen.
The cash disbursement function contains its own menu for data entry of different cash disbursement activities. It is separated into check routines, which handle the information recording of the individual cash disbursements, and reports, which allow the user to control the physical output of cash disbursements.
The menu items are:
Computer Generated Checks
Computer checks are checks the system prints. To produce and record a computer generated check;
select Computer Checks from the Cash Disbursement Menu in Data Entry.
Parts of the Computer Generated Cash Disbursement
You must first
choose a current Schedule
. Choose an existing schedule by clicking on the ![]() magnifying glass icon. A new schedule can be added by clicking on the
magnifying glass icon. A new schedule can be added by clicking on the ![]() Add icon.
Add icon.
Each computer generated cash disbursement has two parts. The first part is the information part of the computer generated cash disbursement which records the purchase order number, disbursement date, payment amount, and complete vendor information. (This is where you can add a vendor to the vendor table if you discover they aren’t in the system yet. Just click on the ![]() ADD button). The second part is the account code distribution of the cash disbursement.
ADD button). The second part is the account code distribution of the cash disbursement.
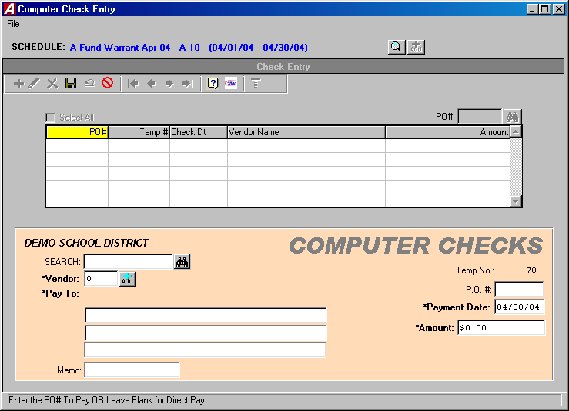
Entering a Computer Generated Cash Disbursement
After selecting a schedule, ACCOUNTING MANAGER will display a listing of all cash disbursements in that schedule.
![]() ADD icon from the Update Panel.
ADD icon from the Update Panel.
![]() magnifying glass to see and alphabetical listing of all vendors. Click
magnifying glass to see and alphabetical listing of all vendors. Click ![]() ADD to add a new vendor to the vendor list. (If a purchase order is being liquidated, the vendor information will be automatically fill in.)
ADD to add a new vendor to the vendor list. (If a purchase order is being liquidated, the vendor information will be automatically fill in.)
![]() SAVE icon.
SAVE icon.
![]() SAVE icon.
SAVE icon.
![]() SAVE icon.
SAVE icon.
Parts of a Manual Cash Disbursement
ACCOUNTING MANAGER considers Manual Checks to be checks that were hand typed and need to be added to the system but not printed. Each Manual Check has two parts. The first part is the information part of the cash disbursement, which records the check number, disbursement date, complete vendor information, disbursement amount, and a brief description of the payment. The second part is the account code distribution of the cash disbursement.
Selecting a Schedule
Choose an existing schedule by clicking on the magnifying glass icon. A new schedule can be added by clicking on the Add icon.
Entering the Manual Check
![]() ADD icon on the toolbar.
ADD icon on the toolbar.
![]() ADD button.
ADD button.
![]() SAVE and you will automatically be brought to the Detail tab.
SAVE and you will automatically be brought to the Detail tab.
This completes the information part of the manual cash disbursement.
Entering the Detail Information
![]() ADD icon from the toolbar.
ADD icon from the toolbar.
Printing and Posting Checks
To print computer-generated checks that have already been entered into the current disbursement warrant,
select Print Disbursement Checks from the Cash Disbursement Menu in Data Entry.

All of the account distribution information was entered on the schedule through the Computer Generated Cash Disbursements module. Through the check printing routine of ACCOUNTING MANAGER, the user can enter the date of the warrant, the actual check numbers, and the range of temporary check to print.
![]() Magnifying glass to select a schedule to print
Magnifying glass to select a schedule to print
![]() Printer button.
Printer button.
Re-Running Checks
After printing the checks, the user has the option of resetting and re-running the checks in case of errors during the printing process. To re-run the checks, click ![]() RE-SET PRINT Icon.
RE-SET PRINT Icon.
ACCOUNTING MANAGER will review the checks that have been sent to the printer to determine if all checks or if only a portion is printed. The range of check numbers assigned to checks will be displayed on screen. The user may select to re-run all checks or only a selected range of check numbers.
Posting Checks
Once the checks have been printed and determined to be accurate, the checks must be posted. Posting the checks records the payment permanently in the accounts payable file. To post the checks click the ![]() POST icon.
POST icon.
Voiding Cash Disbursements
There are 2 ways to void checks. The first way is to simply void a check
, select the Void Checks option in the Cash Disbursement menu of Data Entry.

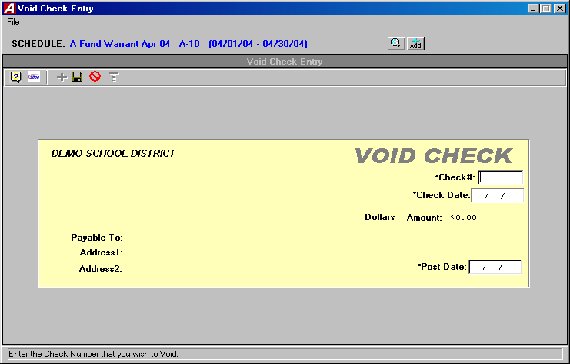
Void Check Only
Void Check Only
![]() box in the upper right corner to return to the ACCOUNTING MANAGER main screen.
box in the upper right corner to return to the ACCOUNTING MANAGER main screen.
The second option is to
void and re-issue checks go to Check Routines in the General Routines of the Utilities Menu.
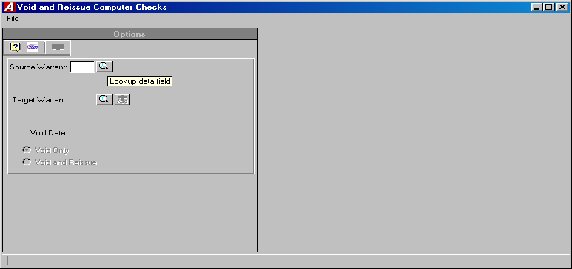
Void and Re-Issue Computer Checks
Void and Re-Issue Computer Checks
�
Select Void and Reissue Computer Checks option in the Check Routines section of General Routines in the Utilities Drop Down menu.
�
Begin by typing in warrant number or clicking on the magnifying glass icon to select the warrant the check to be voided was created in.
�
Select the Target Warrant (the warrant you want the void and the new check to go into).
�
Type in the void date.
�
Select checks to be voided. (You can void as many as are needed.)
�
Select Void and Reissue.

�
Click the Void Check button to continue.
�
A pop up box will appear with the question “Are you sure you want to void the selected checks?”. Click Yes button.
�
A pop up will appear saying “Void complete”. Click the Yes button.
�
You may now go to the print checks routine and print the reissued check.
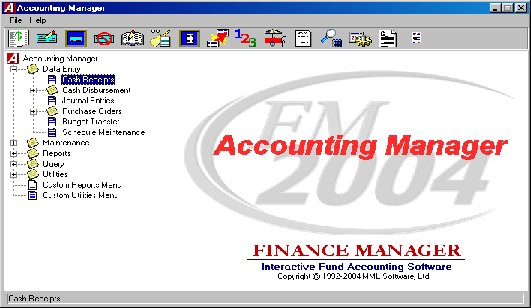
Cash Receipts
The cash receipts module is the first segment of the data entry module. This segment should be used for entering data from the treasurer’s individual cash receipts for the particular period. To enter the cash receipts module, select Data Entry then Cash Receipts from the ACCOUNTING MANAGER drop down menu or simply click the Cash Receipts button..
Entering a Cash Receipt
Each cash receipt has two parts. The first part is the information part of the cash receipt, which records the amount, date, cash receipt number and a brief description. The second part is the Details tab where the account code distribution of the cash receipt takes place.

Entering the Detail

Finding an existing Cash Receipt
In order to edit/change or delete a cash receipt, it is necessary to locate it. Select the Schedules tab. Use the scroll bar to select an open schedule from the list, then click the Cash Receipt tab and use the scroll bar to select the cash receipt from the listing.
Editing/Changing a Cash Receipt
ACCOUNTING MANAGER provides the user with the ability to edit and change the information provided on individual cash receipts already entered into the current schedule.
Removing a Cash Receipt
Users can remove a cash receipt or detail line from any open schedule, essentially voiding the transaction entirely. In order to delete a Cash Receipt the user must have: 1) no detail entries or 2) delete all detail entries before they are allowed to delete the Cash Receipt.
Detail
Cash Receipt
Printing a Cash Receipt
To print a Cash Receipt click the PRINT button on the toolbar.

The Cash Receipts print setup screen will appear.
Journal Entries
The Journal Entries function is the third segment of the data entry menu. This segment should be used for entering journal entries into the system. Built in defaults prevent the user from entering out-of-balance entries into the system. To enter the Journal Entries Module, select Journal Entries form the Data Entry drop down menu or click the journal entry button on the toolbar.

Parts of the Journal Entry
Each Journal Entry has two parts. The first part is the information part of the journal entry, which records the journal entry number, the date, the type of journal entry, and a brief description. The second part is the account code distribution of the journal entry.
Entering a Journal Entry
Select an existing schedule by clicking the magnifying glass icon or add a new schedule by clicking the add button. Journal Entries displayed in RED have no detail accounting records.

Types of Journal Entries:
Standard Journal Entry To record all typical journal entries occurring during the fiscal year to record or correct accounting data.
Budgetary Adjustment To record budgetary journal entries, amending the budgets of revenue and appropriation accounts.
Opening Entry – Ledger To record all opening general ledger balances.
Opening Entry – Subsidiary To record all opening subsidiary budgets and budgetary general ledger account codes.
This completes the information part of the journal entry. ACCOUNTING MANAGER will automatically advance to the second part of the journal entry to make the account distributions.
Find an Existing Journal Entry
In order to edit/change or delete a journal entry, it is necessary to locate it. To find an existing Journal Entry click on the magnifying glass icon to select schedule JE resides in.
Editing/Changing a Journal Entry
ACCOUNTING MANAGER provides the user with the ability to edit and change the information provided on an individual journal entry already entered into the current schedule.
To Change the Accounting Detail of the Journal Entry
User can remove a journal or detail line from any open schedule, essentially eliminating the journal entry entirely. The detail information must be delete before ACCOUNTING MANAGER will allow information piece is deleted
BUDGET TRANSFER
This segment should be used for recording budget transfers between budgetary appropriation accounts.
This function is not for recording total budgetary increases or decreases, which should be made by budgetary journal entries. To enter the Budget Transfer function, select Budget Transfer from the Data Entry menu.

Parts of the Budget Transfer
Each budget transfer has two parts. The first is the information part of the budget transfer, which records the budget transfer reference number, the date, and a brief explanation. The second part is the account code distribution of the budget transfer.
Entering a Budget Transfer
After selecting a schedule by clicking the magnifying glass icon to choose an existing schedule or clicking the add button for a new schedule, ACCOUNTING MANAGER will display a listing of all budget transfers in that schedule.

This completes the information part of the budget transfer. ACCOUNTING MANAGER will automatically advance to the detail screen of the budget transfer to make the appropriate account distributions in add mode.
Editing/Changing a Budget Transfer
ACCOUNTING MANAGER provides the user with the ability to edit and change the information provided on the individual budget transfer already entered into the current schedule.
To Edit/Change the description part of a budget transfer
To Edit/Change the detail item descriptions of a budget transfer
Removing a Budget Transfer
Users can remove a budget transfer from any open schedule, essentially eliminating the budget transfer entirely. The detail data must be deleted prior to delete the transfer information.
Detail Line
PAYROLL TO GENERAL LEDGER DISTRIBUTION
�
The Payroll to GL Distribution routine is used to automate the recording of payroll related expenditures to the proper appropriation accounts in Accounting Manager. Because FM2004 was developed with the ability to run modules separately or all together, the expenditures resulting from payroll(s) are not recorded in Accounting Manager until this routine has been performed.
Initial Set-up:
The first step to setting up the Payroll to GL Distribution routine is to designate the proper control accounts that will be used when FM2004 creates the journal entry for the General Ledger to record payroll expenditures. Designation of these accounts is a one-time set-up that is done in System Manager, Payroll to GL Distribution Accounts. A fund indicator is not necessary for this routine since FM2004 will only distribute to funds with expenditures and will automatically look for each of these accounts in every fund. The first account should be 522, for the expenditure control account in the appropriation subsidiary.
Below is a sample set-up for Payroll to GL Distribution accounts. With these accounts, FM2004 will complete the 522 amounts (along with the all the expenditure subsidiary amounts) automatically with the proper expenditures for each fund and then prompt the user to distribute the offsets as they see fit. Using this sample, for the A fund, the user will enter the TOTAL amount of TRS contributions as a credit to the A632 account (Due to TRS) and the balance of the general fund gross payroll to the A200 account. This sets up a liability for TRS, holding TRS contributions in the general fund until they have been deducted from State Aid. Typically any other funds should not contain the 632 account and therefore will not prompt the user to enter an amount for this account.
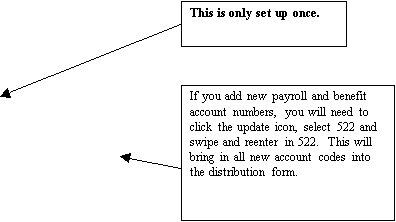
Before going to Accounting, run the following reports from Payroll:
1. Reports \ After Checks Printed \ Payroll Transaction Journal – start date is Saturday of last payroll and end date is the check date, print summary.
2. Reports \ After Checks Printed \ FICA\Medi Expense Report - start date is Saturday of last payroll and end date is the check date, by fund.
Running the Payroll to GL Distribution Routine:
Go into Accounting Manager.
l
Create a new cash disbursement schedule, mixed funds, called Pay Dist # and Date. While the routine will post the payroll expenses to any cash disbursement schedule, most users like to open a separate schedule (keeping these expenditures separate from their normal warrant) for distributions either for each payroll or for a month of payrolls. The routine will post all fund expenditures into this schedule regardless of what way the Mix Funds? question was answered when the schedule was set up.
l
Next select from the tree select Data Entry, Cash Disbursements, Payroll to General Ledger Distribution.
l
To create a new distribution, click the Add ![]() button. Now select a schedule to post the distribution to by using the dropdown button to display the list of open disbursement schedules and clicking on the appropriate schedule.
button. Now select a schedule to post the distribution to by using the dropdown button to display the list of open disbursement schedules and clicking on the appropriate schedule.
The next step is to fill in the demographic information for the payroll to be distributed as follows:

Ref #: This number is used to reference this transaction as a disbursement, therefore acting like a check number. Most districts simply use the date of the payroll for this field. (Ex. 07/18/03 payroll would use 71803. Since the field is numeric, any leading zeros are dropped off)
Posting Date: Enter the effective date to record the payroll as of (check date).
Payroll #: (Optional) Enter the number of this payroll for the current fiscal year.
Description: This field is used for a description of the payroll expenditure and will automatically default to “Payroll Summary” with the posting date for the payroll.
P/R Range: Enter the payroll check date range to be distributed to accounting. This typically is the day after the previous payroll (or the first day of the quarter if applicable) to the current check date being distributed in order to include any additional checks that may have been processed between payrolls. These dates should be the same as the Payroll transaction report.
There are two other fields in this area that are used for display purposes only and are automatically filled in by the system. These are:
Payroll PO#: FM2004 will automatically populate this field when the payroll has been encumbered through the use of the Payroll Encumbrance routine.
Payroll Posted: A Yes/No field which tells the user if the current payroll demographic has been posted or not.
Once all necessary information has been entered, click the Save
![]() button.
button.
Importing Payroll Expenditures:
Once the demographic information has been filled in, click on the Import ![]() button. This will make the routine go out to payroll checks in the P/R Range of dates and accumulate the expenses to be distributed. If any checks in this range have been distributed prior to this, they will not be included now.
button. This will make the routine go out to payroll checks in the P/R Range of dates and accumulate the expenses to be distributed. If any checks in this range have been distributed prior to this, they will not be included now.
Distributing the Payroll Expenditures: The next step after importing the expenditures is to guide FM2004 through the way they should be distributed to the General Ledger and what their offsets will be. To begin, click the Distribute ![]() button. Below is a sample screen showing how the distribution screen should be filled in.
button. Below is a sample screen showing how the distribution screen should be filled in.

While FM2004 automatically populates the 522 expenditure control account (and the subsidiary expenditure amounts under Account Distribution), the user must enter the offset amounts to the expenditures. Remember, the accounts that were set up in Payroll to GL Distribution Accounts in System Manager and are active in the Chart of Accounts will automatically be pulled into the distribution; however, the user must enter the appropriate amounts.
If it is ever necessary to adjust an expense in the subsidiary, the user can click on Distribute to look at the current accounts and their expenditures which have been imported, then manually adjust them. Please keep in mind if for whatever reason you have increased or decreased the amount of expenditures under the Account Distribution tab, the 522 account will also have to be adjusted accordingly.
If you added in FICA and Medicare into the 522 (Expenditure) total then you need to distribute those amounts to Social Security expenditure code. Debit the amount of the Employer share. This should bring you into balance.
Once the distribution has been completed, click on Save.
The total Debits and Credits should equal one another, other wise the system will not let you post the transaction in the next step.
At this point you can click Done and continue on to posting the distribution.
Posting the Payroll to GL Distribution:
Once the distribution has been completed, you are ready to post it to the General Ledger.
To do this, click the Post
![]() button.
FM2004 will make sure all Debits and Credits by fund equal before posting the transaction. If they do not it will give a warning message and stop the posting process.
button.
FM2004 will make sure all Debits and Credits by fund equal before posting the transaction. If they do not it will give a warning message and stop the posting process.
Once the Payroll to GL Distribution has been posted, entries have now been made to record entries to both the control accounts in the General Ledger along with the expenditures in the subsidiary. If the payroll was encumbered, in addition, a liquidation entry will also be made to each account for the amount of the expense up to the remaining encumbrance amount.
NOTE: Once payroll checks have been distributed to Accounting using the Payroll to GL Distribution Routine they cannot be distributed again. Therefore, any adjustments to the distribution will need to be corrected with the posting of journal entries.
Illustration of Distribution of Payroll Expenses from Payroll Manager to Accounting Manager
Run the Payroll to GL Distribution Routine (See Separate Instructions) in the Cash Disbursement sub-menu of
Accounting Manager to distribute the expenses to the subsidiary and post the General Ledger entry for the
payroll. Both the expense per fund and Due to TRS amounts can be found on the Payroll Transaction Journal.
The following is a sample of what will be posted to the General Ledger from the Distribution Routine.
ACCOUNT
Debit
Credit
A522
A Fund Expense
$32,242.16
A632
TOTAL TRS Contributions
$111.08
A200
Cash
$32,131.08
$32,242.16
$32,242.16
ACCOUNT
Debit
Credit
F201522
F201 Fund Expense
$770.45
F201200
Cash
$770.45
$770.45
$770.45
Total Gross Payroll
$33,012.61
$33012.61
Transfer of Gross Payroll from the Funds to Trust & Agency
Transfer money from each fund to cover distribution of gross payroll. (Use amounts above that are also found
on the Payroll Transactions Journal summary).
Fund
Account Check is Posted to:
Check Amount
A
A200
A Fund Checking Account
A Fund Gross Less TRS
$32,131.08
F
F201200
F Fund Checking Account
F Fund Gross
$770.45
$32,901.53
Receipt of Payroll into Trust & Agency
The following is a sample of the Cash Receipt entry which should be made to receive Gross Payroll into TA
ACCOUNT
Debit
Credit
TA200
Gross Less TRS
$32,901.53
TA10
NET PAYROLL
$20,941.20
TA22
FED
$6,875.41
TA21
STATE
$2,360.03
TA26
MED
$478.66
TA26
FICA
$2,046.78
TA28
CITY
$108.99
TA18
ERS
$90.46
$32,901.53
$32,901.53
Transfer of Net Payroll From TA Cash to Payroll Account *
Transfer the Net Payroll to a special payroll account (when applicable) which will have the following affect
on General Ledger:
ACCOUNT
Debit
Credit
TA10
Net Payroll
$20,941.20
TA200
TA Cash
$20,941.20
$20,941.20
$20,941.20
* This disbursement may be created thru the Auto Trust & Agency routine.
Transfer of Employer Related Expenses to Trust & Agency
Transfer Employer's share of FICA/Medicare using FICA/Med Expense Breakdown Report *
A Fund
A9030800000000
FICA-DIST
$1.999.01
A9030800000000
MED-DIST
$467.49
$2466.50
FB Fund
FB90308000000
FICA-DIST
$47.77
FB90308000000
MED-DIST
$11.17
$58.94
Total FICA
$2.046.78
Total Medicare
$478.66
$2,525.44
* This step may be incorporated into the Payroll to GL Distribution routine by increasing 522 and the appropriation expense amount of the budget code.
Receipt of Employer's Share of FICA/Medicare into Trust & Agency
ACCOUNT
Debit
Credit
TA200
TA Cash
$2,525.44
TA26
FICA/Medicare
$2,525.44
$2,525.44
$2,525.44
Produce Disbursements from Trust & Agency
Use the following steps to prepare disbursements for Trust & Agency:
1. Set up a TA disbursement schedule
2. Post computer generated checks for each vendor using the proper TA account #
on the detail screen or use the Auto Trust & Agency routine to create
disbursements
3. Print and proof the checks to be printed report.
4. Print and post the Trust & Agency checks.
The following are sample resulting entries in Trust & Agency from these disbursements:
ACCOUNT
Debit
Credit
TA18
ERS
$90.46
TA21
State Tax
$2,360.03
TA28
City
$108.99
TA200
$2,559.48
$2,559.48
$2,559.48
After Checks - Payroll Transaction Journal (Summary)
07/15/03 DEMO SCHOOL DISTRICT PAGE 1
*****************************************************************************************************************************************
PAYROLL TRANSACTIONS FOR CHECKS DATED BETWEEN 07/05/03 - 07/18/03
PAYROLL JOURNAL SUMMARY.....
=========================================================================================================================================
PAYROLL TRANSACTION TOTALS
GROSS PAY................... 33,012.61
FICA WAGES.................. 33,012.61
FICA WITHHOLDING............ 2,046.78
MEDI WAGES.................. 33,012.61
MEDI WITHHOLDING............ 478.66
FEDERAL WAGES............... 32,811.07
FED WITHHOLDING............. 6,875.41
EARNED INCOME CREDIT........ 0.00
STATE WAGES................. 33,012.61
STATE WITHHOLDING........... 2,360.03
CITY WAGES.................. 16,546.71
CITY WITHHOLDING............ 108.99
ANNUITIES................... 0.00
FLEX DEDUCTIONS ............ 0.00
RETIREMENT DEDUCTIONS....... 201.54
OTHER DEDUCTIONS............ 0.00
NON CASH.................... 0.00
REIMBURSED EXPENSES......... 0.00
NET PAY..................... 20,941.20
************ PAYMENT METHODS *****************
Direct Deposit Amount........ 11,907.06
Normal Distributed Amount.... 9,034.14
**********************************************
********** TAX DEPOSIT INFORMATION ***********
Federal Deposit Amount....... 11,926.29
State Deposit Amount......... 2,360.03
NYC City Deposit Amount...... 36.64
YON City Deposit Amount...... 72.35
**********************************************
SCHEDULE OF OTHER DEDUCTIONS
Code Account Vendor# Vendor Name Amount
-------- --------------- ------- ------------ -------------
ERS TA18 547 EMPLOYER SER 90.46
TRS A632 2049 NYS TEACHERS 111.08
--------------
TOTAL 201.54
07/15/03 DEMO SCHOOL DISTRICT PAGE 2
*****************************************************************************************************************************************
PAYROLL TRANSACTIONS FOR CHECKS DATED BETWEEN 07/05/03 - 07/18/03
PAYROLL JOURNAL SUMMARY.....
=========================================================================================================================================
PAYROLL DISTRIBUTION
Account Number Description Amount
--------------- ---------------------------------------- -------------
A1040160110000 NON-INSTR SAL-DISTR CLERK 10,000.00
A1240150330000 INSTR SAL-SUPERINTENDENT 5,322.12
A1310150220000 ASST SUPER OF BUSINESS SALARY 5,005.81
A1310160220000 NON-INSTR SALARIES 1,117.31
A1620160440000 NON-INSTR SALARIES 1,281.27
A2020160330000 NON-INSTR SALS SECRETARIES 1,190.48
A2110120660000 TEACHER SALARIES K-6 5,229.41
A2110130770000 TEACHING SALARIES 7-12 770.45
A2110160660000 NON-INSTR SAL AIDES 500.31
A2815160660000 NON-INSTR SALS-HLTH SRVC 1,190.48
A5510160555000 NON-INSTR SAL-BUS DR REGULAR 634.52
FUND TOTAL 32,242.16
PAYROLL DISTRIBUTION
Account Number Description Amount
--------------- ---------------------------------------- -------------
F20121101500000 INSTRUCTIONAL SALARIES 770.45
FUND TOTAL 770.45
------------
GRAND TOTAL 33,012.61
Number of Checks from The Payroll(s) appearing on this Journal......... 11
Number of TRANSFERS from The Payroll(s) appearing on this Journal...... 0
Number of Checks Issued for the Payroll(s) appearing on this Journal....... 11 Check Range 327 - 337
Report Completed 11:45 PM
FICA\Medicare Report
07/15/03 DEMO SCHOOL DISTRICT PAGE 1
**********************************************************************************************************************************
PAYROLL TAX EXPENSE BREAKDOWN BETWEEN 07/05/03 - 07/18/03
***** BREAKDOWN OF PAYROLL TAXES *****
Fund Gross Pay FICA Wages FICA Exp MED Wages MEDI Exp Fund Total TRS W/H
--------------- ---------------- --------------- --------------- --------------- --------------- ---------------- --------------
A 32,242.16 32,242.16 1,999.01 32,242.16 467.49 2,466.50 87.97
F201 770.45 770.45 47.77 770.45 11.17 58.94 23.11
--------------- --------------- ------------- --------------- ------------- --------------- --------------
33,012.61 33,012.61 2,046.78 33,012.61 478.66 2,525.44 111.08 TOTAL
** FICA / MEDICARE / TRS TOTALS **
GROSS PAY...................... 33,012.61
FICA WAGES..................... 33,012.61
FICA WITHHOLDING............... 2,046.78
MEDI WAGES..................... 33,012.61
MEDI WITHHOLDING............... 478.66
TRS WITHHOLDING............... 111.08
The breakdown by fund is calculated in proportion to the employees' account code breakdown for the selected
payroll(s). This breakdown does not include any amounts charged to the account NON CASH, which may cause a
difference between the Total Gross Amount and the Gross Account Totals. Any such differences, along with
any other warnings or discrepancies found are reported below.
** No Problems/Discrepancies Found **
Report Completed 11:44 PM
TRUST AND AGENCY PAYMENT PROCESSING
Purpose of the Trust and Agency Payment Processing Routine
The Trust and Agency Payment Processing routine can be used to automate the creation of disbursements for a given payroll(s) from the Trust & Agency fund. Payments for Federal, FICA/Medicare (including the Employer share), State and City withholdings in addition to other employee related disbursements like Credit Union deductions, Garnishments, TSA Contributions, Organizational Dues, Retirement Loan payments, etc., can be included in the routine.
Important Note When Preparing to Use Automated Trust and Agency Processing
Make sure that G/L Accounts and A/P Vendors have been added for ALL deductions in the Deduction Codes maintenance table in PAYROLL MANAGER. This will help in 2 ways: First, this information will be printed on the Payroll Transaction Journal report in payroll where it can be referenced. Second, the Automated Trust and Agency Routine defaults these values for any new codes that are set up.
Using the Automated Trust and Agency Processing Routine
To access the Automated Trust and Agency Processing routine, open the Data Entry menu area in ACCOUNTING
MANAGER
. From the Cash Disbursement area, select the Trust and Agency Payment Processing option. The Automated Trust and Agency Processing window displays.
Initial Setup
Choose the Maintenance folder to set up deduction codes for Trust and Agency payments.
The following are system-default trust and agency codes:
FICA-EMPL - Employees’ share of FICA
FICA-EMPR - Employer’s matching share of FICA
FWT - Employees’ Federal Tax Withholding
MEDI-EMPL - Employees’ share of Medicare
MEDI-EMPR - Employer’s matching share of Medicare
NET - Net Payroll to Disburse
SWT - Employees’ State Tax Withholding
NYC - Employees’ NYC Tax Withholding (if applicable)
YON - Employees’ Yonkers Tax Withholding (if applicable)
Note: If you do not wish to automate any of these default codes, simply change the Pay Cycle to Never on the Maintenance folder.
Updating Default Trust and Agency Codes for first-time use:
1. Enter the Payment Method as either Check, Wire Transfer, or Electronic. Check will produce a Computer Check (to be printed from Finance Manager), while Wire Transfer and Electronic both create Manual Check records.
2. Enter the Type of Payment. The typical Type is Consolidated, but the following explains the differences for each type.
Consolidated – The most commonly used method, creates one check for employees with the same deduction using one consolidated detail line for all employees on the check stub.
Singular by Vendor (Typically only used for Garnishments) – Like the Consolidated option, this method creates one check for employees with the same deduction, except it uses multiple lines of detail (one for each employee) on the check stub. It requires an additional deduction code entry for each employee and allows the entry of a reference number for the employee which is printed as the Invoice number on the check stub.
Example:
Check# Vendor Deduction Invoice Amount
1 ABC Company Garnish Emp1 $25.00
1 ABC Company Garnish Emp2 $30.00
1 ABC Company Garnish Emp3 $45.00
1 ABC Company Garnish Emp4 $50.00
The system will produce ONE check in the amount of $150.00 to vendor ABC Company and the check stub will contain a separate detail line for each employee as noted above.
Singular by Individual (Typically only used for Garnishments) – creates a separate check and separate detail line item for each employee with the same deduction. This method requires an additional deduction code entry for each employee and allows the entry of a reference number for the employee which is printed as the Invoice number on the check stub.
Example:
Check Vendor Deduction Invoice Amount
1 ABC Company Garnish Emp1 $25.00
2 ABC Company Garnish Emp2 $30.00
3 ABC Company Garnish Emp3 $45.00
4 ABC Company Garnish Emp4 $50.00
The system will create 4 separate checks as noted above to vendor ABC Company for each employee with the deduction, each with one detail line item and the respective invoice number.
Note: If the Type of Payment is Singular by Vendor or Singular by Individual, the Employee and Ref fields will open up for entry. The Employee field must be filled in with the employee number (or the lookup may be used) related to the deduction. For multiple employees, you must have multiple records for the same deduction codes, but with different employees linked to the records. The Ref field can be filled in with a unique reference number for each individual employee (defaults to the reference number, if one exists, on the deduction screen for the employee) and is printed in the invoice field on the check stub.
3. Enter the vendor number (the lookup may also be used to find the number). The vendor number specified for the deduction on the Payroll Deduction Maintenance window is defaulted.
4. Enter the Account to create the disbursement for (the lookup may also be used). The account specified for the deduction on the Payroll Deduction Maintenance window is defaulted.
5. Specify the appropriate Pay Cycle for when payment is made for the deduction. This may be Every, Weekly, Monthly, Quarterly, Annually, or Never.
Adding Other Trust and Agency Codes
There are 2 methods to add TA Codes for deductions that were not originally set-up.
1. Manually add ALL deduction codes through the Maintenance folder.
2. Generate Trust and Agency Payments for a pay period – this will add any missing TA included on the current summarized payroll. While the routine will add the new codes, the user must update these codes on the Maintenance tab for their particular Payment Method, Type, Vendor, Account, and Pay Cycle. If the Payroll Deduction Maintenance tab has had the G/L Account and A/P Vendor updated, these values will default from the table. The Pay Cycle for any new codes created during the Generate Payment process, however, defaults to N/A and puts them on Hold, so if there are NEW code(s) created that should be paid on this particular run, one of the following two steps must be taken prior to creating the disbursements:
a) the new code(s) must be updated with the proper Payment Cycle and the user must manually remove the HOLD from the code(s) in the Review Payments folder.
- Or –
b) the new code(s) must be updated with the proper Payment Cycle and the payroll dates summarized again in the Generate Payments folder
Manually adding Trust and Agency Codes from the Maintenance folder:
1. Click the Add button from the Maintenance folder
2. Enter the TA Code (same as the Deduction Code). Use the lookup to select from a listing of valid deduction codes.
3. Enter the Payment Method as either Check, Wire Transfer, or Electronic. Check will produce a Computer Check (to be printed from within Finance Manager), while Wire Transfer and Electronic both create Manual Check records.
4. Enter the Type of Payment. The typical Type is Consolidated, but the following explains the differences for each type.
Consolidated – The most commonly used method, creates one check for employees with the same deduction using one consolidated detail line for all employees on the check stub.
Singular by Vendor (Typically only used for Garnishments) – Like the Consolidated option, this method creates one check for employees with the same deduction, except it uses multiple lines of detail (one for each employee) on the check stub. It requires an additional deduction code entry for each employee and allows the entry of a reference number for the employee which is printed as the Invoice number on the check stub.
Example:
Check# Vendor Deduction Invoice Amount
1 ABC Company Garnish Emp1 $25.00
1 ABC Company Garnish Emp2 $30.00
1 ABC Company Garnish Emp3 $45.00
1 ABC Company Garnish Emp4 $50.00
The system will produce ONE check in the amount of $150.00 to vendor ABC Company and the check stub will contain a separate detail line for each employee as noted above.
Singular by Individual (Typically only used for Garnishments) – creates a separate check and separate detail line item for each employee with the same deduction. This method requires an additional deduction code entry for each employee and allows the entry of a reference number for the employee which is printed as the Invoice number on the check stub.
Example:
Check Vendor Deduction Invoice Amount
1 ABC Company Garnish Emp1 $25.00
2 ABC Company Garnish Emp2 $30.00
3 ABC Company Garnish Emp3 $45.00
4 ABC Company Garnish Emp4 $50.00
The system will create 4 separate checks as noted above to vendor ABC Company for each employee with the deduction, each with one detail line item and the respective invoice number.
Note: If the Type of Payment is Singular by Vendor or Singular by Individual, the Employee and Ref fields will open up for entry. The Employee field must be filled in with the employee number (or the lookup may be used) related to the deduction. For multiple employees, you must have multiple records for the same deduction codes, but with different employees linked to the records. The Ref field can be filled in with a unique reference number for each individual employee (defaults to the reference number, if one exists, on the deduction screen for the employee) and is printed in the invoice field on the check stub.
5. Enter the vendor number (the lookup may also be used to find the number). The vendor number specified for the deduction on the Payroll Deduction Maintenance window is defaulted.
6. Enter the Account to create the disbursement for (the lookup may also be used). The account specified for the deduction on the Payroll Deduction Maintenance window is defaulted.
7. Specify the appropriate Pay Cycle for when payment is made for the deduction. This may be Every, Weekly, Monthly, Quarterly, Annually, or Never.
Processing Payments
Generate Payments
This routine is used to create the trust and agency payment amounts for the current time period and cycles selected. From the Generate Payments folder, the Generate Trust and Agency Payments criteria window displays.

1. Enter the Starting and Ending Payroll Check Dates to summarize payment information for - Typically this is the day after the last payroll summarized through the current payroll check date in order to pick up any additional payments for checks processed after the previous payroll.
2. Set the Payment Cycles to generate payments for – Check any cycles associated to deductions you want to create payments for at this time
3. Click the Generate button – Generating makes the routine proceed with calculating payment amounts based on the criteria set. If you have new deductions in the current payroll you will receive this message:

**After editing deduction codes, regenerate the payments.
Review Payments
To review TA codes and current payment info, click on the Review Payments folder.
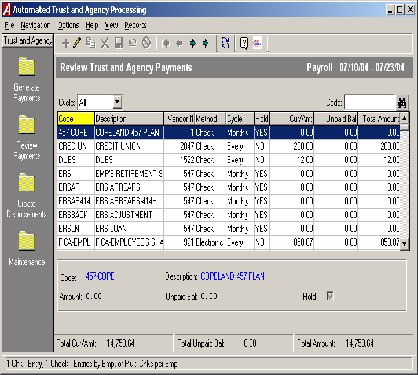
The TA codes may be sorted by Code or any other column simply by clicking on the respective column heading. The column heading is highlighted in yellow to indicate the selected sorting method. To print a report of the current payments, choose the Reports drop-down menu from the top of the window and select the Trust and Agency Payments report.
To Edit the Current Disbursements:
There are 3 items that can be modified:
Creating the Cash Disbursements
To create the actual disbursement, click on the Create Disbursements folder.
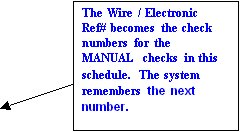
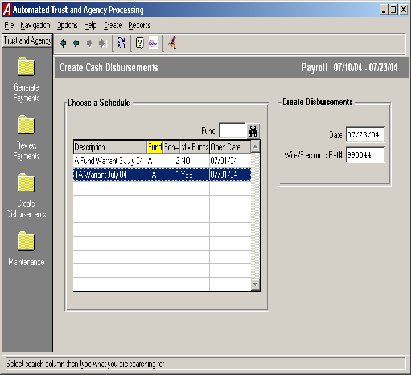
1. Create a new schedule for each payroll week.
2. Highlight the appropriate disbursement schedule (warrant) that the payments should be recorded within
3. Enter the date for the disbursements. For checks this is simply the entry date and may not necessarily be the same as the check date since that will be assigned during the printing process.
4. Enter the Wire/Electronic Ref#. This reference number will serve as a starting number for the manual disbursements created for Wires and Electronic payments. The first time you run Wires/Electronic payments, you should set this number at a number well outside of the normal check number ranges you are using. Once this routine has been run, the Ref# will default to the next number for each subsequent run.
5. Press the RUN button to proceed.
Finishing Up – Running Cash Disbursement Schedule
Once the disbursements have been created, any computer checks that were created can be printed through the normal Print Disbursement Checks routine. The Checks Waiting to Print report may be run to confirm check amounts prior to printing them. In addition, disbursements created for Wires or Electronic payments may now be reviewed in the Manual Checks area or reported on via a Warrant or Cash Disbursement Schedule report.
Recording the Receipt of Trust and Agency Accounts
Print the Cash Disbursement Schedule for the T&A cash disbursements for the current payroll. Use the last page – Schedule Distribution Totals by Accounts – By Fund – to get the accounts and amounts to enter in the journal schedule to record the cash receipt into T&A.
For example:
Debit TA 200
Credit TA Liability Accounts (010, 018, 020, etc.)
REPORTS
Transaction Reports:
Checks Waiting to Print
The Checks Waiting to Print routine provides a listing of check information entered into a current open warrant that have not been printed yet. The report may be printed for any date range of check information entered. You may choose to print a summary report with simply the vendor and dollar amount, or a detail report with a complete detail of the entry. An option is also provided to switch the vendor name on the report.
To access the
Checks Waiting to Print routine, select Reports, Transaction Reports and then select Checks Waiting to Print option
.
The Checks Waiting to Print window provides a listing of all open schedules.
![]() icon to generate the report.
icon to generate the report.
Cash Disbursements Schedules
The Cash Disbursements Schedules routine is used to run a report for open or closed cash disbursement schedules. The report provides a listing of cash disbursements for a selected schedule by check number and includes the date, vendor, check explanation, purchase order number, amount paid, and amount liquidated. You may choose to include a breakdown of account distribution information if needed.
�
To access the Cash Disbursements Schedules routine, Open the Reports tree, Open the Transaction Reports tree and select the Cash Disbursements Schedules option.

The Cash Disbursement Schedule window displays.
1. Select the type of Schedule, Open or Closed, from the drop-down list.
2. Select the schedule from the listing. You may change the sorting method by clicking on the column heading or further restrict your listing by using the search feature to jump to a specific record.
33. Enter the starting disbursement number to restrict the report to a range of cash disbursements. Leave “0” in the Starting Disbursement field to include all cash disbursements from the selected schedule in the report.
4. Select YES to include account distribution information for each disbursement record. The report shows the schedule distribution totals by account and fund. The breakdown for each account shows the Total Amount Expensed and Total Amount Liquidated.
Select NO to show the total cash disbursement amount without distribution information. The summary shows the total check amount for each check on the schedule with an overall total for the schedule.
5. Click the RUN ![]() button to generate the report.
After the report is generated, select one of the following report destinations: Preview(screen), Default Printer, File, or Microsoft Excel.
button to generate the report.
After the report is generated, select one of the following report destinations: Preview(screen), Default Printer, File, or Microsoft Excel.
Check Warrants
The Check Warrants routine is used to run a report displaying detail of any warrant(s) for any selected date range from either open or closed cash disbursement schedules. For each schedule selected, the report provides the check number, vendor name, check date, purchase order number, and check amount. You may choose to print a Summary or Detail Warrant report where needed.
To access the
Check Warrants routine, select Reports, Transaction Reports and then select Check Warrant option
.


The View Print Warrants window displays the following form.
![]() icon to generate the report.
icon to generate the report.
Cash Receipts Schedule Report
The Cash Receipts Schedules routine is used to run a report for open or closed cash receipt schedules. The report provides a listing of cash receipts for a selected schedule by receipt number and includes the date, received from and reason, and amount. You may choose to include a breakdown of account distribution information if needed.
To access the Cash Receipts Schedule routine, Select the Transaction Reports tree and select the Cash Receipts Schedule option.
The Cash Receipt Schedules window displays.
1. Select the type of Schedule, Open or Closed, from the drop-down list.
2. Select the schedule from the listing. You may change the sorting method by clicking on the column heading or further restrict your listing by using the search feature to jump to a specific record.
3. Enter the starting cash receipt number to restrict the report to a range of cash receipts. Leave 0 in the Starting Cash Receipt field to include all receipts in the report.
4. Select YES to include account distribution information for each receipt. The distribution shows the account distribution for each entry, the totals for each receipt and the overall total for the schedule.
Select NO to show the total cash receipt amount without distribution information. The summary shows the dollar amount for each receipt on the schedule with totals for each day’s entries and an overall total for the schedule.
5. Click the RUN ![]() button to generate the report.
button to generate the report.
6. After the report is generated, select one of the following report destinations: Preview(screen), Default Printer, File, or Microsoft Excel.
Journal Entry Schedules
The Journal Entry Schedules routine provides a listing of journal entries included in a selected open or closed schedule by journal entry reference number.
To access the Journal Entry Schedules routine, Open the Reports tree, Open the Transaction Reports tree and select the Journal Entry Schedules option.
The Journal Entries Schedule window displays.
1. Select the type of Schedule - Open or Closed - from the drop-down list.
2. Change the sorting method by clicking on and highlighting the appropriate column heading in the browser (Fund, Schedule Number, Description, Open Date, or Post Date) to sort the listing by the information in that column. You may also further restrict the browser listing by using the search feature to jump to a specific record. Select the schedule from the browser by highlighting the appropriate record.
3. Enter the starting journal entry number to restrict the report to a range of entries. Leave “0” in the Starting Journal Entry field to include all entries from the selected schedule in the report.
4. Click the RUN ![]() button to generate the report.
button to generate the report.
5. After the report is generated, select one of the following report destinations: Preview(screen), Default Printer, File, or Microsoft Excel.
The Journal Entry Schedule Report provides the following information: journal entry reference number, journal entry date, journal entry type (i.e., ST – Standard Journal Entry, OE-GL – Opening Entry General Ledger, etc.), journal entry explanation, account code, and debit and credit amounts. The report concludes with General Ledger and Subsidiary Ledger debit and credit totals as well as a count of the number of journal entries on the schedule. The last page of the report provides schedule distribution totals by account code and fund.
Budget Transfer Schedules
The Budget Transfer Schedules routine provides a listing of budget transfer entries included in a selected open or closed schedule by budget transfer reference number.
�
To access the Budget Transfer Schedules routine, Open the Reports tree, Open the Transaction Reports tree and select the Budget Transfer Schedules option.
 The Budget Transfer Schedules window displays.
1. Select the type of Schedule - Open or Closed - from the drop-down list.
2. Change the sorting method by clicking on and highlighting the appropriate column heading in the browser (Fund, Schedule Number, Description, Open Date, or Post Date) to sort the listing by the information in that column. You may also further restrict the browser listing by using the search feature to jump to a specific record. Select the schedule from the browser by highlighting the appropriate record.
3. Enter the starting budget transfer number to restrict the report to a range of entries. Leave “0” in the Starting Budget Transfer field to include all entries from the selected schedule in the report.
4. Click the RUN ![]() button to generate the report.
button to generate the report.
5. After the report is generated, select one of the following report destinations: Preview(screen), Default Printer, File, or Microsoft Excel.
The Budget Transfer Schedule Report provides the following information: budget transfer reference number, budget transfer date, transfer explanation, account code, and debit and credit amounts. The report concludes with schedule total debit and credit amounts and a net schedule budget transfer amount, as well as a count of the number of budget transfers on the schedule. The last page of the report provides schedule distribution totals by account code and fund.
Vendor Payment History
The View Vendor Payment History routine provides a detail of payments made to a selected vendor or range of vendors. You may choose to restrict the report to detail for a specific fund, purchase order number, or date or include detail for a selected range of funds, purchase order numbers, or dates.
To access the View Vendor Payment History routine, select Reports, Vendor Reports, and select the Vendor Payment History option.
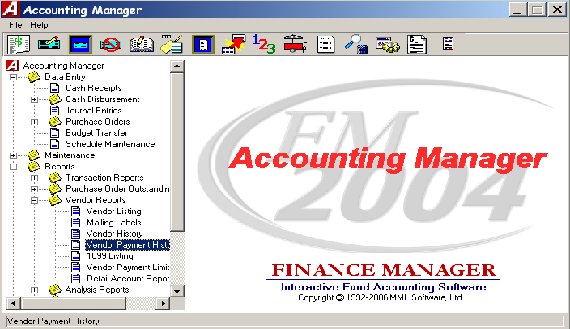
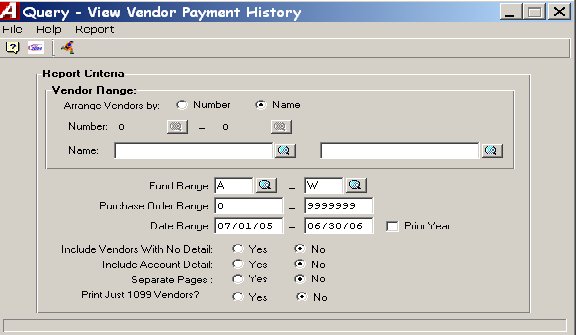
The View Vendor Payment History window displays the following form.
![]() icon to generate the report.
icon to generate the report.
Purchase Order Reports:
Outstanding POs by Individual PO Number
The Purchase Orders Outstanding by Individual PO Number Report routine provides detail relating to a currently outstanding individual manual or computer purchase order within a selected date range.
To access the
Purchase Orders Outstanding by Individual PO Number Report routine, select Reports, Open the Purchase Order Outstanding Reports, and select the By Individual PO Number option.

The Purchase Orders Outstanding by PO Number window displays.
![]() icon to generate the report.
icon to generate the report.
Outstanding POs by Individual Vendor
The Purchase Orders Outstanding by Individual Vendor Report routine provides data relating to manual or computer purchase orders for a specific vendor within a selected date range. You may choose to run a report for all vendor-specific purchase orders or simply for only open (outstanding) purchase orders.
To access the
Purchase Orders Outstanding by Individual Vendor Report routine, select Open the Reports, Open the Purchase Order Outstanding Reports, and select the By Individual Vendor option.


The Purchase Orders Outstanding by Vendor window displays.
![]() icon to generate the report.
icon to generate the report.
Outstanding POs Range by PO Numbers
The Purchase Orders Outstanding by Ranged PO Numbers Report routine provides detail relating to an individual manual or computer purchase order or a range of purchase orders within a selected date range and fund range. You may choose to run a report for all purchase orders or simply for only open (outstanding) purchase orders.
To access the
Purchase Orders Outstanding by Ranged PO Numbers Report routine, select Reports, Open the Purchase Order Outstanding Reports and select the Range by PO Numbers option.
The Purchase Orders Outstanding by Ranged PO Numbers window displays.
![]() icon to generate the report.
icon to generate the report.
Outstanding POs Range by Vendors
The Purchase Orders Outstanding Range by Vendors Report routine provides information relating to an individual manual or computer purchase order or a range of purchase orders for a specific vendor or range of vendors within a selected date range. You may choose to run a report for all vendor-specific purchase orders or simply for only open (outstanding) purchase orders.
To access the
Purchase Orders Outstanding by Ranged PO Numbers Report routine, select Open the Reports, Open the Purchase Order Outstanding Reports tree and select the Range by Vendors option.

The Purchase Orders Outstanding by Vendor window displays.
To sort purchase orders in vendor name order, set the Arrange Vendors By radio button to Name. Then enter the starting and ending vendor name range. Use the lookup to search for a vendor name. To report on purchase orders for one vendor only, enter the same vendor name in the starting and ending range fields.
�
Enter the desired date range in MM/DD/YY format OR check the Prior Year checkbox if you want the report to reflect purchase order information for the prior year. The system changes the date range to the prior fiscal year date range.
�
Enter the starting and ending purchase order numbers. To report on one purchase order only, enter the same number in the Starting and Ending Purchase Order Range fields.
�
If you want to generate a report of only open (outstanding) purchase orders, set the List Open Purchases Only radio button to YES. If you want the report to include all purchase orders, set the List Open Purchases Only radio button to NO.
�
Click the RUN ![]() icon to generate the report.
icon to generate the report.
�
After the report is generated, select one of the following report destinations: Preview(screen), Default Printer, File, or Microsoft Excel.
�
The Purchase Orders Outstanding by Ranged Vendors Report provides the following information: vendor name and number, purchase order number, PO date, schedule number, amount placed, amount liquidated, and amount remaining. Subtotals are provided for each vendor. The report concludes with a grand total amount placed, liquidated, and remaining for all selected purchase orders.
Analysis Reports:
Individual Account Transactions
The Individual Account Transactions Report provides detail of account history within a specified date range for a selected General Ledger, Revenue, or Appropriation account code. The report can only be generated for one account code at a time.
�
To access the Individual Account Transactions Report routine, Open the Reports tree, Open the Analysis Reports tree and select the Individual Account Transactions option.

The Individual Account Transactions window displays.
1. Select the Account status, Active or Inactive, from the drop-down list. This restricts the contents of the browser to accounts with the selected status.
2. Select the type of account from the drop-down list – GL, Revenue, or Appropriation. This restricts the contents of the browser to accounts within the specified type.
3. Select the account code from the listing by highlighting the account record. You may change the sorting method by clicking on the column heading (Account or Name) or further restrict your listing by using the search feature to jump to a specific record.
4. Enter the starting and ending transaction date range (in MM/DD/YY format) to be included in the report. The report will include any history transactions made to the account during the specified date range. To print a report for transactions made on one specific date, enter the same date in the Starting and Ending Date Range fields.
NOTE: When running the Individual Account Transaction Report with a starting date that is AFTER the current fiscal year start date, the first line of the report includes a beginning balance line which encompasses all transactions from the starting fiscal date to the specified starting report date.
OR
Check the Prior Year checkbox if you want the report to reflect account transaction detail for the prior year. The system changes the date range to the prior fiscal year date range.
5. When running the report for a General Ledger account code, choose whether you wish to run a Summary or Detail report. The Summary report lists posted items from closed schedules rolled into a single schedule total. The Detail report displays each individual detail record from open schedules.
6. If your facility uses B-Fund style reports and the Use B-Fund Style Appropriation Reports parameter is checked in System Manager, select the reporting method to be run. Select Current Year only, Previous Year (B-Fund) only, or All for both.
7. When running the report for an Appropriation account code, choose the display method in which the report data is to be sorted. Choose Purchase Order if you want the report to display in numerical ascending order by purchase order number. Choose Date Entered if you want the report to display in ascending order by transaction entry date.
8. Set the Use Detail Line Description radio button to Yes if you want the report to display the detail explanation line as recorded during the transaction entry process. Set the Use Detail Line Description radio button to No if you do not want the detail explanation to be displayed on the report.
9. When running a Detail report for a General Ledger account code, check the Include Disbursement Detail checkbox to print a line for every invoice on every cash disbursement. NOTE: When run to “Include Disbursement Detail”, the report can be very large and may take some time to generate.
10. Click the RUN ![]() button to generate the report.
button to generate the report.
11. After the report is generated, select one of the following output destinations: Preview(screen), Default Printer, File, or Microsoft Excel.
The Detail or Summary Account Transactions Report (for General Ledger accounts) includes the following information for each account code: transaction date, reference number, invoice number, transaction explanation, schedule number, debit amount, credit amount, and running balance. The report concludes with the total debits, total credits, and total balance for the account code.
The Detail Account Transactions Report (for Revenue accounts) includes the following information for each account code: reference number, transaction date, transaction explanation, schedule number, budget amount, adjusted amount, revenue earned amount, and unearned amount. The Budget Amount minus Adjusted Amount minus Revenue Earned Amount equals the Unearned Amount. The report concludes with the total budget, total adjusted, total revenue earned, and total unearned for the account code.
The Detail Account Transactions Report (for Appropriation accounts) includes the following information for each account code: purchase order number, invoice number, reference number, transaction date, transaction explanation, schedule number, appropriation amount, encumbered amount, expensed amount, and unencumbered amount. The Appropriation Amount minus Encumbered Amount minus Expense Amount equals the Unencumbered Amount. The report concludes with the total appropriation, total encumbered, total expense, and total unencumbered amount for the account code.
NOTE: When running the Individual Account Transaction Report for a time frame within a fiscal year and starting with a date AFTER the beginning of the year, the report calculates a “Beginning Balance” which takes all transactions from the starting fiscal date to the report start date into consideration.
Multiple Account Ranges
The Multiple Account Ranges Report provides detail of account history within a specified date range and fund range for a selected General Ledger, Revenue, or Appropriation account code or range of account codes.
�
To access the Multiple Account Ranges Report routine, Open the Reports tree, Open the Analysis Reports tree and select the Multiple Account Ranges option. 
The Multiple Account Transaction Report window displays.
1. Select the fund from the listing by highlighting the appropriate record. You may select more than one fund by using the mouse and Shift or Control key. If necessary, you can change the sorting method by clicking on the column heading (fund or fund description) or further restrict your listing by using the search feature to jump to a specific record, or check the Select All check box to select all funds in the browser.
2. Enter the starting and ending transaction date range (in MM/DD/YY format) to be included in the report. The report will include any history transactions made to the account during the specified date range. To print a report for transactions made on one specific date, enter the same date in the Starting and Ending Date Range fields.
NOTE: When running the Multiple Account Ranges Report with a starting date that is AFTER the current fiscal year start date, the first line of the report includes a beginning balance line which encompasses all transactions from the starting fiscal date to the specified starting report date.
OR
Check the Prior Year checkbox if you want the report to reflect account transaction detail for the prior year. The system changes the date range to the prior fiscal year date range.
3. Enter the starting and ending function, object, location, and program code ranges. To report on one function, object, location, and program only, enter the same number in the Starting and Ending Range fields.
4. Set the radio button to the desired account type – GL, Revenue, or Appropriation. This restricts the contents of the report to accounts within the specified type.
5. Set the Separate Pages radio button to YES to page break the report by account code. Set the Separate Pages radio button to NO to print account code transaction detail continuously in the report.
6. Click the RUN ![]() button to generate the report.
button to generate the report.
7. After the report is generated, select one of the following output destinations: Preview(screen), Default Printer, File, or Microsoft Excel.
The Multiple Account Transaction Report (for General Ledger accounts) includes the following information for each account code: transaction date, reference number, purchase order number, transaction explanation, schedule number, debit amount, credit amount, and running balance. Subtotals are provided for each account code. The report concludes with the total GL debits and total credits.
The Multiple Account Transaction Report (for Revenue accounts) includes the following information for each account code: reference number, transaction date, transaction explanation, schedule number, budget amount, adjusted amount, revenue earned amount, and unearned amount. The Budget Amount minus Adjusted Amount minus Revenue Earned Amount equals the Unearned Amount. Subtotals are provided for each account code. The report concludes with the total revenue budget, total adjusted, total revenue earned, and total unearned amounts.
The Multiple Account Transaction Report (for Appropriation accounts) includes the following information for each account code: purchase order number, invoice number, reference number, transaction date, transaction explanation, schedule number, appropriation amount, encumbered amount, expensed amount, and unencumbered amount. The Appropriation Amount minus Encumbered Amount minus Expense Amount equals the Unencumbered Amount. The report concludes with the total appropriation, total encumbered, total expense, and total unencumbered amounts.
NOTE: When running the Multiple Account Ranges Report for a time frame within a fiscal year and starting with a date AFTER the beginning of the year, the report calculates a “Beginning Balance” which takes all transactions from the starting fiscal date to the report start date into consideration.
Financial Reports:
Trial Balance
The Trial Balance Report provides a current trial balance for the selected fund(s). The report shows control totals for only closed schedules. The report may merge the selected funds together, such as for federal projects where separate funds are used to track each project.
�
To access the Trial Balance Report routine, Open the Reports tree, Open the Financial Reports tree and select the Trial Balance option.

The Trial Balance Report window displays.
1. Select the fund from the listing by highlighting the appropriate record. You may select more than one fund by using the mouse and Shift or Control key. If necessary, you can change the sorting method by clicking on the column heading (fund or fund description) or further restrict your listing by using the search feature to jump to a specific record.
Check the Select All check box to select all funds in the browser and include all funds in the report.
2. Indicate the starting and ending reporting date range.
OR
Check the Prior Year checkbox if you want the report to reflect account detail for the prior year. The system changes the date range to the prior fiscal year date range.
3. Indicate the reporting method.
Debits/Credits Only – This option generates a two-column report displaying only debits and credits.
Debits/Credits/Balance – This option generates a three-column report displaying debits, credits, and balance.
4. Specify your reporting criteria.
If the selected reporting method is Debits/Credits Only, you may choose to display accounts with detail or accounts with no detail. Check the Include Accts with No Detail check box if you want the report to include any entries where the Debits and Credits are zero balances. The Include Accts with No Detail option is only available for the Debits/Credits Only report.
If the selected reporting method is Debits/Credits/Balance, you may choose to display accounts with balances or accounts with no balances. Check the Include Accounts with a Zero Balance check box if you want the report to include all entries that have detail, including those entries where the debit and the credit amounts are equal. The Include Accounts with a Zero Balance option is only available for the Debits/Credits/Balance Report.
5. Click the RUN ![]() button to generate the report.
button to generate the report.
6. If you selected more than one fund, the system displays the question "Do You Wish to Merge Your Selected Funds?". Press YES if the report funds are to be merged together. Press NO if report funds are to be kept separately.
7. After the report is generated, select one of the following output destinations: Preview(screen), Default Printer, File, or Microsoft Excel.
Both the Debits/Credits Only and Debits/Credits/Balance Reports include the selected reporting criteria in the report title.
The Debits/Credits Only Report includes the following information for each account code within the selected fund(s): account number, account name, debit amount, and credit amount. The report concludes with the total debits and credits for the selected fund(s).
The Debits/Credits/Balance Report includes the following information for each account code within the selected fund(s): account number, account name, debit amount, credit amount, and balance. The report concludes with the total debits, credits, and balance for the selected fund(s). If the Credits field is greater than the Debits field for accounts 200 through 999, the letters “Cr” display after the Balance amount.
Trail Balance Diagnostic Report:
The Trial Balance Diagnostic Report provides a descriptive comparison between control totals and subsidiary totals for a specific time period. One report will show the difference between control accounts and sunsidiary accounts. The other report shows which schedules have potential issues that need to be resolved.
To access the Trial Balance Diagnostic Report routine, Open the Utilities tree, Open the General Routines, Open Supervisor Diagnostics and select the Trial Balance Diagnostics.
The Trial Balance Diagnostic Report window displays.
1. Select the fund from the listing by highlighting the appropriate record. You may select more than one fund by using the mouse and Shift or Control key. If necessary, you can change the sorting method by clicking on the column heading (fund or fund description) or further restrict your listing by using the search feature to jump to a specific record. Check the Select All check box to select all funds in the browser and include all funds in the report.
2. Indicate the starting and ending reporting date range.
OR
Check the Prior Year checkbox if you want the report to reflect account detail for the prior year. The system changes the date range to the prior fiscal year date range.
3. Trial Balance vs. Subsidiary Ledgers shows as follows:
4. Detail Entry Schedule Review shows as follows:
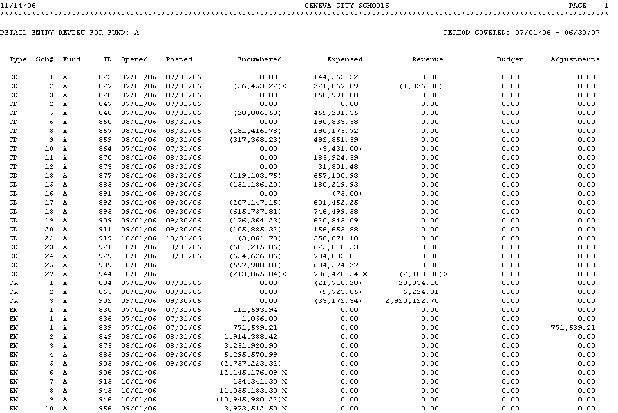
Revenue Status
The Revenue Status Report includes detail of selected individual revenue accounts with respect to the current adjusted budget, revenue earned during the fiscal year to date, and current unearned revenue.
�
To access the Revenue Status Report routine, Open the Reports tree, Open the Financial Reports tree and select the Revenue Status option.
The Revenue Status Report window displays.
5. Select the fund from the listing by highlighting the appropriate record. You may select more than one fund by using the mouse and Shift or Control key. If necessary, you can change the sorting method by clicking on the column heading (fund or fund description) or further restrict your listing by using the search feature to jump to a specific record. Check the Select All check box to select all funds in the browser and include all funds in the report.
6. Indicate the starting and ending reporting date range.
OR
Check the Prior Year checkbox if you want the report to reflect account detail for the prior year. The system changes the date range to the prior fiscal year date range.
7. Enter the starting and ending function, object, location, and program code ranges. To report on one function, object, location, and program only, enter the same number in the Starting and Ending Range fields.
8. Check the Include Null (Zero) Accounts checkbox if you want to include accounts within the selected fund that have no activity.
9. Click the RUN ![]() button to generate the report.
button to generate the report.
10. If you selected more than one fund, the system displays the question "Do You Wish to Merge Your Selected Funds?".
Press YES if the report funds are to be merged together. Press NO if report funds are to be kept separately.
11. After the report is generated, select one of the following output destinations: Preview(screen), Default Printer, File, or Microsoft Excel.
The Revenue Budget Status Report includes the following information for each account code within the selected fund(s): account number, account name, budget amount, adjustment amount, revised budget amount, revenue earned amount, and unearned revenue amount. The Budget amount plus Adjustments amount equals the Revised Budget amount. The Revised Budget amount minus the Revenue Earned Amount equals the Unearned Revenue Amount. Subtotals are provided for each fund selected. The report concludes with grand totals for all selected funds.
Appropriation Status
The Appropriation Status Report includes detail of selected individual appropriation accounts with respect to the current adjusted budget, fiscal year-to-date expenses, current encumbrances, and current unencumbered balance.
�
To access the Appropriation Status Report routine, Open the Reports tree, Open the Financial Reports tree and select the Appropriation Status option.

The Appropriation Status Report window displays.
1. Select the fund from the listing by highlighting the appropriate record. You may select more than one fund by using the mouse and Shift or Control key. If necessary, you can change the sorting method by clicking on the column heading (fund or fund description) or further restrict your listing by using the search feature to jump to a specific record. Check the Select All check box to select all funds in the browser and include all funds in the report.
2. Indicate the starting and ending reporting date range.
OR
Check the Prior Year checkbox if you want the report to reflect account detail for the prior year. The system changes the date range to the prior fiscal year date range.
3. Select the manner in which information is to be reported by. The report may be sorted by function, by object, by function and object, by location and function, by location and program, by program and object, by month, or by ST-3 format.
4. Select the report type as either Detail, Summary, or Consolidated. The Consolidated Report is only available when running the report by Function, by Object, or by Month.
5. Enter the starting and ending function, object, location, and program code ranges. To report on one function, object, location, and program only, enter the same number in the Starting and Ending Range fields.
6. Check the Include Null (Zero) Accounts checkbox if you want to include accounts within the selected fund that have no activity.
7. Use the Break by Totals option to specifically define the formatting of any report breaks that you wish to include. When the Break by Totals option is checked, the Report Preferences area at the bottom left-hand side of the window displays.
You can specify whether you wish to include all, some, or none of the report breaks (as shown in the examples) and whether the subtotals for each break should include an underline by checking the appropriate boxes.
8. The Screen Version selection generates a report that displays the Account Code, Account Description, Adjusted Budget, Expensed Amount, Encumbered Amount, and Available Amount. If Screen Version is NOT selected, the report includes the Account Code, Account Description, Original Budget, Adjustments, Adjusted Budget, Expensed Amount, Encumbered Amount, and Available Amount.
9. In the Title field, enter the report title that you wish to be displayed at the top of each report page.
10. Click the RUN ![]() button to generate the report.
button to generate the report.
11. If you selected more than one fund, the system displays the question "Do You Wish to Merge Your Selected Funds?". Press YES if the report funds are to be merged together. Press NO if report funds are to be listed separately.
12. After the report is generated, select one of the following output destinations: Preview(screen), Default Printer, File, or Microsoft Excel.
The Appropriation Status Report includes the following information for each account code within the selected fund(s): account number, account name, original budget amount, adjustment amount, revised budget amount, expensed amount, encumbered amount, and available amount. Subtotals are provided where indicated in the Report Break fields. Totals are provided for each fund. The report concludes with grand totals for all funds selected.
The Appropriation Status Report (Screen Version) includes the following information for each account code within the selected fund(s): account number, account name, revised budget amount, expensed amount, encumbered amount, and available amount. Subtotals are provided where indicated in the Report Break fields. Totals are provided for each fund. The report concludes with grand totals for all funds selected. The Original Budget amount plus Adjustments Amount equals the Adjusted Budget amount. The Adjusted Budget Amount minus Expensed Amount minus Encumbered Amount equals the Available Amount.
Cash Balance
The Cash Balance Report routine is used to generate a report containing receipts, disbursements, journal entries, daily activity, and running balance for a specified cash account and date range.
�
To access the Cash Balance Report routine, Open the Reports tree, Open the Financial Reports tree and select the Cash Balance option.

The Cash Balance Report window displays.
1. If necessary, change the sorting method by clicking on the column heading (Account or Name) or further restrict your listing by using the search feature to jump to a specific record. Select the cash account code from the browser by highlighting the appropriate record.
2. Indicate the starting and ending reporting date range.
3. Select the report type as either Summary or Detail.
The Summary report includes the following information: receipt amounts, disbursement amounts, journal entry amounts, and running balance summary for the reporting date range.
The Detail report includes the following information: period activity reference information (schedule type and number), transaction date, receipt amounts, disbursement amounts, journal entry amounts, daily activity amount, and running balance.
4. Click the RUN ![]() button to generate the report.
button to generate the report.
5. After the report is generated, select one of the following output destinations: Preview(screen), Default Printer, File, or Microsoft Excel.
Summary Version

Detail Version

This represents the balance in A200 as of 03/31/2003.

These are the Receipts on a schedule that is still open.
05/06/03 DEMO SCHOOL DISTRICT PAGE 1
***********************************************************************************************************************************
CASH RECEIPT SCHEDULE NUMBER 8 - APRIL - A FUND - RECEIPTS
REC# DATE ENTRY/ADDITIONAL EXPLAINATION ACCOUNT DEBITS CREDITS
===================================================================================================================================
10 04/15/03 TEST RECEIPT
A 200 450.00 0.00
A 2401 0.00 450.00
----------------------------------------------------------------------------------------------------------------------------------
11 04/30/03 TEST RECEIPT 2
A 200 7,000.00 0.00
A 1001 0.00 7,000.00
----------------------------------------------------------------------------------------------------------------------------------
GENERAL LEDGER TOTALS.................. 7,450.00 0.00
SUBSIDIARY LEDGER TOTALS............... 0.00 7,450.00
RECEIPT ENTRY COUNT - 2
These are the Disbursements on a schedule that is still open.
05/06/03 DEMO SCHOOL DISTRICT PAGE 1
*********************************************************************************************************************************
CASH DISBURSEMENT SCHEDULE NUMBER 13 - APRIL - A FUND - CHECKS
CHK# DATE VENDOR / EXPLANATION P O # ACCOUNT AMT PAID LIQUIDATED
=================================================================================================================================
6 04/30/03 14 - ABC SPORTS & FITNESS
A2110200772400 10,000.00
**CHECK TOTAL** 10,000.00
7 04/30/03 15 - ABEKA BOOK
A2110480661900 3,000.00
**CHECK TOTAL** 3,000.00
DISBURSEMENT COUNT - 2 SCHEDULE TOTAL..................... 13,000.00 0.00
AUDIT REPORTS
The following document will explain and show the function and use of the Audit Routines that have been built into the Accounting Manager module.
The Audit Routines can be accessed in Accounting Manager by going to the Utilities menu tree option and selecting Audit Routines as shown below.
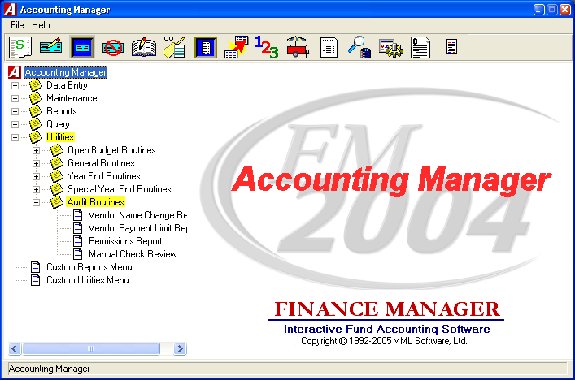
Vendor Name Change Report
As an example, a Vendor was created with the name A & A COMPANY.

The “Payment” name of that vendor was then changed to JASON ROBERTS.
An Accounts Payable check was cut to the Vendor with the new Payment name.
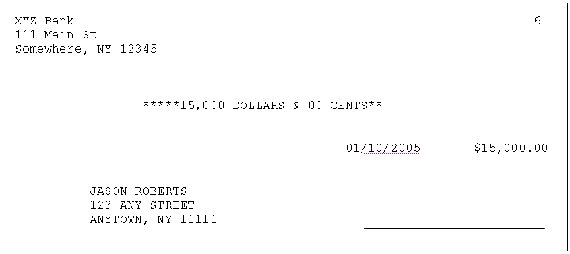
The Vendor Payment name was then changed back to A & A COMPANY.
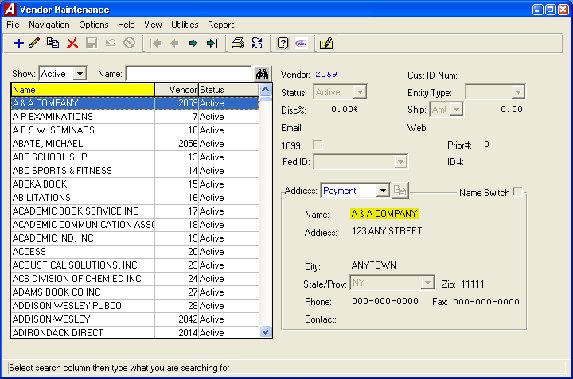
The Vendor Name Change Report is a useful tool in determining if any Accounts Payable checks have been cut to a Vendor who’s Payment Name has been changed on the Vendor Maintenance screen. Double Click the selection from the Accounting Manager - Utilities - Audit Routines menu tree as show below.

The following criteria screen will open for the user to select how the report is to be run - by Vendor Number/Name, for a given date range, and in Summary or Detail.
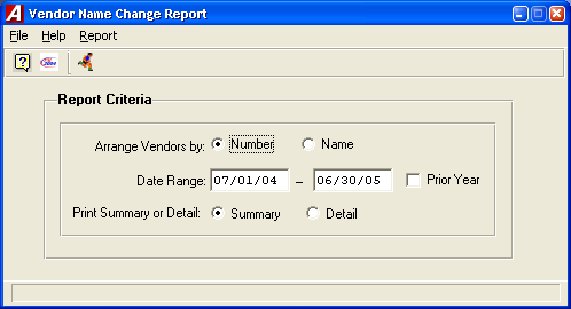
This is the resulting Vendor Name Change Report in Summary. The Vendor Number is listed with the Vendor Name as it appears on the Vendor Maintenance screen as well as the Vendor Name as it printed on the check.
The “Check Type” is “C” for computer.
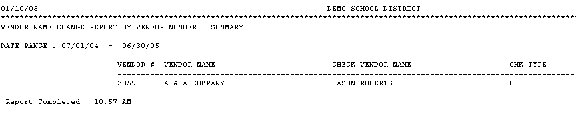
The same report in Detail also includes the Check Number, Check Date, Check Amount, and the User that made the check entry.

NOTE: It is important to note that the check itself will also show on the Warrant with the name that printed on the check - NOT the name that appears on the Vendor Maintenance screen.
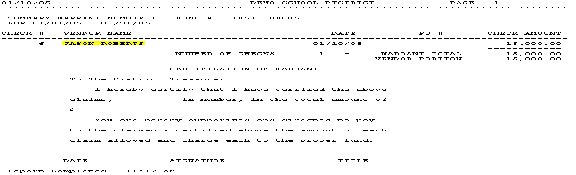
Vendor Payment Limit Report
Double click the Vendor Payment Limit Report choice from the Accounting Manager - Utilities - Audit Routines menu tree as shown below.
The following criteria selection screen will open and allow the user to specify Date Range, Starting Payment Amount, and the report Sort method.

When the report is run with the above criteria, it should yield only those Vendor Payment Totals that are equal to or greater than $10,000.00 during the date range of 07/01/04 through 06/30/05. Review the following report.

This is the same report run with a Starting Payment Amount of $5,000.00.
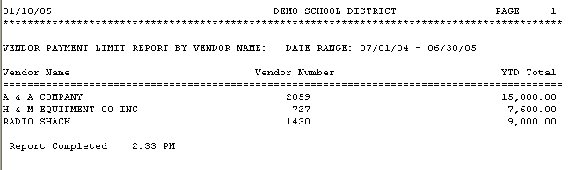
Permissions Report
The Permissions Report audit function was designed to monitor access by users to some of the more crucial functions in Finance Manager in order to maintain proper internal controls.
Double click the Permissions Report choice from the Accounting Manager - Utilities - Audit Routines menu tree as shown below.

Since there is no Criteria window, the following report will be produced automatically.
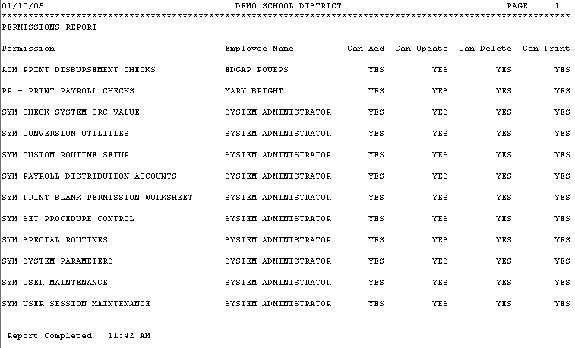
This report will display the users that have access to the Accounts Payable Check Printing process, the Payroll Check Printing process, and all permissions relating to System Manager.
Manual Check Review
Double click the Manual Check Review choice from the Accounting Manager - Utilities - Audit Routines menu tree as shown below.

This report is more or less an Accounts Payable - Manual Check listing that can be run according to the criteria shown below.

If the report is run in Summary, you can include the Check Description if desired. Review the following report.
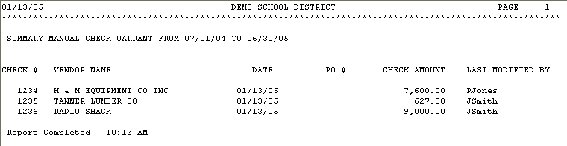
If the report Criteria screen is set to Detail, You can include Check Description, Account Description, and Additional Explanation.

As you can see, the Detail version of the report does show quite a bit more information.
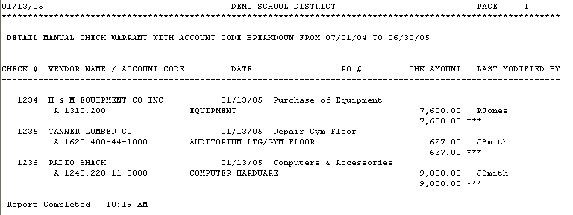
The part of the report where great care should be taken in reviewing is perhaps the Last Modified By column. This could help to determine who, if anyone, has made changes to secure information.
NOTE: The choice to include Additional Explanation will only activate if the System Parameters - Module Options screen is set to Allow Cash Disbursement Detail Descriptions.
BANK RECONCILIATION
Access the Bank Reconciliation Routine from the Accounting Utilities screen.


The following screen opens up.
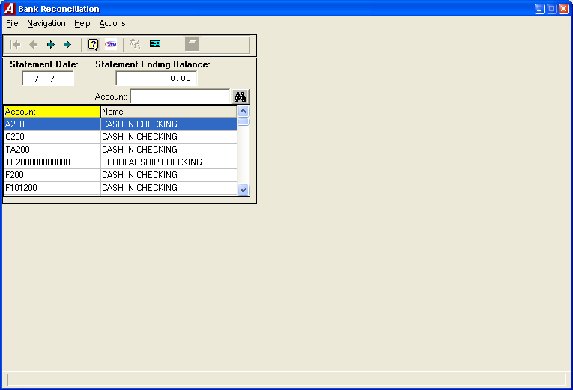
This screen requires the user to enter the “Statement Date” and the “Statement Ending Balance”.
 Press the “Checks” button to continue.
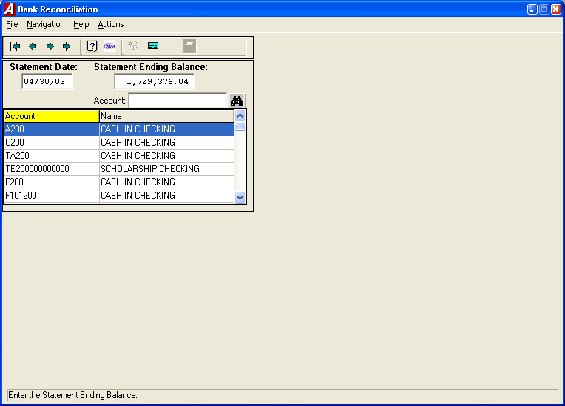
The right side of the screen opens up with a list of all “Uncleared” checks
.

![]() It is important to enter the amount of Deposits that have been made in the month of April, but have not shown up on the Bank Statement.
It is important to enter the amount of Deposits that have been made in the month of April, but have not shown up on the Bank Statement.

Continue by highlighting the check or checks that have been cleared the bank and press the “Clear” button.

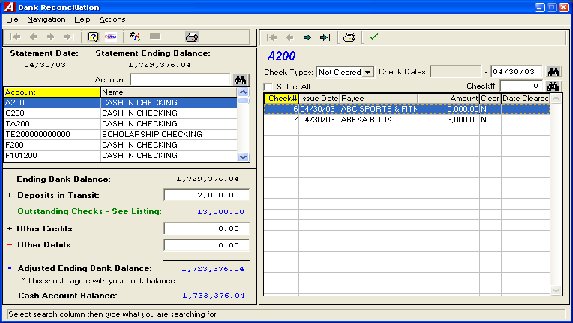
The following screen shows the remaining “Uncleared” check(s).
![]()

Press the “Printer” button to produce the following report.
05/07/03 DEMO SCHOOL DISTRICT PAGE 1
********************************************************************************
Bank Reconciliation
A200 CASH IN CHECKING
Period Ending 04/30/03
04/30/03 Ending Bank Balance: 1,729,376.04
Add Deposits in Transit: 7,000.00
Deduct Outstanding Checks - See Listing: 3,000.00
Add Other Credits: 0.00
Deduct Other Debits: 0.00
------------------
04/30/03 Adjusted Ending Bank Balance: * 1,733,376.04
==================
* This should agree with your book balance
OUTSTANDING CHECK LISTING:
DATE CHECK# PAYEE AMOUNT
---------------------------------------------------------------------
04/30/03 7 ABEKA BOOK 3,000.00
TOTAL: 3,000.00
TOTAL CHECKS: 1
The following is a list of Cash Receipts that have been made in the month of April.
05/06/03 DEMO SCHOOL DISTRICT PAGE 1
***********************************************************************************************************************************
CASH RECEIPT SCHEDULE NUMBER 8 -
APRIL - A FUND - RECEIPTS
REC# DATE ENTRY/ADDITIONAL EXPLAINATION ACCOUNT DEBITS CREDITS
===================================================================================================================================
10 04/15/03 TEST RECEIPT
A 200 450.00 0.00
A 2401 0.00 450.00
----------------------------------------------------------------------------------------------------------------------------------
11 04/30/03 TEST RECEIPT 2
A 200 7,000.00 0.00
A 1001 0.00 7,000.00
----------------------------------------------------------------------------------------------------------------------------------
GENERAL LEDGER TOTALS.................. 7,450.00 0.00
SUBSIDIARY LEDGER TOTALS............... 0.00 7,450.00
RECEIPT ENTRY COUNT - 2
The following is a list of Cash Disbursements that have been made in the month of April.
05/06/03 DEMO SCHOOL DISTRICT PAGE 1
*********************************************************************************************************************************
CASH DISBURSEMENT SCHEDULE NUMBER 13 -
APRIL - A FUND - CHECKS
CHK# DATE VENDOR / EXPLANATION P O # ACCOUNT AMT PAID LIQUIDATED
=================================================================================================================================
6 04/30/03 14 - ABC SPORTS & FITNESS
A2110200772400 10,000.00
**CHECK TOTAL** 10,000.00
7 04/30/03 15 - ABEKA BOOK
A2110480661900 3,000.00
**CHECK TOTAL** 3,000.00
DISBURSEMENT COUNT - 2 SCHEDULE TOTAL..................... 13,000.00 0.00
The following is a “Detail Account Transaction” report through the month of March.
05/06/03 DEMO SCHOOL DISTRICT PAGE 1
****************************************************************************************************************************************
SUMMARY ACCOUNT TRANSACTIONS - A 200 CASH IN CHECKING -
PERIOD COVERED 07/01/02-03/31/03
DATE REF# INV# EXPLANATION SCH DEBITS CREDITS BALANCE
----------------------------------------------------------------------------------------------------------------------------------------
07/01/02 11 OPENING LEDGER ENTRIES JE-1 1,740,000.00 0.00 1,740,000.00
08/31/02 * SEE CASH DISBURSEMENT SCH-4 CD-4 0.00 523.96 1,739,476.04
08/31/02 * SEE CASH RECEIPTS SCH-1 CR-1 1,100.00 0.00 1,740,576.04
11/30/02 * SEE CASH RECEIPTS SCH-4 CR-4 100.00 0.00 1,740,676.04
11/30/02 * SEE CASH DISBURSEMENT SCH-7 CD-7 0.00 1,750.00 1,738,926.04
----------------------------------------------------------------------------------------------------------------------------------------
TOTALS 1,741,200.00 2,273.96 1,738,926.04
Page
1