Intermediate Word Training
MARGINS
Left, Right & First line
You are going to edit this paragraph. First, place the cursor anywhere in this paragraph, then
move the first line margin icon
to the ½ inch mark on the ruler. Notice what happens to the
paragraph indentation. This is a normal ½ inch indentation. If you highlight several paragraphs
you can change them all simultaneously. Now move the
back to 0 and move the left
to the
½ inch mark and note what that does to the format of this paragraph. This is called the hanging
indent. The right
simply controls the right margin.
There are other ways to control the margins. One is to click on File, Page Setup and then the
Margin tab. To control the indents, you can click on Format and Paragraph.
TABS There are five kinds of tabs, each with special properties.
The
left
tab is what we would think of as the normal tab. The cursor jumps to this tab and
when typing begins it acts as a left margin with the word starting there an flowing to the right.
The
right
tab does just the opposite. The cursor jumps to this position but when typing
begins, the tab acts as a right margin and the first letters typed move to the left.
The
centering
tab moves letters to the left or right always keeping the equal numbers of
letters on either side of it.
The
decimal
tab allows the alignment of decimals.
The
bar
tab just leave behind a bar.
Create the following lines with one right tab:
Macbeth................................................................................................... Willy Shakespeare
Lady Macbeth ........................................................................................................ Madonna
Create the following lines using two (2) right tabs and one (1) left tab:
Name_______________________________ Date
_________________________
Subject _____________________________
Period
________________________
Create the following using a right & left tab in the first line and a centering tab in the second:
I hereby grant permission for ______________________ to go on a field trip with you.
(Child’s
name)
1
TABLES
How to Create A Table—There are two ways to create a table:
From the
Table Menu
bar choose
Insert
, then
Table
. Type in the number of columns and rows
that you need—remember a header row if you need one! Click OK. And there is your table!
Or
you can, click on the
Insert Table Icon
on the Standard Tool Bar—
. Click and drag your
mouse to create the size table that you need then let go of the mouse button.
Make a table that is 3 rows by 4 columns. You should get something like this:
Notice that the table that was created goes from the left margin to the right margin and the
columns are evenly spaced.
Move your mouse around slowly (both inside and outside of the table) and note the different
forms that the insertion point takes—
,
ª
,
©
,
w
||
x
,
etc. Each of these has a different meaning
and function. Let’s look at them.
This is a row selector, when you want to highlight a complete row.
ª
This is a column selector, when you want to highlight a complete column.
©
This is a cell selector.
w
||
x
This one changes the size of the column and its cousin which I can’t show you changes
the size of a row—this is only one of several ways to change the size of a cell.
•
Highlight the second row
•
Highlight the third column
•
Highlight the cell in the third column, second row
•
Make the third row narrower
•
Make the second column wider
2
Open the file
table1
:
ID Number
Name
DOB
YOG
BUS NUM
10022
Ruth
3/30/95 2013
159H
10349
Williams
5/8/96 2014
161H
08229
Gehrig
12/19/94 2013
168H
10258
Foxx
3/22/97 2015
10089
Hornsby
1/26/99 2017
10065
Greenberg
10/26/95 2013
155H
09831
Kiner
6/23/95 2013
156H
07891
Musial
3/20/94 2012
160H
10078
Dimaggio
11/2/95 2013
155H
09844
Ott
12/14/93 2012
168H
10298
Keller
1/14/97 2015
10204
Mize
12/23/97 2016
07892
Heilman
7/3/94 2012
148H
09658
Speaker
8/5/98 2016
10330
Wilson
3/15/96 2014
148H
10132
Williams
1/21/99 2017
10131
Averill
3/26/98 2016
09071
Campanella
10/6/95 2013
154H
•
Highlight the first row and center the text.
•
Highlight the table and center everything.
•
Undo center everything
•
Highlight the DOB column and the YOG column and center them.
How To Alphabetize A Table:
Click anywhere in the table
Click Table from the Menu Bar
Click Sort
Under Sort by select Name/Ascending
Click OK
•
Sort the list by DOB Youngest at the top.
•
Sort the list by ID number Largest at the top.
•
Sort by YOG, then by Name
•
Highlight the DOB column and Delete it by Cutting
Select the Table. Click Table/Hide Gridlines
Restore the Grid lines by Selecting the Table and Clicking Table/Show Gridlines
Highlight the name column. Click on the Table Menu Bar and select Insert/Columns to
the left.
Click on a cell near the middle of the table. Click on the Table Menu Bar and select
Insert/Rows Above.
3
Next we will create a table that looks like this one:
New York, NY
Temperature
Time Altitude Low High
We
at
he
r
Create a three column, four row table.
Highlight the table. Click Table/Table Properties/Column. Make the preferred width 1.5
inches.
Highlight the first column. Click Table/Merge Cells. Type the word Weather in this
column.
Click Format/Text Direction and select the proper text orientation.
Highlight the bottom three rows of column two. Click Table/Split Cells. Set the number
of columns to 2 and the number of rows to be 3.
Highlight the bottom three rows of column three. Press the F4 key on the keyboard.
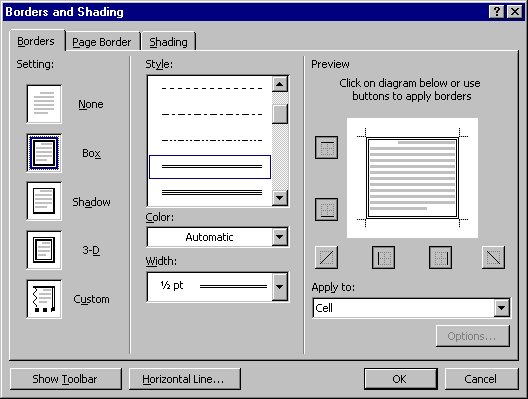
Highlight the first column. Click Format/Borders and Shading/Borders
•
The Setting should be Box
•
The Style should be two lines
•
Color Automatic
•
Width ½ pt
•
Apply to: Cell
Type in the remaining text.
Select columns two and three
Click Format/Borders and Shading/Borders and set a double line around the entire table.
Highlight the cells containing New York and Temperature and put a double line border
around them as well.
Select the twelve cells below New York and Temperature. Click Format/Borders and
Shading. Select a single line style and click once the middle of the preview box.
Select the first column. Click Table/Table Properties/Cell/Center.
Select the table. Click Table/AutoFit/AutoFit to Contents
Select the table. Click Table/Table Properties/Table/Center
4
5
Create a table that looks like this:
Last Week
Current Price
Stocks
High Low Close
AOL TIME WARNER
GEN ELECTRIC
TYCO INTL LTD
EMC CORP/MASS
AT&T WIRELESS S
CONVERTING TEXT TO TABLE
Open Text1
Diane 17 F 121
Andy 17 M 0123
Bob 18 M 124
Helen 18 F 126
Cathy 16 F 1120
George 19 M 1127
Ed 16 M 2125
Fran 18 F 2130
Highlight this data. Click Table/Convert/Text to Table
Add a Header Row by putting the cursor in the first row. Click Table/Insert/Row Above.
Enter appropriate headings.
Back to top