Negotiations Manager


Negotiations Manager 
|
| Navigation Buttons | Function |
| First |
This option is used to highlight the first record in the browser. |
| Previous |
This option is used to highlight the previous record in the browser. For example, if there are five records in the browser and your cursor is highlighting the third record, select the Previous button to highlight the previous (second) record. |
| Next |
This option is used to highlight the next record in the browser. For example, if there are five records in the browser and your cursor is highlighting the third record, select the Next button to highlight the next (fourth) record. |
| Last |
This option is used to highlight the last record in the browser. |
| Print |
This option is used to print a report of one or more earnings schedules. Pressing the Print button displays the Print Selection pop-up box.
Use this window to select the schedule records that you wish to include in the report. 1. Choose the Selected Record option if you want to report on only the earnings schedule that was highlighted in the browser. Choose the All Records option if you want the report to include all existing earnings schedules. 2. Press the OK button to continue the Print process or press Cancel if you do not want to continue the Print process. The Print Field Selection window displays. 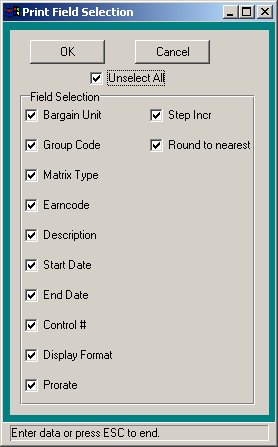
Use this window to select the information that you wish to include for each schedule record in the report. 1. Flag each individual field that you wish to include on the report with a check. You must choose at least one field to print. To include all fields, check the Select All check box. (To remove the check flag from all fields, check the Unselect All check box.) Press the OK button to continue the Print process. The Report Output window displays. This window provides the options of previewing the report, sending the report to the default printer, saving the report to a file, or exporting the report information to Excel. Press Cancel if you do not want to continue the Print process. |
| Refresh |
This option is used to refresh the window to reflect any recent changes that may have been made in any of the salary schedules. |
| Start Search |
This option is used to search for a specific record in the browser. |
| Clear Search |
This option is used to clear out any previously defined search criteria and restore the browser to its original values. |
| Action Buttons | Function |
| Add |
This option is used to add a new salary schedule. |
| Update |
This option is used to update an existing salary schedule. |
| Copy |
This option is used to copy information from an existing salary schedule, increase or decrease salary information as needed, and save it to another newly created schedule. |
| Delete |
This option is used to delete an entire salary schedule. |
| Save |
This option is used to save information entered while adding, updating, or copying salary schedule information. |
| Reset |
This option is used to reset the window back the last saved version. |
| Cancel |
This option is used to cancel the Add, Update or Copy functions. |
| Exit |
This option is used to exit the Schedules function. |
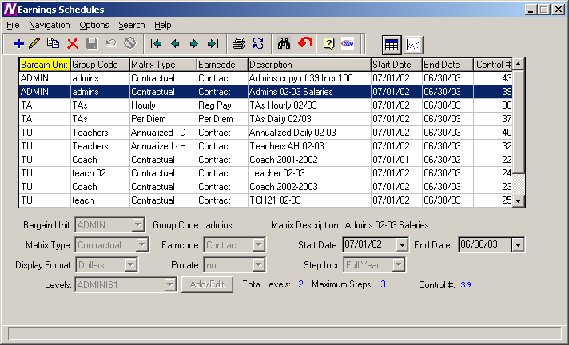
| Field | Description |
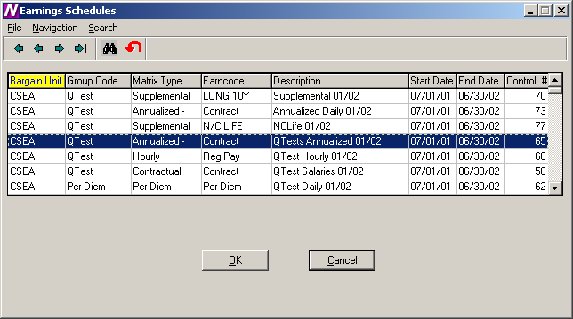
| Bargaining Unit | Enter the code that uniquely identifies the bargaining unit. Bargain Unit Codes are defined in the Bargain Unit Maintenance File in Human Resources. Use the drop-down menu to select from a listing of valid Bargain Unit codes. |
| Group Code | Enter the free-form text (up to 10 characters) that identifies an employee type or group code associated with the specified bargaining unit. This code should allow you to recognize the employee group and bargaining unit associated with the schedule. Example: Clerk00/01 is the salary schedule for Clerks for the fiscal year 2000/2001. |
| Matrix Description | Enter the free-form text (up to 30 characters) that further identifies the salary schedule. |
| Matrix Type | Indicate the salary schedule type. Valid entries are: Contractual, Annualized Daily, Annualized Hourly, Supplemental, Hourly, and Per Diem. Use the drop-down menu to select from a listing of valid codes. You may also type in C, A, S, H, or P or use the up/down arrow keys to change the matrix type. |
| Earncode | Indicate the appropriate earnings code based on the previously selected matrix type. If the Matrix Type is Contractual, Annualized Daily, or Annualized Hourly, the Earncode defaults to Contract and cannot be changed. If the Matrix Type is Supplemental, the Earncode may be any one of the supplemental earnings codes (i.e., Longevity, Credit Hours, etc.) defined in the Earnings Code File. Use the drop-down menu to select from a listing of valid codes. If the Matrix Type is Hourly, the Earncode defaults to Reg Pay and cannot be changed. If the Matrix Type is Per Diem, the Earncode defaults to Per Diem and cannot be changed. |
| Start Date | Enter the effective starting date of the salary schedule. You may simply type the date (in MM/DD/YY format) or use the drop-down menu to select the date from the on-line calendar. |
| End Date | Enter the effective ending date of the salary schedule. You may simply type the date (in MM/DD/YY format) or use the drop-down menu to select the date from the on-line calendar. |
| Display Format | Indicate the display format for the salary schedule. Valid entries are Dollars or Cents. If the Matrix Type is Annualized Daily or Annualized Hourly, the Display Format defaults to Cents. If the Matrix Type is Contract, the Display Format defaults to Dollars. If the Matrix Type is Hourly or Per Diem, the Display Format may be a Dollars or Cents. If the Display Format is Cents, the amount is extended to a decimal value. Example: 24.80. If the Display Format is Dollar, the amount is a flat dollar amount with no decimal extension. Example: 46,029. |
| Prorate | NOTE: This field is only active if the Display Format is Dollars. Enter Y if the salary is to be prorated based on the FTE percentage. Enter N if the salary is not to be prorated. Example: Let’s say that an employee is a 50% FTE in an appointment and is starts out in step 1. Next year, instead of moving them up to the salary associated with step 2, the system will look at the salary schedule and apply the FTE% to the step 1 salary to determine the projected salary. |
| Step Incr | Indicate the step increment for the salary schedule. Valid entries are: Full Year or Half Year. Use the drop-down menu to select from a listing of valid increments. You may also type in F or H or use the up/down arrow keys to change the step increment. For example, if you indicate Half Year and 10 steps, the steps will be .5, 1.0, 1.5, 2.0, 2.5, 3.0, 3.5, 4.0, 4.5, and 5.0 (ten half steps). |
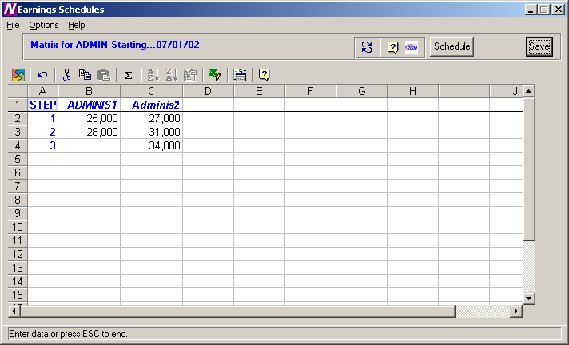
| Levels | Use the drop-down menu to view the existing levels associated with the schedule. Use the Add/Edit button to add and maintain the levels and steps associated with the schedule.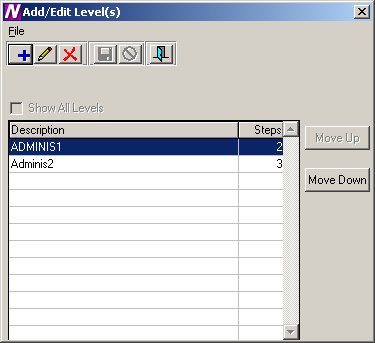 To Add a Step and Level for the Schedule: 1. Select the Add button. 2. Enter the level description (up to 8 characters). Example: Clerk 1, Nurse 1, Admin. NOTE: It is recommended that you enter the Level Description using upper and lower case lettering. 3. Enter the number of steps associated with the level. Each level may have a different number of steps. 4. Press the Save button. NOTE: It is critical that you also press the Save button at the Matrix level (Earnings Schedule window) because you are updating the Matrix when you add or change step/level information. To Update a Step and Level for the Schedule: 1. Select the record that you wish to update. 2. Press the Update button. 3. Make changes as needed. 4. Press the Save button. NOTE: It is critical that you also press the Save button at the Matrix level (Earnings Schedule window) because you are updating the Matrix when you add or change step/level information. To Delete a Step and Level for the Schedule: 1. Select the record that you wish to delete. 2. Press the Delete button. 3. Press the Exit button to return to the Earnings Schedule window. Press the Save button. To Move a Step and Level within the Schedule: 1. Select the Move Up or Move Down button. The column(s) selected are shifted accordingly within the salary matrix. |





| Start | End | Base | Step | Level | Days | Checks | Entitle | Renew
Flag |
Incr Date |
| Current | Contract | 7/1/01 | 6/30/02 | 42,000 | 5 | MA | 200 | 21 | 42,000 | YES | 07/01 |
| Projected | Contract | 7/1/02 | 6/30/03 | 46,000 | 6 | MA | 200 | 21 | 46,000 | YES | 07/01 |
| Start | End | Base | Step | Level | Days | Checks | Entitle | Renew
Flag |
Incr Date |
| Current | Contract | 11/1/01 | 6/30/02 | 42,000 | 5 | MA | 180 | 17 | 37,800 | YES | 07/01 |
| Projected | Contract | 7/1/02 | 6/30/03 | 46,000 | 6 | MA | 200 | 21 | 46,000 | YES | 07/01 |
| Start | End | Base | Step | Level | Days | Checks | Entitle | Renew
Flag |
Incr Date |
| Current | Contract | 7/1/01 | 12/31/01 | 42,000 | 5 | MA | 100 | 10 | 21,000 | NO | 07/01 |
| 1/1/02 | 6/30/02 | 44,000 | 6 | MA | 100 | 11 | 22,000 | YES | 07/01 |
| Projected | Contract | 7/1/02 | 6/30/03 | 48,000 | 7 | MA | 200 | 21 | 48,000 | YES | 07/01 |
| Start | End | Base | Step | Level | Days | Checks | Entitle | Renew
Flag |
Incr Date |
| Current | Contract | 7/1/01 | 12/31/01 | 42,000 | 5 | MA | 100 | 10 | 21,000 | YES | 01/01 |
| 1/1/02 | 6/30/02 | 44,000 | 6 | MA | 100 | 11 | 22,000 | YES | 01/01 |
| Projected | Contract | 7/1/02 | 12/31/02 | 46,000 | 6 | MA | 100 | 10 | 23,000 | YES | 01/01 |
| 1/1/03 | 6/30/03 | 48,000 | 7 | MA | 100 | 11 | 24,000 | YES | 01/01 |
| Start | End | Base | Step | Level | Days | Checks | Entitle | Renew
Flag |
Incr Date |
| Current | Contract | 11/1/01 | 12/31/01 | 42,000 | 5 | MA | 80 | 10 | 16,800 | YES | 01/01 |
| 1/1/02 | 6/30/02 | 44,000 | 6 | MA | 100 | 11 | 22,000 | YES | 01/01 |
| Projected | Contract | 7/1/02 | 12/31/02 | 46,000 | 6 | MA | 100 | 10 | 23,000 | YES | 01/01 |
| 1/1/03 | 6/30/03 | 48,000 | 7 | MA | 100 | 11 | 24,000 | YES | 01/01 |
| Start | End | Base | Step | Level | Days | Checks | Entitle | Renew
Flag |
Incr Date |
| Current | Contract | 10/1/01 | 6/30/02 | 42,000 | 5 | MA | 110 | 14 | 23,100 | YES | 10/01 |
| Projected | Contract | 7/1/02 | 9/30/02 | 44,000 | 5 | MA | 90 | 7 | 19,800 | YES | 10/01 |
| 10/1/02 | 6/30/03 | 46,000 | 6 | MA | 110 | 14 | 25,300 | YES | 10/01 |
