Using Xerox DocuShare 2.2
This User Guide provides basic information about DocuShare 2.2 and detailed instructions for the use
of its features. For specific answers to common problems, see Troubleshooting_DocuShare for quick
answers.
Table of Contents:
1.
Getting Started
Setting up your web browser for use with DocuShare. Also, installation instructions for the
DocuShare File UpHelper Application and the Windows Client.
2.
Becoming a DocuShare User
An introduction to the DocuShare environment.
3.
DocuShare Permissions
Description of the DocuShare permission structure and how to manage objectlevel permissions.
4.
DocuShare Collections
Creating and using DocuShare collections.
5.
DocuShare Files
Creating and using DocuShare files. Instructions for uploading files both through the browser
and with the DocuShare File UpHelper Application.
6.
DocuShare Calendars
Creating and using DocuShare calendars and events.
7.
DocuShare Subscriptions
Creating and using DocuShare subscriptions.
8.
DocuShare URLs
Creating and using DocuShare URLs.
9.
DocuShare Bulletin Boards
Creating and using DocuShare bulletin boards and bulletins.
10. Searching in DocuShare
DocuShare search concepts, instructions for using the main search page and Saved Queries, plus
reference material on query operators and reserved characters.
11. Using the DocuShare Windows Client
Using DocuShare via Windows Explorer.
12. DocuShare ODMA Client
Using the DocuShare ODMA Client with Windows Explorer to access DocuShare from within
Editor Applications. The process of checking files in and out of DocuShare is covered.
13. PaperPort Link to DocuShare
The DocuShare plugin to the Visioneer PaperPort Desktop for local scanning to DocuShare.
14. Appendix: Troubleshooting DocuShare
Encountering problems? Look here for common problems and solutions.
Copyright © 19972000 Xerox Corporation. All Rights Reserved. All Xerox product names mentioned in this document
are trademarks of Xerox Corporation. All other product names mentioned in this document are trademarks of their
respective companies.
P/N 613P08550 3/00
DocuShare 2.2 Users Guide
2
1 Getting Started
DocuShare Overview
Platform Requirements and Options
Platform Requirements
Browser Requirements
Windows Client
Uploading Files
Configuring Your Browser
Disabling Proxies
Setting the Cache Attribute
Helper Applications
DocuShare Client Applications
DocuShare Windows Client
Installing the DocuShare Windows Client
DocuShare UpHelper
Installing the DocuShare UpHelper Application
Manually Configuring the Netscape Browser to Use UpHelper
DocuShare Overview
DocuShare is a Webbased document management system that lets you easily store, access, and
share information in a collaborative work environment. You can maintain information on the
Web without having to understand hypertext markup language (HTML). With DocuShare, users
can create their own accounts and add or delete information without the intervention of a
Webmaster or site administrator.
The information that you store in DocuShare is organized using nested folders called
collections
in DocuShare. Collections may contain other DocuShare objects such as files, calendars, bulletin
boards, URLs and other collections. Any of these DocuShare objects can appear in multiple
collections at once and can be found quickly by using the various DocuShare navigation and
search features.
Some of DocuShare's features are listed below:
DocuShare 2.2 Users Guide
3
•
Users can create and maintain their own accounts and workspaces.
•
You can download files stored on DocuShare to your computer. You can also upload files
from your computer to the DocuShare server.
•
You can mount the DocuShare site as a drive on Windows Explorer and manage files
between the two if you use the Windows Client.
•
You can create and store DocuShare objects such as document files, images, collections
(folders), calendars, subscriptions, saved queries, bulletin boards, and URLs.
•
You can set and maintain access to the files you create without the assistance of a
Webmaster or site administrator.
•
You can easily find new material on DocuShare with the
What's New
feature.
•
You can keep successive versions of a file, track a file's revision history, and lock a file to
prevent multiple simultaneous updates.
•
DocuShare objects can appear in more than one location simultaneously.
•
You can search for objects in DocuShare by date, text, object or document type, etc.
However, DocuShare’s best feature is that you will find it easy to learn and use!
Note: Throughout this manual, all directions to click links, buttons, or icons imply a single
mouse click.
Additionally, all icons and buttons displayed in this manual reflect the default settings of
DocuShare. Your DocuShare Site Administrator may change any of these icons or buttons
to customize the appearance of your site. Contact your DocuShare Site Administrator
regarding any changes due to site customization.
Platform Requirements and Options
DocuShare may be accessed by any standard Web browser. The DocuShare software and
associated files are located on a networked server, not your local computer. With the optional
Windows Client software, DocuShare may be accessed from Windows Explorer instead of or in
addition to using a web browser.
Platform Requirements
You can access and use DocuShare from all computer platforms and operating systems for which
World Wide Web access is available, including:
•
Microsoft Windows (3.x, NT, 95, 98, and 2000)
•
Macintosh
•
Sun, Solaris and SGI (UNIX)
DocuShare 2.2 Users Guide
4
You must have network access to the World Wide Web to access a DocuShare server. You may
encounter some additional usage limitations due to the Web browser you are using or restrictions
imposed by documents created in thirdparty software formats. For example, Microsoft Word
does not run automatically on UNIX.
Browser Requirements
You can access and use DocuShare from a standard World Wide Web browser. Browsers known
to work well with DocuShare are:
•
Netscape Navigator 2.0 and above
•
Microsoft Internet Explorer 3.0 and above
Other browsers may be used but must support tables, "clientside cookies" for login, and the use
of thirdparty helper applications or "viewers" for display of additional content format types such
as word processing, spreadsheet, or presentation files.
Windows Client
If you use Windows 95, Windows 98, or Windows NT 4.0, you can mount DocuShare as a drive
on Windows Explorer and manage files in DocuShare as if they were within Explorer (see
Chapter 11, DocuShare Windows Client).
Uploading Files
DocuShare enables you to upload files from your computer to the DocuShare server, where they
are indexed and managed. Fileupload enabled browsers (such as Netscape Navigator 2.0 and
above, or MS Internet Explorer 4.0) allow you to use your existing browser for all file upload
functions.
To upload files with browsers that do not support the fileupload standard, such as Microsoft
Internet Explorer 3.0, you
must
install the
DocuShare File UpHelper
application on your
personal computer. The DocuShare UpHelper application provides the ability to draganddrop
files from your computer’s file management system and to upload multiple documents at one
time. See the section below DocuShare UpHelper Application for installation instructions.
Note:
The DocuShare UpHelper application is designed for use only with MS Windowsbased
systems. It is not available for the MacOS or UNIXbased systems.
Configuring Your Browser
To use DocuShare successfully, you
must
adjust your browser’s configuration settings. Those
adjustments are:
•
Disable Proxies
•
Enable page updating (set the cache attribute)
•
Check your Helper Application settings
DocuShare 2.2 Users Guide
5
You must also be sure your browser can accept "
cookies
." Some browsers will allow users to
disable this feature. For successful use of DocuShare, your browser
must
accept "
cookies
." See
your Site Administrator for more information on cookies.
In addition, if your browser does not support the fileupload standard, you must also install the
DocuShare File UpHelper Application.
Disabling Proxies
In many corporate networks, a barrier, or firewall, is set up on an internal network (or Intranet) to
restrict the information that flows between the company computers and other external networks
(the Internet). Limited Internet access is provided by a
proxy
server, which sits on the firewall
and provides a pipeline to the Internet. When you use a proxy to access a DocuShare server that
is already on an internal network (or Intranet), you are essentially going out beyond the firewall
and then coming back in
again
to the network.
For the most efficient network response, the preferred method for using DocuShare is to access
the DocuShare server directly through your internal network, therefore bypassing the proxy
server. To do this, you must
turn off proxy access
from the internal network domain. For
example, if your DocuShare server is located in the network domain
sales.acme.com
, you should
configure your browser to
not
use a proxy for the domain
sales.acme.com
.
Note:
If you do not turn off proxy server access settings as described, you may encounter
problems while uploading files to the DocuShare server. Some older proxy servers do not handle
binary file uploads correctly. In that situation, the file uploading procedure may appear to
complete successfully to the user, but no file will appear on the DocuShare server.
Browser
Action
Netscape Navigator
(4.x and 5.x
for
Win95/Win98/NT
)
1.
Go to
Edit
Preferences | Advanced | Proxies
.
2.
Click
Manual Proxy Configuration
; then click
View
.
3.
Type the name of the DocuShare server's domain (e.g.,
sales.acme.com
) in the space for Exceptions.
4.
Click
OK
to return to the Preferences window. Click
OK
again to return to the browser window.
Internet Explorer
(
4.0 for
Win95/Win98/NT
)
1.
Go to
View | Internet Options | Connection
and hit
Advanced button.
2.
In the input field for “
Do not use proxy server for
addresses beginning with,
” type the name of the DocuShare
server's domain (e.g.,
sales.acme.com
).
3.
Click
OK
to return to the Options window.
DocuShare 2.2 Users Guide
6
Internet Explorer
(
5.0 for
Win95/Win98/NT
)
1.
Go to
View | Internet Options | Connection
check the box
for “
Bypass proxy server for local addresses”
then press
the
Advanced
button.
2.
In the input field for “
Do not use proxy server for
addresses beginning with,
” type the name of the DocuShare
server's domain (e.g.,
sales.acme.com
).
3.
Click
OK
to return to the
Internet Options
window and
then click
OK
again.
Setting the Cache Attribute
Most browsers provide caching mechanisms that store Web pages on your local disk and then
retrieve the local files when you reaccess the page. This can significantly increase browsing
speed and reduce network traffic. However, because DocuShare pages are dynamically created
and change frequently, you should configure your Web browser to
not
use a local disk cache
when it connects to your DocuShare server. This will ensure that you always have the latest and
"freshest" version of the DocuShare pages.
Note:
If you do not adjust your cache setting, you may not see recent additions to a collection or
may not even appear to be logged in. Although hitting the
Reload
or
Refresh
button on your
browser will renew your view of the page and correct this situation momentarily, adjusting your
browser's cache options will prevent you from constantly reloading pages manually.
Browser
Action
Netscape Navigator
(
4.x for Win95/NT
)
In
Options | Network Preferences | Cache
, set
Check Documents
to “
Every Time
.”
Netscape Navigator
(
5.x for Win95/NT
)
In
Edit |
Preferences | Advanced | Cache
, set
Check Documents
to “
Every Time
.”
Internet Explorer
(
4.0 for Win95/NT
)
In
View | Internet Options | General |
Temporary Internet Files
, click the Settings
button and set to “
Every visit to the page
.”
Internet Explorer
(
5.0 for Win95/NT
)
In
View | Internet Options |
At
General
tab, press
Settings
button under
Temporary Internet Files
,
set
Check for newer versions of stored pages
to
“
Every visit to the page
.”
Using Helper Applications
DocuShare only provides a repository for your files. It is actually your Web browser software
that determines how a file that you download from DocuShare is handled.
All Web browsers automatically interpret and display pages that have been created in HTML.
However, Web browsers do not automatically display other proprietary formats, such as
DocuShare 2.2 Users Guide
7
Microsoft Office applications, PDF, and so on. When a browser retrieves a file with a file format
that it cannot interpret, the browser uses a separate
viewer
to display that file. The viewer can be
either:
•
A
helper application
, such as Microsoft Word, which may launch inside or
outside of the browser window, or
•
A
plugin
, which launches inside the browser window.
A
helper application
is a particular application such as Word, PowerPoint, Excel, or the
Acrobat Reader, which is automatically launched to display the selected file. For example, when
accessing a Word file, if your browser's helper application is properly configured, your Web
browser will automatically start Microsoft Word and use it to display the Word file.
A
plugin
is a software program that extends the capabilities of your browser in a specific way,
giving you, for example, the ability to play audio samples or view video movies from within
your browser. Plugins are primarily used for multimediatype applications.
Note:
If your browser is not configured for a particular helper application, most newer browsers
will display a dialog box to help you to make these settings each time you encounter an
unrecognized file type. This is much easier than the manual configuration process described
below and should be used whenever possible.
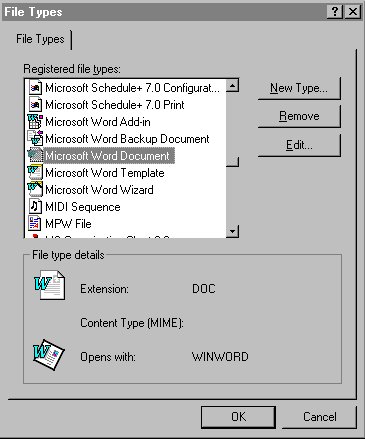
Manual Browser Configuration of Helper Applications
If necessary you may configure your browser manually. Use the following procedures to set up
the helper applications for Microsoft Word, Excel, and PowerPoint and the Adobe Acrobat
Reader. The process to configure your browser for other file types is similar. Contact your local
Site Administrator for the correct MIME type and subtype settings for your DocuShare server.
Browser
Action
Netscape Navigator
(
4.x for Win95/NT
)
1.
Go to
Options | General Preferences | Helpers.
(For Netscape 4.0, go to
Edit | Preferences | Navigator |
Applications
.)
2.
Check to see if the following file types are listed.
For Word
: application/msword
For Excel
: application/msexcel
For PowerPoint
: application/mspowerpoint
For Adobe Acrobat
: application/pdf
You may have to scroll to find the file type you are looking for.
3.
If the file type you want is listed, select it. If the file type you
want is not listed, click
Create New Type
and type
application
for the File/MIME Type. For the
Subtype
, type one of the
following, depending on the application you are setting up:
For Word
:
msword
For Excel
:
msexcel
For PowerPoint
:
mspowerpoint
For Adobe Acrobat
:
pdf
DocuShare 2.2 Users Guide
8
4.
In the File Extensions box, type the appropriate file extension(s)
for the associated application:
For Word
:
doc, dot
For Excel
:
xls
For PowerPoint
:
ppt
For Adobe Acrobat
:
pdf
5.
If Launch the Application is not selected or the application's icon
is not present, do the following:
•
Click
Launch the Application
.
•
Click
Browse
and select the appropriate application:
Word (WINWORD.EXE), Excel (EXCEL.EXE),
PowerPoint (POWERPNT.EXE), or Adobe Acrobat
Reader (ACROREAD.EXE or ACRORD32.EXE).
6.
Repeat steps 3 5 for each helper application you want to set up.
7.
Click
OK
to exit. In Netscape 2.0, also click
Save Options
on
the Options menu.
DocuShare Client Applications
DocuShare Windows Client
The DocuShare Windows Client is an application that allows you to access and manage
DocuShare files from within Windows Explorer. Once installed and mounted (see Installing the
DocuShare 2.2 Users Guide
9
DocuShare Windows Client), DocuShare will show up as another drive on your regular Explorer
tree structure. Using the Windows Client, you can access and interact with DocuShare just as
you would with your local or network drives. For example, you can view the contents of
DocuShare collections, open and edit files, copy files to and from (or within) DocuShare by
dragging and dropping, and even use a combination of Explorer and the web interface to manage
files. For further information, see Chapter 11, DocuShare Windows Client. You can also access
DocuShare files from within your editor applications (e.g., Microsoft Word) using the ODMA
Client to check documents in and out of DocuShare. See Chapter 12, DocuShare ODMA Client.
In addition, desktop scanning is supported with the PaperPort Link to DocuShare within the
Visioneer PaperPort Desktop. See Chapter 13, PaperPort Link to DocuShare.
Note
: You must have either Windows 95, Windows 98, Windows NT 4.0 or higher to use the
DocuShare Windows Client.
Installing the DocuShare Windows Client
To install the Windows Client:
1.
You can get the Windows Client by going to the
Help
section of DocuShare. From there,
click on
DocuShare Windows Client
. Follow the directions: Select your operating
system (Windows 95, Windows 98 or NT 4.0), and then download the installation file
and save it to a temporary location on your computer.
2.
Select the downloaded installation file and doubleclick on it to initiate the installation.
This file is a selfextracting file. The installation process will start. It will also prompt
you for a location to install the Windows Client files, usually C:\Program
Files\Xerox\DSClient. If that directory does not exist, the installation program will create
it automatically. Optionally, you can select browse to choose where you want to install
the Windows Client files.
3.
Follow the rest of the onscreen dialog boxes to complete the Windows Client
installation. The ODMA Client installs as part of the Windows Client and works in
conjunction with the Windows Client. You can disable the ODMA Client if you wish: see
Configuring Options in Chapter 11.
4.
When you restart your computer (as prompted by the onscreen dialog box), you will see
the DocuShare icon show up in the Windows Explorer tree diagram:
DocuShare UpHelper
The
DocuShare File UpHelper Application
is a Windows application that enables file
uploading to DocuShare for older Windows systems. It provides support for users of browsers
such as Internet Explorer 3.0, which do not support the file upload standard. The maximum
number of files you may upload at a time using this helper application is 100.
DocuShare 2.2 Users Guide
10
Netscape Navigator 2.0 and Microsoft Internet Explorer 4.0 support the file upload standard;
however, they only allow the upload of one file at a time. If you are using either of these
browsers and anticipate uploading multiple files during a session, you may also want to install
UpHelper or the DocuShare Windows Client.
To use UpHelper, you must:
•
Download and install the application from your DocuShare server's Help page.
•
If necessary, configure your browser to use the UpHelper application as one of its
recognized helper applications. (This will normally occur automatically during
installation.)
•
Edit your DocuShare User properties to indicate use of the Upload Helper application.
See “DocuShare Users” in Chapter 2 for information on this setting.
Note:
The DocuShare UpHelper application is designed for use only with MSWindowsbased
systems. It is not available for the MacOS or UNIXbased systems. Because it is designed for
older systems, support for the DocuShare UpHelper will be discontinued at the end of 2000.
Installing the DocuShare UpHelper Application
To install the UpHelper Application:
1.
You can get the DocuShare UpHelper Application by going to the
Help
section of
DocuShare. From there, click on
FileUpload Helper Application
. Follow the
directions: Select your operating system (Windows 95, NT 4.0, NT 3.x, or Windows 3.x)
then download the installation file and save it to a temporary location on your computer.
2.
Select that installation file in your file management system and doubleclick on it to
initiate the installation. This is a selfextracting file. The installation process will start. It
will also prompt you for a location to install the UpHelper files, usually C:\DSUpHelper\.
If that directory does not exist, the installation program will create it automatically.
3.
The UpHelper installation program will detect which browser you are using (Netscape or
Internet Explorer) and will configure your browser to use UpHelper. If you have both
Netscape and Internet Explorer installed on your machine, the installation program can
configure both browsers during this process.
4.
Follow the rest of the onscreen dialog boxes to complete the UpHelper installation.
Manually Configuring the Netscape Browser to Use UpHelper
Although the UpHelper installation process will configure both Netscape and Internet Explorer
to use the UpHelper application, in case of any problems, please refer to these directions for
manually configuring the UpHelper to work with the Netscape browser.
Required settings for configuring UpHelper to work with Netscape Navigator 3.0:
1.
Go to
Options | General Preferences | Helpers
.
DocuShare 2.2 Users Guide
11
2.
Click
Create New Type
and fill in the two fields:
•
Mime Type
: application
•
Mime SubType
: xsenddocusharefiles
Select
OK
to exit the dialog box.
3.
Fill in
File Extensions
: dfu.
4.
In the
Action
area, select
Launch the Application
.
5.
Click on the
Browse...
button; locate and select the UpHelper application on your
computer, for example: C:\DSUpHelper\Uphelper.exe.
6.
Select
OK
to exit the Options dialog window.
DocuShare 2.2 Users Guide
12
2 Becoming a DocuShare User
User_Overview
DocuShare Objects
Object Services
•
Properties
•
Permissions
Navigating a DocuShare Site
DocuShare Home Page
DocuShare Collection Pages
What's New
DocuShare Navigation Bar
•
Login
•
Accounts
•
Contents
•
Search
•
New
•
Help
DocuShare Users
User Accounts
Viewing User Properties
Editing User Properties
Changing Your User Name or Password
DocuShare Groups
Creating a User Group
Viewing Group Properties
Editing Group Properties
Change Owner of a Group
Mailing to all Group Members
Deleting a User Group
Overview
DocuShare is a webbased document management system that allows users to store, access and
manage information and files in a
Community –Maintained
TM
repository using a standard web
browser or Microsoft Windows Explorer. Anyone who can access the server can download
existing files and upload new files. They can also create and manage storage areas, group
calendars, bulletin boards and other tools to facilitate group communications over a network.
DocuShare 2.2 Users Guide
13
A DocuShare site is composed of
objects
that are presented in the familiar model of nested
directories or folders. These folders are called
collections
. Any file, collection, subscription,
calendar or bulletin board created in DocuShare is a unique object with an object identifier called
a
handle
. That unique identifier stays with the object forever, even when you edit or move it.
You will find in time that this comes in handy when setting bookmarks or sending people
pointers to your information.
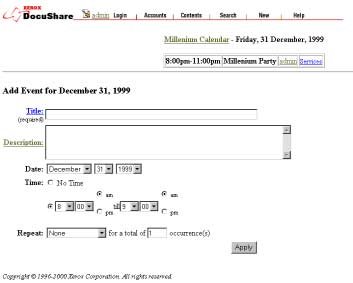
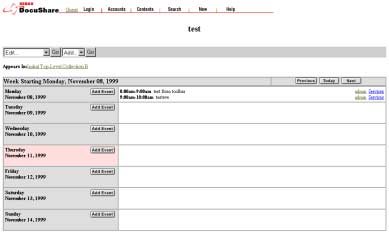
A typical collection page in the default configuration, entitled “Millennium,” is shown above.
Your site administrator has the ability to customize the DocuShare site and configuration
significantly, so remember, appearance and/or behavior of the site could be vastly different
depending on what is required or desired by users.
Since it is impractical to cover all possible customizations, this User Guide will focus on general
usage and supply default configuration examples. If your DocuShare site is highly customized,
your site administrator may have a personalized user guide describing functionality of the tailor
made site.
In the default configuration (and most customizations), DocuShare pages will have a
navigation
bar
at the top to provide access to general DocuShare utilities such as accounts, search, and help.
Below that is the collection's title and summary. The contents of the Summary field will appear
below the object’s title on the page in which the object appears. Below the title and summary are
the pulldown menus, which offer various options. The
Edit
Menu
allows you to view and/or
change certain aspects of the collection, or even delete the collection (Writer or Manager access
is required for some options). The
Add... Menu
allows you to add content to the collection:
files, URLs, bulletin boards, calendars, etc. (Writer access is required to add content.)
Below the pulldown menus is the collection's
Appears In
list, which provides pointers to all
collections in which this collection appears. Any DocuShare object may appear in more than one
location at the same time. Finally, there is a list of the collection's content, which may include
other collections, or files, URLs, calendars and bulletin boards.
DocuShare 2.2 Users Guide
14
DocuShare pages contain a variety of links that make navigating through the site easy. A few
common usage tips include:
•
Click the name of an object to view the object.
•
Click the collection’s folder icon or the collection's title to open a collection.
•
Click the
Appears In
link to go up a level in the hierarchy.
•
Click the object's
Services
icon to see more information about an object. The displayed
Services
page lists the properties of the object, and an
Edit pulldown menu,
which
provides further options for that object.
There are other navigation methods, such as a tableofcontents view and an extensive search
utility, to help you get around the DocuShare site. No matter which combination of navigational
tools you use, you will find your way easily around a DocuShare site.
DocuShare Objects
As a document management and sharing environment, DocuShare provides a rich set of services
and utilities for defining, editing, and tracking
File
objects. You can store and manage files
regardless of their format. For more information on files, see Chapter 5, DocuShare Files.
The object types you can create from within DocuShare are listed below:
DocuShare Icon
Object
User
– A registered user of DocuShare.
Group
– An assembly of one or more DocuShare users and/or other
groups.
Collection
– The DocuShare equivalent of a folder.
Calendar
– An online Calendar. Calendars also hold
Event
objects.
URL
– A World Wide Web address (URL).
Bulletin Board
– An online Bulletin Board. Bulletin Boards also hold
Bulletin
objects.
Saved Query
– A saved search query that will display the results of that
query each time it is opened.
Subscribe (Immediate)
Allows users to subscribe to DocuShare content
and be notified by email
immediately after
changes occur.
Subscribe (Daily)
Allows users to subscribe to DocuShare content and
be notified by email when changes occur via
daily summary reports
.
DocuShare 2.2 Users Guide
15
Subscribe (Weekly)
Allows users to subscribe to DocuShare content
and be notified by email when changes occur
via weekly summary reports.
Note:
Collections, Calendars, and Bulletin Boards are considered
container
objects because
they can hold other objects.
Object Services
Every object in DocuShare has
Services
that are available to you, such as viewing/editing object
properties, editing access permissions, deleting the object, or changing its location. Some objects
may have extra services available (e.g., locking and versioning for files). To access the services
for any object, click on its
Services
icon
, located to the right of the object title in a collection
listing.
When you click on Services, the
Services Page
will appear, listing the properties for that object
and an Edit pulldown menu, which provides access to other options. A typical Services page for
a DocuShare file is displayed below.
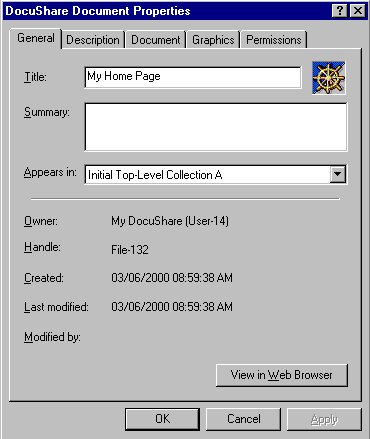
Properties
Properties, as shown above, further describe the object by giving information, such as title,
summary, description, owner, date of creation, date of last modification, and keywords. Some
DocuShare 2.2 Users Guide
16
properties (e.g., Title) may be edited if you have the proper permission, while others (e.g.,
Creation Date) are fixed.
To change or edit properties, select
Edit Properties
from the
Edit
pulldown menu on the
Services page, and the
Edit [
Object
]
page will appear. Make changes as you wish and then press
the
Apply
button; the
Services
page will reappear showing the property changes you made.
Fixed properties (e.g., Creation Date) will not show up on the
Edit [
Object
]
page.
You may view or edit the properties of container objects without clicking on the Services icon by
selecting
View Properties
or
Edit Properties
from the
Edit
pulldown menu. You must be
inside the container object to do this (e.g., viewing a collection page). Regardless of how you
access the View Properties/Service page of an object, you need Writer or Manager level access
to edit properties.
Permissions
Access depends on the
permission
status you have in regards to the object. The owner (creator)
of an object – not the site administrator – assigns
permissions
for that object.
Permissions
establish security for the DocuShare site. Differing levels of permission or access allow various
privileges regarding DocuShare objects. For example, if you have
Reader
access, you can view
an object but not modify it or its properties. For more information on permissions, see Chapter 3,
DocuShare Permissions.
Navigating a DocuShare Site
DocuShare Home Page
The DocuShare default home page provides the initial
entrance
to your DocuShare site and
contains links to one or more toplevel or "root" collections that contain other subcollections.
There are also links to the accounts, the login screen, the site map, and information
About
DocuShare
. Your DocuShare Site Administrator can easily customize the DocuShare home
page, so your server's home page may be different. Contact your Site Administrator for
information on the customization of your DocuShare site.
The home page also features the What's New in DocuShare feature, which helps you to find out
what has been added to DocuShare recently.
DocuShare Collection Pages
DocuShare uses a series of collections and subcollections to organize content. These collections
are connected together through root collections in much the same way other file management
systems use root folders and subfolders to organize content. One important difference is that any
DocuShare object may exist within more than one collection at the same time, thus leveraging
the Web’s powerful hypertext capabilities.
DocuShare 2.2 Users Guide
17
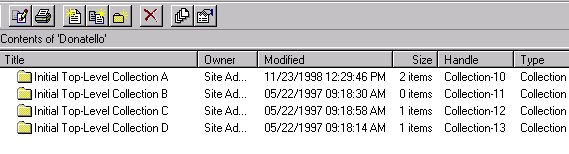
Each collection in DocuShare has a separate page. The example below shows some of the basic
elements found on every collection page. Customization may change the appearance of a
collection page to create a distinct look; however, these elements are typical:
1.
A
Navigation Bar
with links to commonly used features, including Login, Accounts,
Contents, Search, New, and Help.
2.
The
Title
of the collection.
3.
An optional
Summary
of the contents of the collection. An optional
description
can also
appear below this summary. The contents of the Summary field will appear below the
object’s title on the page in which the object appears.
4.
A
menu
bar
with pulldown menus that have selections for the operations that you can
perform on the collection, including deleting the collection, viewing the properties, and
adding content.
5.
The
collection content
. This content includes other DocuShare objects such as additional
collections, files, URLs, calendars, or bulletin boards.
Like collections, the site administrator can customize objects, but the information listed below
for each object is typical of what will appear:
−
An object icon
−
Title of the object
−
Summary information about the object (if any)
−
The owner of the object
−
The creation date (date object added to DocuShare)
−
The numbers of items (collections only) or the file size (files only)
To open a collection
, just click on its title or folder icon. The collection page will open.
Similarly, DocuShare
calendars
and
bulletin boards
open by clicking on their title or icon.
Other objects perform differently when clicked.
−
When you click on a URL object, you will move (within your browser window) to the
indicated URL link.
−
When you click on a file icon, one of two things may occur:
1.
If your browser is configured to use that file’s native applications as a helper
application, the helper application will open and your file will be displayed.
2.
Other file types, such as executable files (.exe) or compressed files (.zip) may
display a dialog box to allow you to save them to your hard drive.
DocuShare 2.2 Users Guide
18
How these events occur is determined by your browser settings
,
not by DocuShare
. For more
information on helper application settings, see Helper Applications in Chapter 1.
Note:
Having your helper applications configured properly is
essential
for successful use of
DocuShare.
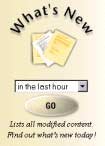
What’s New
One of DocuShare's most popular features is
What's New
.
What's New
allows you to see recent
additions to DocuShare over a time frame that you can select
−
t he last hour, today, the last 2
days, the last 3 days or the last 4 days. The extent of the listing that you see is dependent upon
your loggedin status and the access permissions of the newly added object.
To find out what's new in DocuShare:
1.
In the
What's New
area on the DocuShare home page, select a time frame from the pull
down menu. Time frame selections are: in the last hour, today, in the last 2 days, in the
last 3 days, or in the last 4 days.
Note:
You can also select
New
in the navigation bar at the top of any page to access a
similar listing. This may restrict the What's New listing to new objects in the current
collection.
2.
Click
Go
. A list of new and modified DocuShare objects appears. Only those objects for
which you have at least Reader access appear.
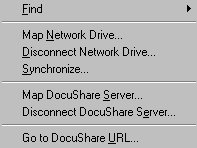
DocuShare Navigation Bar
The default
navigation bar
appears at the top of each DocuShare page. It provides the following
links:
•
DocuShare
or
site
icon – Links to the DocuShare site home page (unless you are already
on the home page). May appear as a different icon unique to your DocuShare site.
•
Loggedin User –
Links to the loggedin user’s services page.
DocuShare 2.2 Users Guide
19
•
Login
– Links to the
DocuShare Login
page, where you can enter your DocuShare user
name and password to log in.
•
Accounts
– Links to the
DocuShare Community Registry
where you can log in, create
a DocuShare user account, create a user group, list all registered DocuShare users and
groups, or search for a registered DocuShare user.
•
Contents
– Displays a tableofcontents view of the entire site when selected from the
home page. If selected while in a collection, displays a similar view of the current
collection and its subcollections.
•
Search
– Links to the
DocuShare Search
page, where you can search for specific
information within the DocuShare site. If selected while in a collection, you can restrict
the search to the contents of the current collection.
•
New
– Lists all objects that have been added to DocuShare within a time period you
select.
If selected while in a collection, you can restrict the listing to all new additions to the
current collection.
•
Help
– Links to the
DocuShare Help Desk
, which includes the
DocuShare User Guide
.
Access to the
DocuShare File UpHelper Application
and
Windows Client
installation
files are also available from the Help Desk page.
Login
Logging in
to DocuShare gives you greater privileges on the DocuShare site. Until you log in,
you have only limited
Guest
access. You only need to log in to DocuShare once per browser
session. You remain logged in even if you minimize your browser window.
Note:
If you are not logged in to DocuShare and you try to perform a restricted operation, such
as accessing a protected file or submitting information, you will see a "Not Authorized" message.
You will also be provided an opportunity to log in.
To log in to DocuShare:
1.
From the top navigation bar (any location in DocuShare), click the
Login
link. The
DocuShare Login
page appears.
2.
Type your user name and password, then click
Login
. Remember that your user name
and password are casesensitive.
3.
The
Login Successful
page appears. If you make a mistake and see the "Invalid
password" or "Invalid user name" error message, click
Back
in the browser to return to
the DocuShare Login page and try again.
4.
Click the
Click here to continue
link to complete the login process.
DocuShare 2.2 Users Guide
20
The DocuShare page you started from appears. You are now logged in to DocuShare. Your user
name should appear in the navigation bar.
Logging out of DocuShare
You are automatically logged out of DocuShare when you close your browser session. To ensure
the security of your documents, you should log out of DocuShare if you plan to leave your
computer unattended and/or the screen unlocked.
To log out of DocuShare:
1.
From the top navigation bar (any location in DocuShare), click the
Login
link. The
DocuShare Login
page appears.
2.
Click the
Logout
link. The
Logout Successful
page appears.
3.
Click the
Click here to continue
link.
The DocuShare page you first started with appears. You are now logged out of DocuShare. The
word
Guest
is displayed in the navigation bar instead of your user name. As a guest, you can still
browse the DocuShare repository, but you can no longer add content or update information.
Accounts
The
Accounts
link displays the
DocuShare Community Registry
. In this registry you can:
•
Log in as an existing user. See the previous section “Login” for details.
•
Create a new user account. See “Creating a User Account” for details.
•
List all registered users.
•
Search for a registered user.
•
Create a new user group. See “Creating a User Group” for details.
•
List all registered groups.
Note:
Depending on the access policies set by your Site Administrator, some or all of these
features may not be available.
You can access the DocuShare Community Registry using one of two methods:
•
Click the
Accounts
link from the navigation bar at the top of every DocuShare page.
•
Click
Login
on any page, and then click
Accounts
at the bottom of the page.
Follow the links for each option listed to perform the desired task within the Community
Registry. The
List All Registered Users
or
List All Registered Groups
options provide an
DocuShare 2.2 Users Guide
21
alphabetical list of all registered users or groups. The
Search for a Registered User
option
allows you to search the user listing to find a particular user.
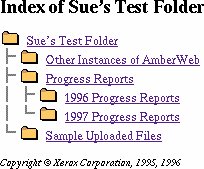
Contents
The
Contents
link provides a tableofcontents view of DocuShare collections. If accessed from
the home page, it provides a view of the entire DocuShare repository. If selected while in a
collection, it displays a similar view of the current collection and its subcollections. You can
click on any object within this index to access it. An example of this tableofcontents view is
shown below.
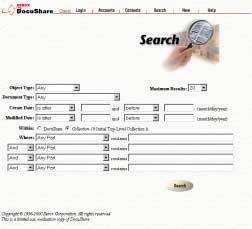
Search
Search
provides the ability to search for any item within the DocuShare site. If selected from the
home page, it will search the entire site. If selected while within a collection, the search can be
restricted to just that collection. For more information on searching, see Chapter 10, “Searching
in DocuShare” for more details.
New
Provides the same functionality as the “
What's New
” feature on the home page, but can be
accessed anywhere within the DocuShare site. When selected from the home page, it presents a
listing of all new items added to the site within the selected time frame. If selected while in a
collection, the
What's New
listing can be restricted to just that collection. See “What's New” for
more details.
Help
Help
provides access to the
DocuShare Help Desk
−
i nformation sources to help DocuShare
users with problems encountered while using DocuShare. The
Quick Reference Guide
and the
more extensive
DocuShare User Guide
can be found there. There is also a link to contact the
Site Administrator to report any unusual problems.
Help also provides access to the installation files for the
DocuShare Windows Client
along with
instructions for
DocuShare File UpHelper Application
installation.
DocuShare Users
A
user
is a registered user of DocuShare. They are represented in the
What's New
listing by a
icon.
DocuShare 2.2 Users Guide
22
User Accounts
Although you can browse through the DocuShare site and view many documents contained
there, you cannot write to the site or view restricted content without obtaining a
user account
.
Registered users of a DocuShare site can add content, create personal or workgroup collections
and view documents not available for viewing by guests of the site.
When you create a user account in DocuShare, that process creates a user record with
information such as your name, email address, phone number, DocuShare user name, and
DocuShare password (known only to you). This can provide a convenient resource to assist other
users in contacting you. You can update this information at any time by editing your user
properties.
Note:
In the default setting for DocuShare, any guest can create a user account. Your DocuShare
Site Administrator can alter this policy by restricting user account creation to only other
registered users of the site or to the Site Administrator. Check with your DocuShare Site
Administrator for the user account creation policies for your site.
To create a user account:
1.
From anywhere in DocuShare, click the
Accounts
link in the toolbar at the top of the
page. The
DocuShare Community Registry
page appears.
2.
Click the
Create a New User Account
link. The
Create User
page appears.
Note:
If you do not see the
Create a New User Account
link on this page, your Site
Administrator has restricted the ability to create new accounts. Contact your Site
Administrator for assistance.
3.
Fill out the fields on the
Create User
page. Refer to the table below for descriptions of
each field.
Note:
If you are unsure of the purpose of a field while creating this user account, you
can click on the highlighted field name for a brief Help description of the field.
4.
When completed, click the
Add User
button at the bottom of the page. The
Login
Successful
page appears.
Note:
DocuShare automatically logs you in after creating a new user account.
5.
Click the
Click here to continue
link.
The
Create User page
has the following properties:
Property
Description
First Name
(Optional) Together with the Last Name field, provides your name for display
purposes in DocuShare.
Note:
This is not the name you use to log in to DocuShare; you specify your login
name in the User name field.
Last Name
Together with the First Name field, provides your name for display purposes in
DocuShare 2.2 Users Guide
23
DocuShare.
This is a required field.
Note:
This is not the name you use to log in to DocuShare; you specify your login
name in the User name field.
Email
Address
(Optional) Specifies your fully qualified email address. Used to send an individual
mail message to you or when sending email to a DocuShare group of which you are
a member. Your email address must be specified in full Internet format (for
example, fred_smith@sales.acme.com).
Email Format
Specifies your prefered format when receiving email from DocuShare. Some mail
environments, such as Microsoft Outlook, support the use of HTMLformatted mail.
If you are using an HTMLcapable mail reader, select
HTML
. Otherwise, select
Plain Text
, which works for all mail readers.
Home Page
(Optional) Specifies the URL (Uniform Resource Locator) for your personal Web
home page, if you have one. The URL must be a fully qualified address including
the “http://” (for example:
http://somemachine.domain.companyname.com/~user.html).
Mailing
Address
(Optional) Specifies your street address or an internal mailstop (for example, M/S
12851E). For display purposes only.
Phone
(Optional) Your phone number or extension. For display purposes only.
Use Helper
for Upload
The
Use Helper for Upload
attribute specifies when to use the DocuShare File
UpHelper application. It may be set to one of three values:
•
Never
– Never use UpHelper. Files are uploaded via the browser's file upload
function if it is an uploadcapable browser.
•
When Necessary
– The browser is used when possible; otherwise the Upload
Helper is used.
•
Always
– Always use UpHelper, never the browser. This setting is required if
you use an uploadenabled browser but still wish to use UpHelper because of
its ability to upload multiple files.
For more information on the DocuShare File UpHelper Application, please see
“DocuShare UpHelper” in Chapter 1.
Organization (Optional) Specifies your internal workgroup organization. For display purposes
only.
User name Specifies the name you use to log in to DocuShare.
This is a required field.
This entry is casesensitive. When you log in to DocuShare you
must
type your user
name exactly as you enter it in this field.
Note:
DocuShare user names and passwords are unique in the DocuShare system;
they are not the same as your user name and password for any other system (for
DocuShare 2.2 Users Guide
24
example, Novell). Logging in to DocuShare does not log you into the Novell
network and vice versa.
Password Specifies the password you use to log in to DocuShare.
This is a required field.
This entry is casesensitive. When you log in to DocuShare you
must
type your
password exactly as you enter it in this field. The password does not expire.
Note:
DocuShare user names and passwords are unique in the DocuShare system;
they are not the same as your user name and password for any other system (for
example, Novell). Logging in to DocuShare does not log you into the Novell
network and vice versa.
Password
Again
Requires you to type your password a second time for confirmation.
This is a
required field.
Note:
There may be additional properties displayed on this page that are not listed here. They are
specific to your DocuShare site. See your Site Administrator for details.
Note:
If you forget your DocuShare password, do not reregister as a user. Instead, contact your
local DocuShare Site Administrator for assistance.
Viewing User Properties
You can view the properties of a user at any time. You do not need to be logged in to view user
properties. However, you must be logged in to DocuShare to perform any editing functions that
can be accessed through the Services page.
There are two ways to access a user's
Services
page, depending upon your location:
•
Click on the user's user name anywhere in the DocuShare site. This could be as a logged
in user in the Navigation Bar or as the listed owner of a DocuShare object.
•
Click on the
Accounts
link in the Navigation Bar. In the
DocuShare Community
Registry
, select
List All Registered Users
. Select the name of the user from this listing.
User properties include:
•
The first name and last name of the user.
•
The email address of the user.
•
The user's home page (if any).
•
The user's mailing address, phone number and organization.
•
The user groups that list this user as a member. To see the properties for any of these
groups, click on their name.
•
The user's user name.
•
The user's Use Helper for Upload property.
DocuShare 2.2 Users Guide
25
Note:
There may be additional properties displayed on this page that are not listed here. They are
specific to your DocuShare site. See your Site Administrator for details.
All of these properties (except groups and user name) can be
modified
by the user through the
Edit Properties
function. To edit the user's
User name
, use the
Change User name
function.
The
Services
page provides access to editing functions using these selections in the pulldown
menu area:
•
Edit Properties
– Edit your user properties.
•
Change Password
– Change your password.
•
Change User name
– Change your user name.
Note:
These editing functions are
only
available to the registered user listed or the Site
Administrator. A user cannot edit another user's properties.
Editing User Properties
You can edit any user property after initial creation. You must be logged in as the registered user
to edit your user properties. You cannot edit another user's properties.
To edit your properties:
1.
View your user properties:
•
Click on your user name anywhere in the DocuShare site. This could be as a logged
in user in the Navigation Bar or as the listed owner of a DocuShare object.
•
Click on the Accounts link in the toolbar at the top of each page. In the DocuShare
Community Registry, select List all Registered Users. Select your name from this
listing.
The
User
Services
page appears, showing the user properties.
2. Click the
Edit Properties
selection in the
Edit…
pulldown menu. The
Edit User
page
appears.
3. Edit the information. Refer to the property descriptions in the previous table for details.
Note:
If you are unsure of the purpose of a field while editing these properties, you can
click on the highlighted field name for a brief Help description of the field.
4. Click the
Apply
button. The
User Services
page for the user appears. The properties
have now been updated to reflect your changes.
Changing Your User Name or Password
To change your Password:
DocuShare 2.2 Users Guide
26
1. View your user properties (see instructions above).
2. Click the
Change Password
selection in the
Edit…
pulldown menu. The
Change User
Password
page appears.
3. Your First Name, Last Name and User name will display. In the entry box for
Old
Password
, type in your current password. In the entry box for
New Password
, type in
your new password. In the entry box for
New Password Again
, type the new password
again. Both entries are case sensitive.
4. Click the
Apply
button. The
Services
page for the user appears. Your password has now
been changed.
To change your User name:
1. View your user properties (see instructions above).
2. Click the
Change User name
selection in the
Edit…
pulldown menu. The
Change
User name
page appears.
3. Your First Name, Last Name and current User name will display. In the entry box for
Password
, type in your current password. In the entry box for
New User name
, type in
your new user name. Both entries are case sensitive.
4. Click the
Apply
button. The
User Services
page for the user appears. Your user name
has now been changed.
DocuShare Groups
A
group
is an assembly of one or more DocuShare users and/or other groups into a distinct unit.
They are represented in the
What's New
listing by an
icon.
Creating a User Group
When you are working with more than a few individuals or documents, creating a user group
makes it easier to maintain access permissions for a group of users. You must be logged in to
create a user group.
To create a user group:
1. From any location in DocuShare, click the
Accounts
link in the Navigation Bar. The
DocuShare Community Registry
page appears.
2.
Click the
Create a New Group
link. The
Create Group
page appears.
3.
Fill out the
Create Group
page. Refer to the property descriptions in the table below for
details.
DocuShare 2.2 Users Guide
27
4.
To
Add Members
to the group, select a user or group from the scrolling list. To make
additional selections, press the CONTROL key while selecting the additional users or
groups.
Note:
Use the CONTROL key for MS Windowsbased Operating Systems only.
Substitute the Command (or Apple key) key for the MacOS. UNIXbased systems
require no special key for this multiple list item selection.
5.
Click the
Add Group
button at the bottom of the page. The
Group Services
page
appears. The new group is now registered in DocuShare.
The
Create Group
page has the following properties:
Property
Description
Group Name
Contains a descriptive name for the permission group (for example, PIT
Members).
This is a required field.
This name will be used in all menus when
selecting, viewing, or editing the group. Choose a name that reflects the function
of the group.
Summary
(Optional) Contains a short description of the group being created in DocuShare
(for example, Members of Process Improvement Team). The contents of the
Summary field will appear below the object’s title on the page in which the object
appears.
Change
Membership
If you select Owner, only the owner of the group (the user who created the group
in DocuShare) can change the membership of the group. If you select Group
Members, the specified members of the group can change the membership of the
group. The default is Owner.
Members
Use this scrolling list to specify the members of the new group. The list shows the
names of all registered DocuShare users and groups.
If you select user
Anyone
, any user (including guests) browsing the DocuShare
repository is automatically a member of the group.
Note:
There may be additional properties displayed on this page that are not listed here. They are
specific to your DocuShare site. See your Site Administrator for details.
You can list all of the currently registered DocuShare groups from the
DocuShare Community
Registry
. Click the
Accounts
link on any DocuShare page to go to the Registry, then click the
List All Registered Groups
link to view the
Current DocuShare Groups
page.
Viewing Group Properties
You can view the properties of a group at any time. You do not need to be logged in to view
group properties. However, you must be logged in to DocuShare to perform any editing
functions that can be accessed through the Services page.
DocuShare 2.2 Users Guide
28
To access a group's
Services
page, click on the
Accounts
link in the Navigation Bar. In the
DocuShare Community Registry
, select
List All Registered Groups
. Select the name of the
group from this listing.
Group properties include:
•
The title and summary of the group.
•
The group's identifying object number (handle), the owner of the group and the date and
time of creation and last modification.
•
Whether the Owner or the Members can change group membership.
•
The members of the group. To see the user properties for any of these users, click on their
name.
Note:
There may be additional properties displayed on this page that are not listed here. They are
specific to your DocuShare site. See your Site Administrator for details.
All of these properties (except the object ID and the creation/modification dates/times) can be
modified
by the owner of the group through the
Edit Properties
function. You can also use this
function to add new members to the group or remove members from the group. To edit the
Owner
of the group, use the
Change Owner
function.
The
Group Services
page provides access to editing functions, using these selections in the
Edit…
pulldown menu:
•
Delete
– Delete this user group.
•
Edit Properties
– Edit the properties of this group.
•
Change Owner
– Changes the owner of the group.
•
Mail To
– Send a mail message to all members of the group.
Editing Group Properties
You can edit the properties of a DocuShare user group at any time by selecting
Edit Properties
from the
Edit…
pulldown menu on the Group Services page. Editing group properties also
allows you to add or remove members from a group. You must be the owner of the group to edit
its properties. You must also be logged in to DocuShare.
To edit the properties of a group:
1. From any location in DocuShare, click the
Accounts
link. The
DocuShare Community
Registry
page appears.
2. Click the
List All Registered Groups
link. The
Current DocuShare Groups
page
appears with the names of all groups registered in DocuShare.
DocuShare 2.2 Users Guide
29
3. Click the name of the group you want to update. The
Group Services
page for the
specified group appears.
4. Click
Edit Properties
from the
Edit…
pulldown menu. The
Edit Group
page appears.
5. Edit the group information. Refer to the property descriptions in the previous table for
details.
6. Use the
Add Members
and
Remove Members
scrolling lists to add or remove members
from the group. To make additional selections, press the CONTROL key while selecting
the additional users or groups.
Note:
Use the CONTROL key for MS Windowsbased Operating Systems only.
Substitute the Command (or Apple key) key for the MacOS. UNIXbased systems
require no special key for this multiple list item selection.
7. Click the
Update Group
button at the bottom of the page. The
Group Services
page for
the group appears. The properties of the group are updated to reflect your edits.
Change Owner of a Group
If you are the owner of a group, you can transfer ownership of the group to another user. You
must be logged in to DocuShare.
To change ownership of a group:
1. View the properties for the group.
2. Click the
Change Owner
selection in the
Edit…
pulldown menu.
3. Select a user from the
New Owner
scrolling list.
4. Click the
Apply
button.
The group now reflects the change in owners.
Mailing to all Group Members
You can send an email message to all members of a DocuShare user group if:
•
Each group member correctly specified his or her full email address in his or her
DocuShare User Properties.
•
Your Web browser has a properly configured mail client. See your System
Administrator for information on configuring Web browser mail clients.
To send an email message to a user group:
1. From any location in DocuShare, click the
Accounts
link. The
DocuShare Community
Registry
page appears.
DocuShare 2.2 Users Guide
30
2. Click the
List All Registered Groups
link. The
Current DocuShare Groups
page
appears with the names of all groups registered in DocuShare.
3. Click the name of the group to which you want to send mail. The
Group Services
page
for the group appears.
4. Click
Mail To
in the pulldown menu. The
Send Mail to Members
of <
>
page appears.
5. Click the
To compose an email message to the group, click here
link. The mail
group
name
client composition window appears.
6. Type the message and fill in the Subject field. The Recipients list is already filled in with
the addresses of the DocuShare group members.
7. Click
Send
. The message is sent to the members of the DocuShare user group.
Deleting a User Group
Only the loggedin owner of a user group or a DocuShare site administrator can delete the group.
To delete a user group:
1. From any location in DocuShare, click the
Accounts
link. The
DocuShare Community
Registry
page appears.
2. Click the
List All Registered Groups
link. The
Current DocuShare Groups
page
appears with the names of all groups registered in DocuShare.
3. Click the name of the group you want to delete. The
Group Services
page appears.
4. Click
Delete
in the
Edit…
pulldown menu. The Confirm Deletion page appears.
Note:
If you change your mind, click
Back
in the browser to close the Delete Object
page.
5. Click
Delete
. The
Delete Successful
page appears, and the group is deleted from
DocuShare.
DocuShare 2.2 Users Guide
31
3 DocuShare Permissions
Overview of Object Permissions
Viewing and Editing DocuShare Object Permissions
Adding Users and Group s to an Object's Access List
Unifying DocuShare Object Permissions
Changing an Object's Owner
Working with WriteOnly Objects
Overview of Object Permissions
Every DocuShare object has a set of associated permissions called its
Access Control List
.
Permissions
are the authorization level that a defined set of users or groups has to view, delete
or modify a DocuShare object. These object permissions are not assigned or maintained by the
Site Administrator; rather, they are maintained by the owner of the object or any user with
Manager level access to the object.
There are three permission categories:
•
Reader
– Allows the user or group to read the contents of a file or object and view its
associated properties and permissions. The user can open a file from the DocuShare site and
can also save this file to their local computer. However, a user with only Reader access to an
object cannot change its properties or add new content. No writing or editing of any kind is
granted by Readerlevel access. Users will only see objects in collection, Contents or
What’s New listings for which they have Readerlevel access.
•
Writer
– Allows the user or group to edit an object’s properties and add new objects to a
container object (e.g., a collection). Writer level access to an object does not grant
permission to delete it or edit its permissions. Granting users or groups Writer permission
without granting them Reader permission enables advanced features like blind submission
collections, but requires that special steps be taken to make those features accessible. See
the section entitled Working with WriteOnly Objects at the end of this chapter.
•
Manager
– Grants the user or group full read/write access to the object. In addition to
read/write permission, a Manager can delete the object and edit its access permissions.
Users with Manager permission can also change ownership rights of an object from its
current owner to another user.
DocuShare 2.2 Users Guide
32
The user who initially creates an object in the DocuShare repository, known as the
owner
,
receives automatic Manager level permission after creating the object. The owner can now assign
which users and groups can access the object and what level of access they have to this object.
Permissions are assigned at the individual object level.
You specify permissions using one or more user names, group names, or both. When you are
working with more than a few individuals or objects, user groups can make creating and
maintaining access permission lists easier. A user group is a named set of users and/or groups.
See Creating a User Group in Chapter 2 for more information on creating a user group in
DocuShare.
Permissions work with your logged in status on DocuShare. If you are not logged in to
DocuShare, you are considered a Guest and the user name
Guest
appears on each page.
Guests
cannot add objects or perform any edit operations
.
Within access permissions, the user
Anyone
represents anyone accessing a DocuShare object,
either a loggedin user or a guest. Granting write access to
Anyone
gives any logged in user
write permission; Guest is always denied edit capability. For example, if you give Reader and
Writerlevel access to Anyone for a collection, then user Mary Smith can view the contents of
the collection, even if she is not logged in (i.e., a guest). However, if Mary Smith wants to add an
object to that collection, she must log in. If she is not logged in, when she attempts to add that
object, DocuShare will present a warning message stating that Guest cannot perform that
operation. It will also present a login box to allow the user to log in and complete the operation.
The user will only be able to complete adding the object if they have Writer access permissions
to the object.
Object permissions can be inherited from higherlevel parent or
container objects
. Collections,
Calendars, and Bulletin Boards are considered container objects because they hold other objects.
Calendars hold
Events
, Bulletin Boards hold
Bulletins
, and Collections hold every other type of
DocuShare object, including other collections. By initially setting the access permissions for a
higher level container object, any object subsequently added to that container object
automatically
inherits
those higherlevel permissions from the container object.
For example, if you create a collection and give user Joe Smith both Reader and Writer access to
the collection, then any object (e.g., file, Collection, Calendar, or Bulletin Board) subsequently
added to that collection
automatically
contains Reader and Writer access permissions for user
Joe Smith. Inheriting permissions from container objects can be a very powerful tool to quickly
set access permissions for new DocuShare objects.
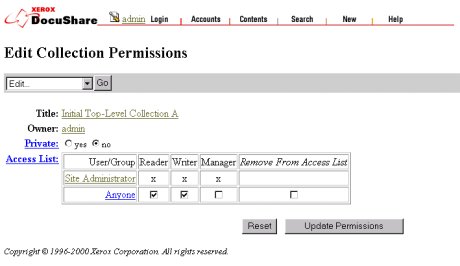
Viewing and Editing DocuShare Object Permissions
To view the current permissions on a DocuShare object, click on the
Services
icon for the object,
then click
Permissions
in the
Edit…
pulldown menu. If you have Manager access permissions
to the object, you see the
Edit Permissions
page (shown below). Otherwise, you see the
View
Permissions
page, a readonly version of the same information. You must be logged in to
DocuShare to edit permissions in any manner.
DocuShare 2.2 Users Guide
33
The
Permissions
page has the following properties:
Property
Description
Title
Displays the title or name of the DocuShare object.
Owner
Displays the current owner of the DocuShare object.
Private
Specifies whether the title of the DocuShare object will appear in a search result.
Yes
allows only users with Reader access to see the object in a search results list.
No
lists
the object's title, summary, and owner information in the search results list, regardless
of the user's access rights.
Users without Reader access to the objects will not be able to view the object and its
properties, but will have enough information to contact the owner for access
permission rights.
Access List
Lists users and/or groups that have access to the object and the associated
permissions:
•
Reader:
The user can view the contents of the object and the associated
properties, but cannot edit them.
•
Writer:
The user can edit the object content and associated properties, as well
as add new file versions.
•
Manager:
The user can delete, view, and edit the object and its permissions,
delete the object, and change the object's owner. The owner always has
managerlevel access and is therefore not an editable entry in the access list.
DocuShare 2.2 Users Guide
34
To edit the permissions of an object in DocuShare:
1. At the DocuShare object whose permissions you want to change, click the
Services
icon.
The
Services
page appears.
2. Click the
Permissions
selection in the
Edit…
pulldown menu. The
Permissions
page
appears. If you have Manager level access, you can edit the contents of the page.
3. Click any check box to select or deselect Reader, Writer, or Manager access for a user or
group. A check mark means that the corresponding access right apply.
4. Click the check box
Remove From Access List
to remove a user or group from the
access list.
5. Click
Update Permissions
to finalize your changes. Click
Reset
to cancel your changes.
Adding Users and Groups to an Object's Access List
To add users and groups to an object's access list:
1.
At the DocuShare object whose permissions you want to change, click the
Services
icon.
The
Services
page appears.
2.
Click the
Permissions
selection in the
Edit…
pulldown menu. The
Permissions
page
appears. If you have Manager level access, you can edit the contents of the page.
3.
Click the
Add to Access List
selection in the
Edit…
pulldown menu.
4.
Select one or more users or groups from the
Add Members
list. This is a list of users
who are currently not members.
5.
Click
Add Members to Access List
.
At first, the users and groups that are added to the access list appear without new access rights.
Follow the steps in the previous section to grant specific access rights to the new users or groups.
Unifying DocuShare Object Permissions
Occasionally, you may change the permissions for a higherlevel container object (Collection,
Calendar, and Bulletin Board). Perhaps you may want to add a new user or extend wider access
to another user or group. However, the objects within that container object will not reflect those
new permissions. You can edit the permissions for each object individually, but that process can
be timeconsuming and error prone, especially if there are a large number of objects within that
container object. DocuShare provides the
Unify
command to make this process easier.
Edit the permissions on the higher level DocuShare container object, then select
Unify
to set the
permissions for all objects within that higher level container object to inherit the revised
permission settings. However, if you do not have Manager level access to an object,
Unify
will
not change permissions for that object. DocuShare will list those objects as it performs the Unify
command. Permissions for these objects must still be edited individually by someone with
Manager access permission.
DocuShare 2.2 Users Guide
35
To unify object permissions:
1. At the DocuShare collection, click the
Services
icon. The
Collection
Services
page
appears.
2. Select
Permissions
from the
Edit…
pulldown menu. The
Edit Collection Permissions
page appears. Make any changes that are necessary at this time.
3. Select
Unify
from the
Edit…
pulldown menu on the
Edit Collection Permissions
page.
Note:
The
Do not unify objects that are also located elsewhere
option means that the
Unify command will not apply to objects that are also located outside of the set being
unified. Leave this option checked to prevent the changes performed by the Unify
command from propagating into other areas of the DocuShare repository.
4. Click
Unify
.
Changing an Object's Owner
Users with Manager access to an object can change the object's owner at any time. The default
owner is the user who initially created the object in DocuShare. While all Managers of an object
have the same permissions as its owner, it is the owner's name that is shown whenever the object
is displayed or an unauthorized access is attempted.
To change an object's owner:
1.
At the DocuShare collection, click the
Services
icon. The
Collection
Services
page
appears.
2.
Select
Permissions
from the
Edit…
pulldown menu. The
Edit Collection Permissions
page appears. Make any changes that are necessary at this time.
3.
Select
Change Owner
from the
Edit…
pulldown menu on the
Edit Collection
Permissions
page.
4.
Select a new owner from the
New Owner
list. You can only select one owner.
5.
Click
Apply
.
Ownership of the object is assigned to the new owner. The previous owner is added to the
object's access list and is automatically given Reader, Writer, and Manager access permissions.
Working with WriteOnly Objects
Because Reader and Writer permissions are independent, DocuShare offers the ability to grant
writeonly access to objects. The primary use of this feature is to create container objects that
allow users to add content while preventing them from seeing what other users have added. For
example, a “Suggestions” bulletin board can be created that allows users to privately add their
suggestions for improving the company. This bulletin board could even be made anonymous by
granting write permission only to a special anonymous account to which submitters must log in
DocuShare 2.2 Users Guide
36
prior to making their suggestions.
Because users with writeonly access to an object cannot open it or even see it, they are unable to
reach the object’s regular
Add...
menu. Submission to writeonly objects requires going directly
to the desired edit form. For example, to add a new bulletin to a writeonly bulletin board called
BulletinBoard16, a user must go to:
http://docushareserver/dscgi/ds.py/Add/BulletinBoard16/Bulletin
This link can be made available to users as a DocuShare URL, or as a link on a custom web
page. For blind submission to collections, the link is similar. For example, to add a file to
Collection47, users would go to:
http://docushareserver/dscgi/ds.py/Add/Collection47/File
DocuShare 2.2 Users Guide
37
4 DocuShare Collections
Adding a Collection
Viewing Collection Properties
Editing Collection Properties
Deleting a Collection
Re
stor
ing a Deleted Collection
Editing the Location of a Collection
A
collection
is the DocuShare equivalent of a folder. A collection is represented by an
icon.
Collections are considered
container objects
, which means that they can hold other DocuShare
objects (e.g., other (sub)collections, documents or application files, bulletin boards, URLs, or
calendars).
Adding a Collection
You can add a collection to any location in DocuShare to which you have at least Writer access
permissions. However, you must be logged in to DocuShare to create a collection.
To create a collection:
1.
From the location in DocuShare where you want to add a collection, select
Add
Collection
from the
Add...
pulldown menu. The
Add Collection page
appears.
2.
Fill out the fields on the
Add Collection
page. Refer to the table below for descriptions
of each field.
Note:
If you are unsure of the purpose of a field while creating the collection, you can
click on the highlighted field name for a brief Help description of the field.
3.
Click the
Apply
button to complete this process. The collection is created in DocuShare
and the
Services
page for the collection appears.
The
Add Collection page
has the following properties:
Property Description
Title Specifies a descriptive title for the collection. The title can contain spaces and other
punctuation marks. You should assign a meaningful title to the collection.
This is a
required field.
Summary (Optional) Specifies a brief description of the collection. The contents of this field
are displayed below the collection title. Use the Description field to provide a more
DocuShare 2.2 Users Guide
38
detailed description for the collection.
Description (Optional) Contains a detailed description of the collection. The contents of this
field are displayed below the collection title and summary on the DocuShare
collection page. The Description field can contain HTML markup to customize the
collection's appearance. (See the Troubleshooting section for cautions about using
some HTML markup categories)
Keywords (Optional) This field should contain any
Keywords
associated with this object.
Keywords help to categorize documents and allow for more accurate searching.
Simply type in a series of words in the field.
Show Search
Tool
Enables users to enter simple search queries directly within a collection page,
without having to go to the more sophisticated DocuShare Search facility. Searches
may be for content anywhere on the site, or limited to the contents of the current
collection. When
Show Search Tool
is set to
No
, the search tool will not be
displayed for that collection.
View Format Indicates how its contents should be displayed. The
Detailed Listing
setting
provides a traditional file folder list view. The
Images
setting provides a thumbnail
view of image files and a large icon view of other content types. Thumbnails will
be generated for GIF, JPEG, TIFF, BMP, PNG, and Targa file formats.
Note:
There may be additional properties displayed on this page that are not listed here. They are
specific to your DocuShare site. See your Site Administrator for details.
You can verify that the collection was created by clicking the
Appears In
link to move you up
one level in the collection hierarchy. The collection should now be listed with a
icon. If you
don't see the collection, click
Reload
on your browser to refresh the page display.
Note:
After creating the collection, you should adjust the
access permissions
for the collection
to make sure they provide the desired level of access for other users and groups. See the section
Viewing and Editing DocuShare Object Permissions
in Chapter 3 for more information on
adjusting these permissions.
Viewing Collection Properties
You can view the properties of a collection at any time. You do not need to be logged in to view
the collection properties. However, you must be logged in to DocuShare to perform any editing
functions that can be accessed through the Services page.
There are two ways to access a collection's
Services
page, depending upon your location:
1.
While in an open collection, select
View Properties
from the
Edit…
pulldown menu, or
2.
In a higherlevel collection listing, click on the
Services
icon to the right of the collection
listing.
DocuShare 2.2 Users Guide
39
Collection properties include:
•
The title, summary and description of the collection
•
Keywords to enhance searching
•
The collection's identifying object number (handle), the owner who created the
collection and the date and time of creation and last modification
•
An image, called
logo
, that can appear at the top of the collection page
•
A background image for the collection page
•
The sort order of objects contained within the collection
•
The location of this collection within the collection hierarchy of the DocuShare site
(
Appears In
property). All DocuShare objects may appear in one or more locations
•
The collection search tool, which enables users to enter simple search queries directly
within a collection page
•
The collection's format, which indicates how its contents should be displayed
Note:
There may be additional properties displayed on this page that are not listed here. They
are specific to your DocuShare site. See your Site Administrator for details.
All of these properties (except the object ID, the creation/modification dates/times, and
collection location) can be edited or modified by the owner of the collection or a user with
Writer access permissions through the
Edit Properties
function. To edit the
Appears In
property (collection location), use the
Edit Location
function.
The
Collection Services
page provides access to editing functions, using these selections from
the
Edit…
pulldown menu:
•
Edit Properties
– Edit the properties for this collection. You must be the owner of the
collection or have at least Writer access permissions to edit collection properties.
•
Permissions
– View the access permissions for this collection. If you are the owner or have
Manager access permissions, you can also edit the access permissions from here.
•
Edit Location
Change (move) or add locations for this collection. You must be the owner
of the collection or have at least Writer access permissions to change collection locations.
See the section Editing the Location of a Collection
in this chapter for more information.
Editing Collection Properties
DocuShare 2.2 Users Guide
40
Many of the Properties of a collection can be edited or modified after initial creation. You must
be the owner of the collection or have Writer access permissions to edit the properties for a
collection. You must also be logged in to DocuShare.
In addition to editing properties such as title, summary and description, you can also change the
sort order of the objects contained within a collection, add an image that will appear at the top of
a collection page, or add an image that will appear as the background for the collection page.
To edit the properties of a collection:
1.
Go to the edit page for this collection:
•
If located in the open collection, select
Edit Properties
from the
Edit…
pulldown
menu. The
Edit Collection
page appears.
•
Within a higherlevel collection listing, click on the
Services
icon to the right of the
collection listing. The Services page appears. Select
Edit Properties
from the
Edit…
pulldown menu. The
Edit
Collection
page appears.
2.
Edit the information. Refer to the descriptions in the table below for details on the
properties that can be edited through this function.
Note:
If you are unsure of the purpose of a field while adding a collection, you can click
on the highlighted field name for a brief Help description of the field.
3.
Click the
Apply
button. The
Services
page for the collection appears. The properties
have now been updated to reflect your changes.
The
Edit Collection
page has the following properties:
Property
Description
Title
Specifies a descriptive title for the collection. The title can contain spaces and other
punctuation marks. You should assign a meaningful title to the collection.
This is a
required field
.
Summary
(Optional) Specifies a short description for the collection. The contents of this field
are displayed below the collection title. Use the Description field to provide a more
detailed description of the collection.
Description
(Optional) Specifies a detailed description for the collection. The contents of this
field are displayed below the collection title and summary on the DocuShare
collection page. The Description field can contain HTML markup to customize the
collection's appearance. (See the Troubleshooting section for cautions about using
some HTML markup categories)
Keywords
(Optional) Lets you associate one or more words with the collection. Keywords
help categorize the different collections and streamline searches.
Logo
(Optional) Contains a URL that points to a .GIF or .JPG image that is displayed at
DocuShare 2.2 Users Guide
41
the top of the collection page. You can specify any valid URL. If you want to use
an image that is already in DocuShare, you can supply the file handle (object ID#)
for that image (for example, File3072), and DocuShare automatically converts the
file handle into the correct URL for the image.
Background
Image
(Optional) Contains a URL that points to a .GIF or .JPG image that is displayed as
the background of the collection page. You can specify any valid URL. If you want
to use an image that is already in DocuShare, you can supply the file handle (object
ID#) for that image (for example, File3073), and DocuShare automatically
converts the file handle into the correct URL for the image.
Sort Order
Specifies the sort order for the contents of the collection by type and title, type and
date, date only, or title only. The default sort order is by type and title.
Show Search
Tool
Enables users to enter simple search queries directly from a collection page,
without having to go to the DocuShare Search page. When
Show Search Tool
is set
to
No
, the search tool will not be displayed for that collection.
View Format
Indicates how the collection contents should be displayed. The
Detailed Listing
setting provides a traditional file folder list view. The
Images
setting provides a
thumbnail view of image files and a large icon view of other content types.
Note:
There may be additional editable properties displayed on this page that are not listed here.
They are specific to your DocuShare site. See your Site Administrator for details.
Deleting a Collection
Only the owner of a collection or a user with Manager access can delete a collection from
DocuShare. You must be logged in to delete a collection from DocuShare.
Unlike the more familiar filemanagement model that requires you to select an item before you
delete it, DocuShare requires that you must open or be within a collection in order to delete it.
This ensures that you view the contents of the collection prior to deletion.
If you choose to delete a collection that contains other objects, you will be given the choice to
delete the collection and all objects contained within the collection or to delete just the
collection. Deleting a collection without deleting its contents will orphan the contents of the
collection. Orphaned objects still exist within DocuShare but are not accessible to users. Only a
Site Administrator can recover orphaned objects.
Note:
Your collection will not be deleted if it contains objects that you do not own or do not
have Manager access permission.
To delete a collection:
1. Open the collection that you want to delete.
2. Select
Delete
from the
Edit…
pulldown menu.
DocuShare 2.2 Users Guide
42
3. If there are no objects in the collection, the
Confirm Deletion
page appears. Select the
Delete
button to delete the collection.
If the collection contains other objects the
Delete
page appears. This page lists the
number of objects in the collection that will be deleted. It also lists the number of objects
that will not be deleted because of insufficient access rights or because they appear in
other locations.
•
To delete the collection and its contents, select the
Delete Object and Contents
button.
•
To delete just the collection, select the
Delete Just this Object
button.
Note:
If you change your mind about deleting this collection, use the
Back
button on
your browser to close the Delete or Confirm Deletion page.
4. The
Delete Successful
page appears. Click the
Click here to continue
link.
The collection is now deleted. You may need to
Reload
the page to see these changes.
Restoring a Deleted Collection
If you inadvertently delete a collection from the DocuShare repository, the Site Administrator
can easily restore it for you. All deleted content is sent to a trashcan accessible only to the Site
Administrator. If you mistakenly delete an object, you must contact the Site Administrator and
provide him/her with the required information. The Site Administrator is responsible for purging
the recycle bin on an asneeded basis. After purging, you will be unable to restore items deleted,
so be sure to notify the Site Administrator of deletion restorations as soon as possible.
Editing the Location of a Collection
The
Edit Location
command allows a user to move a DocuShare object from one location to
another or allows the object to appear in multiple locations within the DocuShare repository.
You must have at least Writer access to the object to change its location.
The location of an object is displayed in the
Appears In
property, which is displayed at the end
of each
Properties
listing for an object. Using the
Edit Location
command allows you to edit
the
Appears In
property.
This is a helpful command if you have created a collection (or any other DocuShare object) in
the wrong location and want to move it instead of deleting it and then recreating it. It is also
helpful if you would like the same object to appear in one or more additional locations. All
DocuShare objects can appear in multiple locations at once. However, there is actually only one
physical copy of the object in the DocuShare database; the system simply creates additional
pointers or references to the object.
A negative side effect of this command is that if used incorrectly, you can orphan the object.
Orphaned objects still exist within the DocuShare repository but are not accessible to users. Only
a Site Administrator can recover orphaned objects.
DocuShare 2.2 Users Guide
43
To edit the location of a collection:
1.
From an open collection, select
Edit Location
from the
Edit…
pulldown menu. The
Edit Collection Location
page appears.
2.
For the
Appears In
field, a scrolling list is displayed that contains all DocuShare
collections to which you have at least Writer access. The collection's current location is
highlighted.
•
To move an object, select the collection where you wish to move this object. The
previous location will be deselected.
•
To have an object appear in multiple locations, press the CONTROL key while
selecting the additional locations.
Note:
Use the CONTROL key for MS Windowsbased Operating Systems only.
Substitute the Command (or Apple key) key for the MacOS. UNIXbased systems
require no special key for this multiple list item selection.
Note:
Use caution when deselecting locations. Deselecting improperly can create
orphaned files. Be sure that at least
one
location is selected in the scrolling list before
selecting the
Update Locations
button.
3.
Click the
Update Locations
button.
The Services page for that collection now appears and the new location(s) is/are displayed in
Appears In
. If you don't see this change reflected on the Services page, click
Reload
on your
browser to refresh the page display.
DocuShare 2.2 Users Guide
44
5 DocuShare Files
Overview
Adding Files to DocuShare
–
Using a Web Browser
–
Using the DocuShare File UpHelper Application
Viewing File Properties
Editing File Properties
Deleting a File
Re
stor
ing a Deleted File
View Files in HTML
Editing the Location of a File
Managing Files Through Versioning and Locking
Working with Files
Overview
DocuShare allows you to store and manage documents in many popular file formats and access
those files via a World Wide Web (WWW) connection.
DocuShare provides a
repository
on an internal network server that is accessed through a Web
browser. You can add files to this repository from your computer. Conversely, you can also
download copies of these files from the repository and open or save them to your computer. You
can manage access to these files by other users by setting user access permissions. You can also
delete files from the repository, manage multiple document revisions, and lock files for safe
collaborative authoring.
Because DocuShare provides this webbased repository, you can access, transfer and share files
between groups located within an internal network. All the users need to use the DocuShare file
repository is a properly configured Web browser and access to the internal network.
Files are downloaded from the DocuShare repository simply by clicking on the filename. If your
browser is properly configured to open a file of this application type, the file’s native application
will open and the file will be displayed. You can then choose to save the file to your own
computer, print out a copy from the application, or just view the file and close it when finished.
Note:
Downloading does not transfer the actual file to your computer, only a copy. The original
DocuShare 2.2 Users Guide
45
copy of the file remains in the DocuShare repository until it is deleted.
The DocuShare server comes with default settings to accept a variety of popular application file
types, including:
DocuShare Icon
Application
File Extensions
Microsoft Word
.doc, .dot
Microsoft Excel
.xls
Microsoft PowerPoint
.ppt
Microsoft Access
.mdb
Microsoft Project
.mpp
Adobe Acrobat (pdf)
.pdf
PostScript
.ps
Visio
.vsd
Compressed Files (zip)
.zip
Image File formats
.gif, .jpg, .pct
Rich Text Format (rtf)
.rtf
Executable files
.exe
Text or HTML files
.txt, .htm, .html
Note:
This may not be a complete list of application file types or extensions for your particular
DocuShare site. Contact your Site Administrator for a complete listing.
DocuShare only provides a
repository
for these file types. Because you are using a Web browser
to access the files in this repository, it is the configuration of your Web browser that controls
how these files are handled
.
They can be opened within the browser or application window or
saved directly to your computer. For most of the proprietary application formats listed in the
previous table, your Web browser requires helper applications to view these files properly. In
most cases, these are the same applications that were originally used to create these files. Your
browser must be configured to use these helper applications to view these files. This is essential
for successful use of DocuShare.
For example, your browser may be configured to open the application Microsoft Word whenever
you download a file that has the extension of “.doc”. Your browser may also be configured to
automatically save any file that has the extension of “.exe” or “.zip”. To ensure that your browser
is properly configured for these applications, see the section Helper Applications in Chapter 1 for
more details.
DocuShare 2.2 Users Guide
46
Windows Users have the option of utilizing the
Windows Client
and
ODMA Client
to view,
manage, and edit DocuShare files directly from Explorer or editor applications. See Chapter 11,
Using the DocuShare Windows Client and Chapter 12, DocuShare ODMA Client
for more
information on these options.
Adding Files to DocuShare
You can add a file to any collection in DocuShare to which you have at least Writer access
permissions. You must also be logged in to DocuShare to add a file.
New or edited files are sent (or uploaded) to the DocuShare repository using three different
methods:
•
Using a file upload enabled web browser (Netscape 2.0 or above, or MS Internet
Explorer 4.0)
Using a file upload enabled browser allows you to send one file at a time to
the DocuShare repository through a standard DocuShare form.
•
Using a web browser that is not file upload enabled (MS Internet Explorer 2.0 and 3.0)
If you are using a browser that is not file upload enabled, you
can
use the DocuShare File
UpHelper application to upload files to the DocuShare repository. See DocuShare UpHelper
in Chapter 1 for installation instructions.
•
Windows users can “draganddrop” files to add them to DocuShare
. Using standard
Windows Explorer procedures, select and copy files to the DocuSharemounted server within
Explorer. See Chapter 11, Using the DocuShare Windows Client for more information on
this option.
Use (or nonuse) of the File UpHelper application is controlled by the “
Use Helper for Upload
”
user property. See “DocuShare Users” in Chapter 2 for more details on this setting.
Adding a File to DocuShare using a Web Browser
To add (or upload) a file to the DocuShare repository using a web browser, you must be using a
file upload enabled web browser (Netscape 2.0 or above) and your “
Use Helper for Upload
”
attribute in User Properties must be set to either
When Necessary
or
Never
. You must be logged
in to DocuShare and have at least
Writer
access permissions to the collection.
To add a file to DocuShare using a Web Browser:
1. In the collection where you want to add the file, select
Add File
from the
Add…
pull
down menu. The
Add File
page appears.
2. Click the
Browse
button. The Browse dialog appears.
Note:
If the Browse button is
not
displayed on this page, your Web browser cannot
upload files. You must use the DocuShare File UpHelper to upload files.
DocuShare 2.2 Users Guide
47
3. Browse for the file on your computer and select the file to add. You may need to adjust
the files types drop down box to view your selected file type. Click
Open
or
Accept
. The
path to the file is displayed in the File field.
4. Fill out the fields on the
Add File
page. Refer to the table below for descriptions of each
field.
Note:
While adding this file, if you are unsure of the purpose of a field, you can click on
the highlighted field name for a brief Help description of the field.
5. Click
Apply
.
The
Add File
page has the following properties:
Property
Description
Document
Specifies the path and name of the file you want to upload from a local or
network drive to DocuShare.
This is a required field.
Title
Specifies the title for the new file. The title can contain spaces and other
punctuation marks. You should assign a meaningful title to the file.
This is a
required field.
Summary
(Optional) Specifies a short description for the file. The contents of this field are
displayed below the title of the file on the DocuShare collection page.
Max
Versions
Specifies whether DocuShare provides version control for the file. You can
specify the maximum number of versions of a file that are retained in DocuShare
as a record of the file's history. Enter 1 to turn off versioning (only keep one copy
of a file at a time). If you add more versions than this maximum value, the oldest
version is deleted.
Description
(Optional) Specifies a detailed description of the file, such as an abstract. The
description may include a summary of the purpose and the audience of the file.
Keywords
(Optional) Lets you specify one or more words associated with the file. Keywords
help categorize the different files and streamline searches.
Restrict
Write
If you select Yes, specifies that the new file is created with write access limited to
the owner, rather than being inherited from the collection.
Author
Name of the document’s author, which may be different from the owner
submitting the file.
Note:
There may be additional properties displayed on this page that are not listed here. They are
specific to your DocuShare site. See your Site Administrator for details.
DocuShare 2.2 Users Guide
48
Adding Files to DocuShare Using the File UpHelper Application
To add (or upload) a file to the DocuShare repository when using a web browser that is not file
upload enabled (Microsoft Internet Explorer 2.0 or 3.0) you must have the
DocuShare File
UpHelper
application installed on your computer. See DocuShare UpHelper
in Chapter 1 for
installation instructions. Users of uploadcapable browsers can also use this application to upload
files, especially if they wish to upload multiple files to the repository.
Your “
Use Helper for Upload
” attribute in User Properties must also be set to either
When
Necessary
or
Always
. Netscape users using the UpHelper application should set the attribute to
Always
. You must be logged in to DocuShare and have at least
Writer
access permissions to the
collection.
The UpHelper application for DocuShare supports draganddrop addition of files and directories
from your file management application. You can drag a directory into the UpHelper window and
the directory structure will be maintained. This directory structure will also be recreated after
upload into DocuShare. The directory name will become the name of the new collection; the files
and/or subdirectories located within that directory will be uploaded into DocuShare and placed in
that new collection.
To add files to DocuShare using the File UpHelper application:
1.
In the collection where you are adding the files, click
Add File
. A
DocuShare
Informational Message
screen appears. When you click the
Click here to initiate
helper application
link, the DocuShare File Upload Helper dialog appears.
2.
Use the
Browse
option from the
File
menu or the
yellow folder button
on the toolbar to
navigate your file system and select one or more files to add. You may need to adjust the
file types drop down box to view your selected file type. Click
Open
or
Accept
to select
the file. The selected file displays in the Upload Helper dialog window (see below). You
can repeat this process for any additional files you wish to upload.
You can also select a file or directory from your file management application and drag
this over to the UpHelper window to add. The directory will appear as a subcollection of
the current collection in the left dialog window and the contents of this directory will
appear in the right dialog window. Refer to the illustration below for an example.
DocuShare 2.2 Users Guide
49
3.
For each file selected, specify a title and summary by clicking on the file name and
editing the Title and Summary fields. The application automatically supplies a default
title that is the file name without the extension. This title can be edited to a more
meaningful title like “Minutes for 8/09/97 meeting.”
4.
From the
File
menu, click
Upload All
to add all selected files, or select an individual file
and click
Upload
to add just one file at a time. The
blue arrow button
on the toolbar can
also be used to
Upload All
files.
5.
A status screen appears which displays the progress of the uploading process.
6.
When the upload process has completed, a final status window appears, giving you the
option to
Stay
or
Exit
.
Stay
will leave UpHelper running, enabling you to send more file
to the same Collection if you wish. The typical choice would be to
Exit
.
7.
Return to the browser, where the
DocuShare Informational Message
screen appears.
Click the
Click here to refresh your view of the collection
link to view the updated
collection.
Note:
After adding the file, you should check the
access permissions
for the file to make sure
they provide the desired level of access for other users and groups. See the section Viewing and
Editing DocuShare Object Permissions
in Chapter 3 for more information on adjusting these
permissions.
Known problems adding files to DocuShare with the File UpHelper application:
1.
If the upload process appears to complete successfully, but the file is not visible within
the DocuShare repository, check your proxy settings to be sure that you are
not
using a
proxy server to access DocuShare. See “Disabling Proxies” in Chapter 1 for more
information on proxy settings. Restart your browser and repeat the upload procedure after
adjusting the proxy settings.
DocuShare 2.2 Users Guide
50
2.
If you are using the Netscape browser and it hangs during uploading, check to see if the
file is open in its associated application (for example, Word or PowerPoint). If the file is
open, close it from the application, and then try uploading the file again.
Viewing File Properties
You can view the properties of a file at any time. You do not need to be logged in to view the file
properties. However, you must be logged in to DocuShare to perform any editing functions that
can be accessed through the Services page.
To access a file's
Services
page, click on the
Services
icon to the right of file in the collection
listing. The Services page will appear, listing the file properties.
Properties include:
•
The title, summary, and description of the file
•
For most document formats, an automaticallygenerated abstract of the file.
•
The file's identifying object number (handle), the owner who created the file and the date
and time of creation and last modification
•
The location of this collection within the collection hierarchy of the DocuShare site
(
Appears In
). All DocuShare objects may appear in one or more locations.
Note:
There may be additional properties displayed on this page that are not listed here. They are
specific to your DocuShare site. See your Site Administrator for details.
All of these properties (except the object ID, the creation/modification dates/times, and
collection location) can be edited or modified by the owner of the file or a user with Writer
access permissions through the
Edit Properties
function. To edit
Appears In
(collection
location), use the
Edit Location
function.
The
Services
page provides access to editing and versioning functions, using these selections in
the
Edit…
pulldown menu:
•
Delete
– Delete this file. You must be the owner of the file or have Manager access
permissions to delete a file. See the section Deleting a File in this chapter for more
information.
•
Permissions
– View the access permissions for this file. If you are the owner or have
Manager access permissions, you can also edit the access permissions from here.
•
Edit Properties
– Edit the properties for this file. You must be the owner of the file or
have at least Writer access permissions to edit file properties.
•
Edit Location
– Change (move) or add locations for this file. You must be the owner of
the file or have at least Writer access permissions to change file locations. See the section
Editing the Location of a File in this chapter for more information.
DocuShare 2.2 Users Guide
51
•
New Version
– Add a new version of this file.
•
History
– View the version history of this file. For information on the last three functions
listed, see the section Managing Files Through Versioning and Locking in this chapter.
•
Lock/Unlock
– Lock or Unlock this file.
Editing File Properties
Many properties of a file can be edited or modified after initial creation. You must be the owner
of the file or have Writer access permissions to edit a collection's properties. You must also be
logged in to DocuShare.
To edit the properties of a file:
1.
Click on the
Services
icon to the right of the collection listing. The
Services
page
appears.
2.
Select
Edit Properties
from the
Edit…
pulldown menu. The
Edit File
page appears.
3.
Edit the information. Refer to the property descriptions in the table below for details on
the properties that can be edited through this function.
Note:
If you are unsure of the purpose of a field while editing the file properties, you can
click on the highlighted field name for a brief Help description of the field.
4.
Click the
Apply
button. The
Services
page for the collection appears. The properties
have now been updated to reflect your changes.
Deleting a File
Only the owner of a file or a user with Manager access can delete a file from the DocuShare
repository. You must be logged in to delete a file from DocuShare.
Note:
Opening or saving a file on your local machine does
not
delete the file from the
DocuShare repository.
To delete a file:
1. Click the
Services
icon for the file you want to delete. The
Services
page appears.
2. Select
Delete
from the
Edit…
pulldown menu. The
Confirm Deletion
page appears.
Note:
If you change your mind about deleting this file, click
Back
in the browser to close
the Confirm Deletion page.
3. Click
Delete
to confirm. The
Delete Successful
page appears.
4. Click the
Click here to continue
link to return to the page you started from.
The file is now deleted. You may need to
Reload
the page to see these changes.
DocuShare 2.2 Users Guide
52
Restoring a Deleted File
If you inadvertently delete a file from the DocuShare repository, the Site Administrator can
easily restore it for you. All deleted content is sent to a trashcan accessible only to the Site
Administrator. If you mistakenly delete an object, you must contact the Site Administrator and
provide him/her with the necessary information. The Site Administrator is responsible for
purging the recycle bin on an asneeded basis. After purging, you will be unable to restore items
deleted, so be sure to notify the Site Administrator of deletion restorations as soon as possible.
View Files in HTML
The
View
option provides a conversion of files into HTML for immediate viewing without use
of a helper application. Supported file types include word processing files such as Microsoft
Word and image files such as TIFF. This conversion adds a
View
icon next to the
Services
icon
for all files added to the DocuShare repository that can be converted in this manner. When you
click on the
View
icon, the file in question is converted into HTML on the server and the
converted document is then sent to your browser. This feature provides quick viewing access to
the contents of files and does not require configuration of a helper application.
For a list of file formats that are supported by this feature, please see Readme.txt or contact your
Site Administrator.
To view a file:
1. Click the
View
icon for the file you want to view. The file appears in your browser
window as an unformatted HTML file. Some file templates may provide frames and/or
tables to display the contents of the file.
2. To close the View display, use your browser's
Back
button.
Editing the Location of a File
The
Edit Location
command allows a user to move a DocuShare object from one location to
another or allows the object to appear in multiple locations within the DocuShare repository.
You must have at least Writer access to the object to change its location.The location of an object
is displayed in the
Appears In
property, which is displayed at the end of each
Properties
listing
for an object. Using the Edit Location command allows you to edit the
Appears In
property.
This is a helpful command if you have added a file (or any other DocuShare object) in the wrong
location and want to move it instead of deleting it and then recreating it. It is also helpful if you
would like the same file to appear in one or more additional locations. All DocuShare objects can
appear in multiple locations at once. However, there is actually only one physical copy of the
object in the DocuShare database; the system simply creates additional pointers or references to
the object.
A negative side effect of this command is that if used incorrectly, you can orphan the object.
Orphaned objects still exist within the DocuShare repository but are not accessible to users. Only
DocuShare 2.2 Users Guide
53
a Site Administrator can recover orphaned objects.
To edit the location of a file:
1. Click the
Services
icon for the file you want to delete. The
Services
page appears.
2. Select
Edit Location
from the
Edit
pulldown menu. The
Edit File Location
page
appears.
3. For the
Appears In
field, a scrolling list is displayed that contains all DocuShare
collections to which you have at least Writer access. The file's current location is
highlighted.
•
To move a file, select the collection where you wish to move this file. The previous
location will be deselected.
•
To have a file appear in multiple locations, press the CONTROL key while selecting
the additional locations.
Note:
Use the CONTROL key for MS Windowsbased Operating Systems only.
Substitute the Command (or Apple key) key for the MacOS. UNIXbased systems
require no special key for this multiple list item selection.
Note:
Use caution when deselecting locations. Deselecting improperly can create
orphaned files. Be sure that at least
one
location is selected in the scrolling list before
selecting the
Update Locations
button.
4. Click the
Update Locations
button.
The Services page for that file now appears and the new location(s) is/are displayed in
Appears
In
. If you don't see this change reflected on the Services page, click
Reload
on your browser to
refresh the page display.
Managing Files through Versioning and Locking
DocuShare supports the complete range of a document's life cycle, including collaborative
authoring of a series of drafts, and final archival publication of a completed work. When working
on an important document over time, such as a product's functional requirements, you may want
to retain an ongoing record of all past versions of the file. When working as part of a team, you
may need a way to control who is currently working on a given file and thereby prevent the other
team members from making conflicting edits. In many other cases, you may simply want to store
and exchange individual copies of files without any of the traditional document management
overhead. By using DocuShare's versioning and locking features, you can manage each
individual file in the most appropriate way.
Version control maintains a record of a file's history. For each past version, it retains a copy of
that version, the identity of the user who put that version into DocuShare and when it was done,
and an optional usersupplied comment about that version. The number of past versions that are
retained by DocuShare (i.e., the length of the file's history) is specified by the file's
Max
Versions
property. Setting Max Versions to
N
causes DocuShare to retain at most the last
N
DocuShare 2.2 Users Guide
54
versions. If
N
versions are currently stored, then adding a new version will cause the oldest
version to be deleted. You can track and download a specific file version by viewing the file's
history
. All previous versions of the file are available for download and edit. You can change the
value of Max Versions at any time, but this action does not reconstruct prior versions.
When you set Max Versions equal to one, versioning is effectively turned off and the history is
empty.
If you are collaborating on a file with other users, you should
lock
the file in DocuShare when
you are working on it. This is a standard document management procedure that indicates to other
users that you are working on the file. Locking a file prevents other users from editing it at the
same time and adding a new version. When you lock a file, a tiny padlock icon appears next to
the file's
Services
icon. You can also
unlock
a file without creating a new version (discard any
changes made since the last version).
You must be the owner of the file or have at least Writer level access to upload a new version of
a file. You must also be logged in to DocuShare.
To edit and add a new version of a file to DocuShare using a web browser:
1.
From within the collection listing, click on the file’s CheckOut icon (
). This will lock
the file, preventing other users from editing it, and open it in the appropriate editor.
Alternatively, you could click on the file’s
Services
icon and from there, select
Lock
to
lock the file and click on the file’s Title to download the file to a temporary location on
your computer.
2.
When you are finished editing the file, on the file’s
Services
page, select
New Version
from the
Edit…
pulldown menu. The
Upload New Version
page appears.
3.
Click
Browse
.
4.
Browse for and select the updated file, then click
Open
or
Accept
.
The path to the edited file appears in the File field. You can also add comments in the
Comments
field.
5.
Click
Apply
.
6.
The
New Version Successful
page appears. Click the
Click here to continue
link.
The updated version of the file is now unlocked and in the DocuShare repository. You can verify
that the updated version is in DocuShare by clicking on the file title to open it and check for your
edits.
To unlock a file without adding a new version:
1.
For the file you want to unlock, select
Unlock
from the
Edit…
pulldown menu on the
Services
page. The
Unlock Successful
page appears.
2.
Click the
Click here to continue
link.
DocuShare 2.2 Users Guide
55
To view the version history of a file:
1.
From the
Services
page, select
History
from the
Edit…
pulldown menu. A table with
all version numbers, the date and time each file was created, its owner, and any
associated comments are displayed.
2.
Click on a version number to download that version of the file.
Working with Files
Two tips to remember about files:
1.
Like all other DocuShare objects, files have an individual File Handle number,
identifying them as unique objects within the DocuShare repository. Because each file is
a unique object in the repository, even if you add a file that has the same name as another
file, it will be a unique object in the repository. For example, you could have three files in
your collection, all named “Test.” To DocuShare, they are all unique objects with
different handle numbers.
2.
If you are the owner of a file, you could download a file from the repository with the
intention of updating the file to contain new information. You would have the file open in
its helper application, perform the required updates and then select
Save
in your
application. But selecting Save will
not
save this file back to the DocuShare repository; it
will only save the file to your computer. To add this updated file to the repository,
you
must upload the newly edited version of file to the repository
, using the procedures in
Adding Files or Managing Files Through Versioning and Locking
. Alternatively, you can
use the DocuShare Windows Client, which provides an online editing capability.
DocuShare 2.2 Users Guide
56
6 DocuShare Calendars
Calendar Overview
−
Month View
−
Week View
Adding a Calendar
Viewing Calendar Properties
Editing Calendar Properties
Deleting a Calendar
Re
stor
ing a Deleted Calendar
Editing the Location of a Calendar
Adding a Calendar Event
Editing Calendar Event Properties
Deleting a Calendar Event
Editing the Location of a Calendar Event
Calendar Overview
DocuShare also has the ability to create online
calendars
. They are represented by a
icon.
You can use a DocuShare online calendar as a personal calendar or as a shared, group calendar.
Calendar entries are called
Events
. Each event is associated with a specific day, or with a
specific sequence of days, such as every Monday for six weeks. As with all DocuShare objects,
events have a title, description, and the standard set of permission attributes. By default, an
event's permissions are inherited from the calendar, but they can be individually modified to
create various kinds of public and private events, for example.
Calendars have two view options: one month at a time or one week at a time. One editable
property of a calendar is which view to use as the default when the calendar is initially opened.
When first opened, a calendar will display either the current month or week, with the current day
highlighted.
DocuShare 2.2 Users Guide
57
Month View
An example calendar in Month view is shown in the following example.
In the Month view, a calendar displays all the days in a specified month, with the first three
events of each day displayed in an abbreviated manner. The toolbar includes a button that will
take you to a week view for that month. If it is the current month, the week view button will
display the current week. Otherwise, it will display the first week of the month. Use the
highlighted month names to navigate forward or backward in the calendar.
To add an event to or display details about a specific day, click on the day number link. An
Event page for the selected day appears, as shown in the following example.
DocuShare 2.2 Users Guide
58
Existing events are listed in a table at the top of the page. You can click on the
Services
link to
display or edit the properties of an existing event. Below that table is a form to add new events
for that day. To return to the current calendar view, click the highlighted calendar name link at
the top of the Event page.
Week View
DocuShare 2.2 Users Guide
59
The figure shows an example calendar in Week view. In the Week view, a calendar displays all
the days in a specific week, starting with Monday and ending with Sunday. Each day contains a
complete listing for all of the events in that day, including the events' complete title and
description. To display or edit the properties of an existing event, click on its
Services
icon. To
add an event to a specific day, select the
Add Event
button for the desired day.
The toolbar includes a button that will take you to the month view containing the week currently
displayed. Use the
Previous
and
Next
buttons to move to the previous and next week,
respectively. Use the
Today
button to move to the current week. The current day will be
highlighted.
Adding a Calendar
You can add a calendar to any collection in DocuShare to which you have at least Writer access
permissions. However, you must be logged in to DocuShare to create a calendar.
To add a calendar:
1.
In the collection where you want to add the calendar, select
Calendar
from the
Add...
pulldown menu. The
Add Calendar
page appears.
2.
Fill in the page. Refer to the property descriptions in the table below for descriptions of
each field.
Note:
If you are unsure of the purpose of a field while creating the calendar, you can
click on the highlighted field name for a brief Help description of the field.
3.
Click the
Apply
button. The calendar is created in DocuShare and the
Services
page for
the calendar appears.
The
Add Calendar
page has the following properties:
Property
Description
Title
Specifies a descriptive title for the calendar. The title can contain spaces and other
punctuation marks. You should assign a meaningful title to the calendar. The default
title is New.
This is a required field.
Summary
(Optional) Specifies a short description of the calendar. The contents of this field are
displayed below the calendar title on the corresponding DocuShare collection page.
Use the Description field to provide a more detailed description of the calendar.
Description
(Optional) Specifies a detailed description of the calendar. The contents of this field
are displayed below the calendar title and summary on the DocuShare page. The
Description field can contain HTML code to customize the calendar's appearance.
Keywords
(Optional) Lets you specify one or more words associated with the file. Keywords
help categorize the different files and streamline searches.
Default View
(Optional) Specifies the default calendar view: by Month or by Week. The user can
DocuShare 2.2 Users Guide
60
toggle between Month and Week view from within an open calendar.
Note:
There may be additional properties displayed on this page that are not listed here. They are
specific to your DocuShare site. See your Site Administrator for details.
You can verify that the calendar was created by clicking the
Appears In
link to move you up
one level in the collection hierarchy. The calendar should now be listed with a
icon. If you
don't see the calendar, click
Reload
on your browser to refresh the page display.
Note:
After creating the calendar, you should adjust the
access permissions
for the calendar to
make sure they provide the desired level of access for other users and groups. See the section
Viewing and Editing DocuShare Object Permissions
in Chapter 3 for more information on
adjusting these permissions.
Viewing Calendar Properties
You can view the properties of a calendar at any time. You do not need to be logged in to view a
calendar's properties. However, you must be logged in to DocuShare to perform any editing
functions that can be accessed through the Calendar Services page.
To access a calendar's
Services
page, click on the
Services
icon to the right of the calendar in the
collection listing. If you are in an open calendar, select
View Properties
from the
Edit…
pull
down menu.
Calendar properties include:
•
All of the properties listed in the previous section
•
The calendar's identifying object number (handle), the owner who created the calendar,
and the date and time of creation and last modification
•
The location of this calendar within the collection hierarchy of the DocuShare site
(
Appears In
property). All DocuShare objects may appear in multiple locations.
All of these properties (except the object ID, the creation/modification dates/times, and calendar
location) can be edited or modified by the owner of the calendar or a user with Writer access
permissions through the
Edit Properties
function.
Use the
Edit Location
function on main calendar toolbar to edit the
Appears In
property
(calendar location).
The
Services
page provides access to editing functions, using these selections in the
Edit…
pull
down menu:
•
Permissions
– View the access permissions for this calendar.
If you are the owner or have Manager access permissions, you can also edit the access
permissions from here.
DocuShare 2.2 Users Guide
61
•
Edit Location
– Change (move) or add locations for this calendar.
You must be the owner of the calendar or have at least Writer access permissions to
change calendar locations. See the section Editing the Location of a Calendar in this
chapter for more information.
•
Edit Properties
– Edit the properties for this calendar.
You must be the owner of the calendar or have at least Writer access permissions to edit
calendar properties.
Editing Calendar Properties
You can edit the properties of a calendar at any time by selecting
Edit Properties
from the
calendar’s
Edit
pulldown menu. You must be the owner of the calendar or have Writer access
permissions to edit a calendar's properties. You must also be logged in to DocuShare.
To edit the properties of a calendar:
1. Click the
Services
icon for the calendar whose properties you want to edit. The
Calendar
Services
page appears.
2. Select
Edit Properties
from the
Edit…
pulldown menu. The
Edit Calendar
page
appears.
3. Edit the calendar properties. Refer to the property descriptions from the table in the
previous section for information.
Note:
If you are unsure of the purpose of a field while editing the calendar, you can click
on the highlighted field name for a brief Help description of the field.
4. Click
Apply
. The Services page for the calendar appears. The calendar properties are
updated to reflect your edits.
Note:
There may be additional editable properties displayed on this page that are not listed here.
They are specific to your DocuShare site. See your Site Administrator for details.
Deleting a Calendar
Only the owner of a calendar or a user with Manager access for that calendar can delete a
calendar from DocuShare. You must be logged in to DocuShare to delete a calendar.
To delete a calendar:
1. Open the calendar that you want to delete.
2. Select
Delete
from the
Edit…
pulldown menu.
3. If there are no objects in the calendar, the
Confirm Deletion
page appears. Select the
Delete
button to delete the calendar.
If the calendar contains other objects the
Delete
page appears. This page lists the number
of event objects in the calendar that will be deleted. It also lists the number of objects that
DocuShare 2.2 Users Guide
62
will not be deleted because of insufficient access rights or because they appear in other
locations.
•
To delete the calendar and its contents, select the
Delete Object and Contents
button.
•
To delete just the calendar, select the
Delete Just this Object
button.
Note:
If you change your mind about deleting this calendar, use the
Back
button on your
browser to close the Delete or Confirm Deletion page.
4. The
Delete Successful
page appears. Click the
Click here to continue
link.
The calendar is now deleted. You may need to
Reload
the page to see these changes.
Restoring a Deleted Calendar
If you inadvertently delete a calendar from the DocuShare repository, the Site Administrator can
easily restore it for you. All deleted content is sent to a trashcan accessible only to the Site
Administrator. If you mistakenly delete an object, you must contact the Site Administrator and
provide him/her with the necessary information. The Site Administrator is responsible for
purging the recycle bin on an asneeded basis. After purging, you will be unable to restore items
deleted, so be sure to notify the Site Administrator of deletion restorations as soon as possible.
Editing the Location of a Calendar
The
Edit Location
command allows a user to move a DocuShare object from one location to
another or allows the object to appear in multiple locations within the DocuShare repository.
You must have at least Writer access to the object to change its location.
The location of an object is displayed in the
Appears In
property, which is displayed at the end
of each
Properties
listing for an object. Using the Edit Location command allows you to edit the
Appears In
property.
This is a helpful command if you have created a calendar (or any other DocuShare object) in the
wrong location and want to move it instead of deleting it and then recreating it. It is also helpful
if you would like the same object to appear in one or more additional locations. All DocuShare
objects can appear in multiple locations at once. However, there is actually only one physical
copy of the object in the DocuShare database; the system simply creates additional pointers or
references to the object.
A negative side effect of this command is that if used incorrectly, you can orphan the object.
Orphaned objects still exist within the DocuShare repository but are not accessible to users. Only
a Site Administrator can recover orphaned objects.
To change the location of a calendar:
1. Click the
Services
icon for the calendar whose location you want to change. The
Calendar Services
page appears.
DocuShare 2.2 Users Guide
63
2. Select
Edit Location
from the
Edit
pulldown menu. The
Edit Calendar Location
page
appears.
3. For the
Appears In
field, a scrolling list is displayed that contains all DocuShare
collections to which you have at least Writer access. The calendar's current location is
highlighted.
•
To move an object, select the collection where you wish to move this object. The
previous location will be deselected.
•
To have an object appear in multiple locations, press the CONTROL key while
selecting the additional locations.
Note:
Use the CONTROL key for MS Windowsbased Operating Systems only.
Substitute the Command (or Apple key) key for the MacOS. UNIXbased systems
require no special key for this multiple list item selection.
Note:
Use caution when deselecting locations. Deselecting improperly can create
orphaned files. Be sure that at least
one
location is selected in the scrolling list before
selecting the
Update Locations
button.
4. Click the
Update Locations
button.
The Services page for that calendar now appears and the new location(s) is/are displayed in
Appears In
property. If you don't see this change reflected on the Services page, click
Reload
on your browser to refresh the page display.
Adding a Calendar Event
You can add a calendar event to any calendar in DocuShare to which you have Writer access
permission. You must be logged in to DocuShare create a calendar event.
You can also repeat DocuShare calendar events over a series of days/weeks/months. For
example, if you have a meeting every two weeks, you can simply specify the meeting as
repeating every two weeks, without having to enter each occurrence of the meeting.
To add a calendar event:
1. Open the calendar where you want to add an event. If the calendar is in month view, click
the date for the event. If the calendar is in week view, select
Add Event
for
the date you
want. The
Add Event
page appears.
2. Specify the event information. Refer to the table below for descriptions of each field.
Note:
If you are unsure of the purpose of a field while creating the calendar event, you
can click on the highlighted field name for a brief Help description of the field.
3. Click the
Apply
button.
The
Add Event
page has the following properties:
Property
Description
Title
Specifies a descriptive title for the calendar event (for example, "Meet with Joe").
DocuShare 2.2 Users Guide
64
The title can contain spaces and other punctuation marks. You should assign a
meaningful title to the calendar event. The default title is New. Only the first fifteen
characters of the title are displayed on the calendar's month view.
This is a required
field
.
Description
(Optional) Specifies a detailed description of the calendar event (e.g., “Meeting in
conference room 218; bring bagels and juice!”).
Date
Specifies the year, month, and day for the event.
Time
Specifies the start and end time for the event, in quarterhour increments. Radio
buttons allow selection of a.m. or p.m. For events that will occur for an entire day,
select
No Time
.
Repeat
Specifies whether the event repeats: daily, weekly, every two weeks, monthly, or by
date. Also specifies the number of times that the event repeats.
Note:
There may be additional properties displayed on this page that are not listed here. They are
specific to your DocuShare site. See your Site Administrator for details.
The event is created in the DocuShare calendar and the
Services
page for the event appears.
You can verify that the event was created by clicking the
Appears In
link to move you to the
default calendar view. If you don't see the collection, click
Reload
on your browser to refresh the
page display.
Note:
After creating the event, you should view the
access permissions
for the event to make
sure they provide the desired level of access for other users and groups. See the section Viewing
and Editing DocuShare Object Permissions in Chapter 3 for more information on adjusting these
permissions.
Editing Calendar Event Properties
You can edit the properties of a calendar event at any time by selecting
Edit Properties
from the
Edit
pulldown menu on the calendar event's Services
page. For repeating events, you can
specify to edit all of the events in the series, or just the selected event.
You must be the owner of the calendar event or have at least Writer access permissions to edit
event properties. You must also be logged in to DocuShare.
To edit the properties of a calendar event:
1. Open the calendar with the event you want to edit.
2. Click the date for the event. The
Add Event
page appears.
3. In the event list table, click the
Services
icon for the event whose properties you want to
edit. The
Services
page appears.
4. Select
Edit Properties
from the
Edit…
pulldown menu. The
Edit Event
page appears.
DocuShare 2.2 Users Guide
65
5. Edit the information. Refer to the property descriptions in the previous section for
information.
Note:
If you are unsure of the purpose of a field while editing the calendar event, you can
click on the highlighted field name for a brief Help description of the field.
6. Click the
Apply
button. The
Services
page for the event appears. The event properties
have now been updated to reflect your changes.
Note:
There may be additional properties displayed on this page that are not listed here. They are
specific to your DocuShare site. See your Site Administrator for details.
Deleting a Calendar Event
Only the owner of a calendar event or a user with Manager permission for the event can delete it
from DocuShare. For repeating events, you can specify to delete all of the events in the series, or
just the selected event. You must be logged in to DocuShare to delete events.
To delete a calendar event:
1.
Go to the day on which the event occurs. For example, in Month view, click on the
relevant day.
2.
Click the
Services
icon for the calendar event you want to delete. The
Services
page
appears.
3.
Select
Delete
from the
Edit…
pulldown menu.
4.
If this is the only instance of this event, the
Confirm Deletion
page appears. Select the
Delete
button to delete the event.
If this is a repeating event, the
Delete
page appears. This page lists the number of events
that will be deleted.
•
To delete all repeating events, select
Delete All Events in This Series
button.
•
To delete just this event select the
Delete Just This Event
button.
Note:
If you change your mind about deleting this collection, use the
Back
button on
your browser to close the Delete or Confirm Deletion page.
5.
The
Delete Successful
page appears. Click the
Click here to continue
link.
The event is now deleted. You may need to
Reload
the page to see these changes.
Note:
If you delete an entire series, or a nonrepeating event, it can easily be restored by the Site
Administrator. However, if you delete a single event out of a repeating series, it is permanently
deleted and cannot be restored.
DocuShare 2.2 Users Guide
66
Editing the Location of a Calendar Event
Just as in other DocuShare objects, the
Edit Location
command allows a user to move a
DocuShare event from one calendar to another or allows the event to appear in multiple
calendars within the DocuShare repository. There is only one physical copy of the event in the
DocuShare database; the system simply creates additional pointers or references to it.
You must have at least Writer access to the object to change its location. You must also be
logged in to DocuShare.
The location of an object is displayed in the
Appears In
property, which is displayed at the end
of each
Properties
listing for an object. Using the Edit Location command allows you to edit the
Appears In
property.
Editing the location of a calendar event enables creating group or shared calendars. You can
create an event in your own calendar and then edit its location to appear in your calendar
and
your workgroup's shared calendar.
A negative side effect of this command is that if used incorrectly, you can orphan the event.
Orphaned objects still exist within the DocuShare repository but are not accessible to users. Only
a Site Administrator can recover orphaned objects.
To change the location of a calendar event:
1.
Go to the day on which the event occurs. For example, in month view, click on the
relevant day.
2.
Click the
Services
icon for the calendar event whose location you want to change. The
Services
page appears.
3.
Select
Edit Location
from the
Edit…
pulldown menu. The
Edit Event Location
page
appears.
4.
For the
Appears In
field, a scrolling list is displayed that contains all DocuShare
calendars to which you have at least Writer access. The calendar's current location is
highlighted.
•
To move an event, select the calendar where you wish to move this event. The
previous location will be deselected.
•
To have an event appear in multiple calendars, press the CONTROL key while
selecting the additional calendar(s).
Note:
Use the CONTROL key for MS Windowsbased Operating Systems only.
Substitute the Command (or Apple key) key for the MacOS. UNIXbased systems
require no special key for this multiple list item selection.
Note:
Use caution when deselecting locations. Deselecting improperly can create
orphaned events. Be sure that at least
one
location is selected in the scrolling list before
selecting the
Update Locations
button.
DocuShare 2.2 Users Guide
67
5.
Click the
Update Locations
button.
The Services page for that calendar event now appears and the new location(s) is/are displayed in
Appears In
. If you don't see this change reflected on the Services page, click
Reload
on your
browser to refresh the page display.
DocuShare 2.2 Users Guide
68
7 DocuShare Subscriptions
Subscription Overview
Subscription Events of Interest
Adding a Subscription
Viewing Subscription Properties
Editing Subscription Properties
Editing Recipients of a Subscription
Deleting a Subscription
Re
stor
ing a Deleted Subscription
Subscription Overview
DocuShare allows users to subscribe to DocuShare content and be notified by email when
changes occur. As with all DocuShare objects, subscriptions have a title, description, and the
standard set of permission attributes. Unlike the other DocuShare objects, however, subscriptions
do not
appear in
collections or other container objects. Subscriptions to DocuShare objects can
be created and managed through those objects’ Edit menu.
Subscriptions provide a variety of options to specify which events are of interest, who should be
notified when those events occur, and when email notifications will be sent. The subscription
Events of Interest
property lists which modifications (e.g.,
Any Change
,
Something Deleted
)
will be reported to the subscription recipients. The subscription
Period
property indicates when
the notifications will be sent, and may be on an
Immediate
,
Daily
, or
Weekly
basis. All daily and
weekly notices scheduled to be received by each recipient are combined into a single summary
report. The recipients of a subscription may be changed on an asneeded basis through the Edit
Recipients option on the subscription’s Edit menu.
When a subscription is made to a container object, such as a collection, it applies to the
collection and everything within that collection. When a subscription is made to individual, non
container objects, such as a file, it applies only to that individual object.
Subscription Events of Interest
Each subscription lists the specific set of change events that are of interest to the recipients.
Subscriptions can be made for all changes, a limited set of changes, or just one type of change.
The set of possible event types are:
DocuShare 2.2 Users Guide
69
Event Description
Any change The
Any Change
event type covers all possible changes and subsumes
all other events types.
Something added A new object has been added. This event type applies to container objects
only, such as collections.
A new version A new version has been added to a file. This event type applies to
collection and file objects.
Something deleted An object within the scope of the subscription, such as a collection’s
contents or the subscribedto object itself, was deleted.
Properties edited The properties of an object, such as its title or description, were edited.
Permissions edited The permissions of an object, including who has read, write or manager
permission, were edited.
Change in ownership The owner of an object was changed.
Location edited An object was moved. This event type will include moving something
out of or into the scope of the subscription, such as moving a file into a
subscribedto collection or out of a subscribedto collection.
File locked or
checked out
A file has been locked for editing. A file may be locked explicitly via the
Lock
option on its
Services
page, or as a sideeffect of having been
checked out.
File unlocked A file has been unlocked. This event applies only to files that have been
explicitly UnLocked without addition of a new version.
Adding a Subscription
Any user with Read access to an object may create a subscription to that object. If the object is a
container, such as a collection, the subscription includes changes to the collection and its
contents.
To add a subscription:
1. Go to the collection or object to be modified. From the
Edit…
pulldown menu, click on
Subscriptions
. The
Add Subscription
page appears.
2. Fill in the page. Refer to the property descriptions in the table below for descriptions of
each field.
Note:
If you are unsure of the purpose of a field while creating the subscription, you can
click on the highlighted field name for a brief Help description of the field.
Note:
To select more than one parameter, press the CONTROL key while clicking on
the additional parameters.
3. Click
Apply
.
DocuShare 2.2 Users Guide
70
4. The subscription is created in DocuShare and the
Subscription Services
page appears.
The Add Subscription page has the following properties:
Property Description
Events of Interest The DocuShare events about which you would like to be notified.
This is a
required field.
Period The period property specifies when you would like to be notified about the
events of interest. The value
Immediate
indicates that you want to receive
notification immediately after the event occurs. The value
Daily
indicates
that you want the event to be included in a daily summary report. The value
Weekly
indicates that you want the event to be included in a weekly
summary report.
Include Recipient’s
Activity
A subscription will notify its recipients of all events of interest. The value
No
indicates that a recipient should not be notified of her/his own activity.
Setting this property to
No
avoids receiving email about edits that you made
yourself.
Viewing Subscription Properties
To view the properties of a subscription, you must access the Services page by clicking on the
View Properties
option in the
Edit…
pulldown menu, or by clicking on the Services icon to the
right of the link. Subscription properties include:
•
All of the properties listed in the previous section (see Adding a Subscription)
•
The subscription’s title, summary, description, keywords, handle, owner, create and
modified dates, who modified the subscription, the publisher, and the recipients of the
subscription.
Editing Subscription Properties
You can edit the properties of a subscription by selecting
Edit Subscription
from the
Edit…
pulldown menu, or by clicking on the Services icon. The
Edit Subscription
page contains the
following properties:
Property Description
Title This field should contain the title of the object being submitted to the DocuShare
repository. The title should be short but descriptive and may contain spaces and other
punctuation marks.
This is a required field.
Summary (Optional) This field should contain a short description of the object being submitted
to the DocuShare repository. The contents of this field will be displayed beneath the
object's title when printing the contents of a Collection in which this object appears.
The Description field may be used to provide a more detailed description of the
object.
DocuShare 2.2 Users Guide
71
Description (Optional) This field should contain a detailed description of the object. For
Collections and other containertype objects, the contents of this field will be
displayed at the top of the page, just below the title and/or image associated with the
object. If desired, this field may contain HTML markup that will be inserted into the
page without modification.
Keywords This field should contain any Keywords associated with this object. Keywords help
to categorize documents and allow for more accurate searching. Simply type in a
series of words in the field.
External
Recipients
A list of email addresses for recipients who are not registered users on this
DocuShare server. External recipients will always be sent immediate email in plain
text format. Daily or weekly summary reports are not available for external
recipients.
Events The DocuShare events about which you would like to be notified. To select more
than one event, press the CONTROL key while selecting the additional events.
This
is a required field.
Note:
Use the CONTROL key for MS Windowsbased Operating Systems only.
Substitute the Command (or Apple key) key for the MacOS. Unixbased systems
require no special key for this multiple list item selection.
Period The period property specifies when you would like to be notified about the events of
interest. The value
Immediate
indicates that you want to receive notification
immediately after the event occurs. The value
Daily
indicates that you want the event
to be included in a daily summary report. The value
Weekly
indicates that you want
the event to be included in a weekly summary report.
Include
Recipient’s
Activity
A subscription will notify its recipients of all events of interest. The value
No
indicates that a recipient should not be notified of her/his own activity. Setting this
property to
No
avoids receiving email about edits that you made yourself.
To edit properties of a subscription:
1.
In the
Edit…
pulldown menu, select
Edit Properties
.
Note:
If you are not automatically taken to the Edit Properties page, click the
Go
button.
2. Edit the subscription properties. Refer to the property descriptions from the above table
for information.
Note:
If you are unsure of the purpose of a field while editing subscription properties,
you can click on the field name for a brief Help description of that field.
3. Click the
Apply
button. The Services page appears for that subscription, and the
properties are updated to reflect your changes.
Editing Recipients of a Subscription
DocuShare allows managers of a subscription to add and remove users or groups from a
DocuShare 2.2 Users Guide
72
subscription.
To add or remove users from a subscription:
1. Click on
Edit Recipients
from the
Edit…
pulldown menu.
•
To add a recipient to the subscriber list, highlight or type the user’s name in the
Add
Recipients
box.
•
To remove a recipient from the subscriber list, highlight or type the user’s name in the
Remove Recipients
box.
•
Enter a commaseparated list of email addresses to include recipients who are not
registered users.
2. Click
Apply
. The
Subscription Services
page appears, and your changes will be
reflected.
Deleting a Subscription
To delete a subscription:
1. Open the subscription that you want to delete.
2. Select
Delete
from the
Edit…
pulldown menu.
3. The
Confirm Deletion
page appears. Click on the
Delete
button to delete the
subscription.
Note:
If you decide that you do not want to delete the subscription, click the
Back
button on
your browser to close the Delete or Confirm Deletion page.
4. The
Delete Successful
page appears. Click the
Click here to continue
link to continue
working in DocuShare.
Restoring a Deleted Subscription
If you inadvertently delete an object from the DocuShare repository, the Site Administrator can
easily restore it for you. All deleted content is sent to a trashcan accessible only to the Site
Administrator. If you mistakenly delete an object, you must contact the Site Administrator and
provide him/her with the necessary information. The Site Administrator is responsible for
purging the recycle bin on an asneeded basis. After purging, you will be unable to restore items
deleted up to that point, so be sure to notify the Site Administrator of deletion restorations in a
timely manner.
DocuShare 2.2 Users Guide
73
8 DocuShare URLs
Adding a URL
Viewing URL Properties
Editing URL Properties
Deleting a URL
Re
stor
ing a Deleted URL
Editing the Location of a URL
You can also save
URL
(Uniform Resource Locator) links in DocuShare. They are represented
by a
icon. You can think of a DocuShare URL as a shared bookmark.
Adding a URL
URLs can be added to any collection in DocuShare to which you have Writer access. You must
be logged in to DocuShare to add a URL.
To add a URL:
1. In the collection where you want to add the URL, click the
Add URL
selection in the
Add…
pulldown menu. The
Add URL
page appears.
2. Fill in the URL information: title, summary, and URL. Refer to the property descriptions
in the table below for descriptions of each field.
3. When you are finished, click the
Apply
button. The URL is created in DocuShare and
the
Services
page appears.
The
Add URL
page has the following properties:
Property Description
Title Specifies a descriptive title for the URL being submitted to the DocuShare repository.
The title can contain spaces and other punctuation marks. You should assign a
meaningful title to the URL. The default title is New.
This is a required field
.
Summary (Optional) Specifies a brief description of the URL being submitted to the DocuShare
repository. The contents of this field appear below the URL title when you display
the contents of the DocuShare collection that contains the URL.
URL Specifies the URL of the Web document you wish to reference (e.g.,
http://www.xerox.com).
Must be the fully qualified URL (i.e., including the “http://” portion of the reference).
The URL can be for any valid internet protocol in addition to HTTP, such as FTP,
DocuShare 2.2 Users Guide
74
Gopher, mailto, news, TELNET, WAIS, or file.
This is a required field
.
An easy method to record the correct URL for a Web site or Document is to first goto
that location in your browser. You can then copy the URL from your browser and
paste it into the DocuShare URL field.
Note:
There may be additional properties displayed on this page that are not listed here. They are
specific to your DocuShare site. See your Site Administrator for details.
You can verify that the URL was created by clicking the
Appears In
link to move you up one
level in the collection hierarchy. The URL should now be listed with a
icon. If you don't see
the URL, click
Reload
on your browser to refresh the page display.
Note:
After creating the URL, you should adjust the
access permissions
for the URL to make
sure they provide the desired level of access for other users and groups. See the section Viewing
and Editing DocuShare Object Permissions
in Chapter 3 for more information on adjusting these
permissions.
Viewing URL Properties
You can view the properties of a URL at any time. You do not need to be logged in to view a
URL's properties. However, you must be logged in to DocuShare to perform any editing
functions that can be accessed through the View URL Services page.
To access a URL’s
Services
page, click on the
Services
icon to the right of the URL in the
collection listing.
Properties for a URL include:
•
All of the properties listed in the previous section (see table above).
•
The URL’s identifying object number (handle), the owner who created the URL and the
date and time of creation and last modification.
•
The location of this URL within the collection hierarchy of the DocuShare site (
Appears
In
property). All DocuShare objects may appear in multiple locations.
All of these properties (except the object ID, the creation/modification dates/times and URL
location) can be edited or modified by the owner of the URL or a user with Writer access
permissions through the
Edit Properties
function. Use the
Edit Location
function to edit the
Appears In
property (URL location).
The
Services
page provides access to editing functions, using these selections in the
Edit…
pull
down menu:
•
Delete
– Delete this URL. You must be the owner of the URL or have Manager access
permissions to delete a URL. See the section Deleting a URL in this chapter for more
information.
DocuShare 2.2 Users Guide
75
•
Permissions
– View the access permissions for this URL.
If you are the owner or have Manager access permissions, you can also edit the access
permissions from here.
•
Edit Location
– Change (move) or add locations for this URL.
You must be the owner of the URL or have at least Writer access permissions to change
URL locations. See the section Editing the Location of a URL
in this chapter for more
information.
•
Edit Properties
Edit the properties for this URL.
You must be the owner of the URL or have Writer access permissions to edit URL
properties.
Editing URL Properties
You can edit the properties of a URL at any time by selecting
Edit Properties
from the
Edit…
pulldown menu on the
URL Services
page. You must be the owner of the URL or have at least
Writer access permissions to edit a URL’s properties. You must also be logged in to DocuShare.
To edit the properties of a URL:
1.
Click the
Services
icon for the URL whose properties you want to edit. The
URL
Services
page appears.
2.
Select
Edit Properties
from the
Edit…
pulldown menu. The
Edit URL
page appears.
3.
Edit the URL properties. Refer to the property descriptions in the previous section for
information.
Note:
While editing the URL properties, if you are unsure of the purpose of a field, you
can click on the highlighted field name for a brief Help description of the field.
4.
Click
Apply
. The Services page for the URL appears. The URL properties are updated to
reflect your edits.
Note:
There may be additional, editable properties displayed on this page that are not listed here.
They are specific to your DocuShare site. See your Site Administrator for details.
Deleting a URL
Only the owner of a URL (the user who added it to DocuShare) or a user with Manager access
for that URL can delete a URL from DocuShare. You must be logged in to DocuShare to delete a
URL.
To delete a URL:
1. Click the
Services
icon for the URL you are deleting. The
URL Services
page appears.
2. Select
Delete
from the
Edit…
pulldown menu. The
Confirm Deletion
page appears.
Note:
If you change your mind, click
Back
on the browser to close the Confirm Deletion
page.
DocuShare 2.2 Users Guide
76
3. Click the
Delete
button. The
Delete Successful
page appears.
4. Click the
Click here to continue
link.
The URL is now deleted. You may need to
Reload
the page to see these changes.
Restoring a Deleted URL
If you inadvertently delete a URL from the DocuShare repository, the Site Administrator can
easily restore it for you. All deleted content is sent to a trashcan accessible only to the Site
Administrator. If you mistakenly delete a URL, you must contact the Site Administrator and
provide him/her with the necessary information. The Site Administrator is responsible for
purging the trashcan on an asneeded basis. After purging, you will be unable to restore items
deleted, so be sure to notify the Site Administrator of deletion restorations as soon as possible.
Editing the Location of a URL
The
Edit Location
command allows a user to move a DocuShare object from one location to
another or allows the object to appear in multiple locations within the DocuShare repository.
You must have at least Writer access to the object to change its location.
The location of an object is displayed in the
Appears In
property, which is displayed at the end
of each
Properties
listing for an object. Using the Edit Location command allows you to edit the
Appears In
property.
This is a helpful command if you have created a URL (or any other DocuShare object) in the
wrong location and want to move it instead of deleting it and then recreating it. It is also helpful
if you would like the same object to appear in one or more additional locations. All DocuShare
objects can appear in multiple locations at once. However, there is actually only one physical
copy of the object in the DocuShare database; the system simply creates additional pointers or
references to the object.
A negative side effect of this command is that if used incorrectly, you can orphan the object.
Orphaned objects still exist within the DocuShare repository but are not accessible to users. Only
a Site Administrator can recover orphaned objects.
To change the location of a URL:
1.
Click the
Services
icon for the URL whose location you want to change. The
URL
Services
page appears.
2.
Select
Edit Location
from the
Edit…
pulldown menu. The
Edit URL Location
page
appears.
3.
For the
Appears In
field, a scrolling list is displayed that contains all DocuShare
collections to which you have at least Writer access. The URL’s current location is
highlighted.
•
To move an object, select the collection where you wish to move this object. The
DocuShare 2.2 Users Guide
77
previous location will be deselected.
•
To have an object appear in multiple locations, press the CONTROL key while
selecting the additional locations.
Note:
Use the CONTROL key for MS Windowsbased Operating Systems only.
Substitute the Command (or Apple key) key for the MacOS. Unixbased systems
require no special key for this multiple list item selection.
Note:
Use caution when deselecting locations. Deselecting improperly can create
orphaned files. Be sure that at least
one
location is selected in the scrolling list before
selecting the
Update Locations
button.
4.
Click the
Update Locations
button.
The
URL Services
page now appears and the new location(s) is/are displayed in
Appears In
. If
you do not see this change reflected on the Services page, click
Reload
on your browser to
refresh the page display.
DocuShare 2.2 Users Guide
78
9 DocuShare Bulletin Boards
Overview
Adding a Bulletin Board
Viewing Bulletin Board Properties
Editing Bulletin Board Properties
Deleting a Bulletin Board
R
estor
ing a Deleted Bulletin Board
Editing the Location of a Bulletin Board
Adding a Bulletin
Editing Bulletin Properties
Viewing and Deleting Expired Bulletins
Editing the Location of a Bulletin
Overview
DocuShare can also create online
Bulletin Boards
. They are represented by a
icon.
You can think of a DocuShare bulletin board as a place where users can post notices or messages
or maintain a running exchange of ideas. An example bulletin board is shown below.
Users can add new
bulletins
to the bulletin board. These bulletins appear in reverse
chronological order. Although bulletins have titles, DocuShare does not support threaded
discussions within a bulletin board. Setting an expiration period for the bulletins ranging from
one hour to two months to never can age a bulletin board. A bulletin board is considered a
container object
because they hold bulletin objects.
Adding a Bulletin Board
You can add a Bulletin Board to any collection in DocuShare to which you have at least Writer
access permissions. However, you must be logged in to DocuShare to create a bulletin board.
To add a Bulletin Board:
1.
In the collection where you want to add the bulletin board, select
Add Bulletin Board
from the
Add…
pulldown menu. The
Add Bulletin Board
page appears.
DocuShare 2.2 Users Guide
79
2.
Fill in the page. Refer to the property descriptions in the table below for descriptions of
each field.
3.
Click the
Apply
button.
The
Add Bulletin Board
page has the following properties:
Property Description
Title Specifies a descriptive title for the bulletin board. The title can contain spaces
and other punctuation marks. You should assign a meaningful title to the bulletin
board. The default title is New.
This is a required field
.
Summary (Optional) Specifies a brief description of the bulletin board. The contents of this
field are displayed below the bulletin board title on the associated DocuShare
collection page. You can use the Description field to provide a more detailed
description of the bulletin board.
Description (Optional) Specifies a detailed description of the bulletin board. The contents of
this field are displayed below the bulletin board title and/or image on the
DocuShare page. This field can contain HTML code to customize the bulletin
board's appearance.
Expires Specifies when bulletin board entries are automatically archived. The default is
Never. Archived items are no longer displayed on the main bulletin board.
Note:
There may be additional properties displayed on this page that are not listed here. They are
specific to your DocuShare site. See your Site Administrator for details.
The bulletin board is created in DocuShare and the
Services
page for the bulletin board appears.
You can verify that the bulletin board was created by clicking the
Appears In
link to move you
up one level in the collection hierarchy. The bulletin board should now be listed with a
icon.
If you don't see the bulletin board, click
Reload
on your browser to refresh the page display.
Note:
After creating the bulletin board, you should adjust the
access permissions
for the bulletin
board to make sure they provide the desired level of access for other users and groups. See the
section Viewing and Editing DocuShare Object Permission
in Chapter 3 for more information on
adjusting these permissions.
Viewing Bulletin Board Properties
You can view the properties of a bulletin board at any time. You do not need to be logged in to
view a bulletin board's properties. However, you must be logged in to DocuShare to perform any
editing functions that can be accessed through the Bulletin Board Services page.
To access a bulletin board's
Services
page, click on the
Services
icon to the right of the bulletin
board in the collection listing. If you are in an open bulletin board, select
View Properties
from
the
Edit…
pulldown menu.
Bulletin board properties include:
•
All of the properties listed in the previous section.
•
The bulletin board's identifying object number (handle), the owner who created the bulletin
DocuShare 2.2 Users Guide
80
board and the date and time of creation and last modification.
•
The location of this bulletin board within the collection hierarchy of the DocuShare site
(
Appears In
property). All DocuShare objects may appear in multiple locations.
All of these properties (except the object ID, the creation/modification dates/times, and bulletin
board location) can be edited or modified by the owner of the bulletin board or a user with Writer
access permissions through the
Edit Properties
function. Use the
Edit Location
function on
main bulletin board
Edit…
pulldown menu to edit the
Appears In
property (bulletin board
location).
The
Bulletin Board Services
page provides access to editing functions, using these selections in
the pulldown menu:
•
Permissions
– View the access permissions for this bulletin board.
If you are the owner or have Manager access permissions, you can also edit the access
permissions from here.
•
Edit Location
– Change (move) or add locations for this bulletin board.
You must be the owner of the bulletin board or have at least Writer access permissions to
change bulletin board locations. See the section Editing the Location of a Bulletin Board in
this chapter for more information.
•
Edit Properties
– Edit the properties for this bulletin board.
You must be the owner of the bulletin board or have at least Writer access permissions to
edit bulletin board properties.
Editing Bulletin Board Properties
You can edit the properties of a bulletin board at any time by selecting
Edit Properties
from the
Edit…
pulldown menu. You must be the owner of the bulletin board or have Writer access
permissions to edit a bulletin board's properties. You must also be logged in to DocuShare.
To edit the properties of a Bulletin Board:
1. Click the
Services
icon for the bulletin board whose properties you want to edit. The
Bulletin Board Services
page appears.
2. Select
Edit Properties
from the
Edit
pulldown menu. The
Edit Bulletin Board
page
appears.
3. Edit the bulletin board properties. Refer to the property descriptions from the table in the
previous section for information.
Note:
If you are unsure of the purpose of a field while editing the bulletin board
properties, you can click on the highlighted field name for a brief Help description of the
field.
4. Click
Apply
. The
Bulletin Board Services
page for the bulletin board appears. The
bulletin board properties are updated to reflect your edits.
DocuShare 2.2 Users Guide
81
Note:
There may be additional, editable properties displayed on this page that are not listed here.
They are specific to your DocuShare site. See your Site Administrator for details.
Deleting a Bulletin Board
Only the owner of a bulletin board (the user who added it to DocuShare) or a user with Manager
access for that bulletin board can delete a bulletin board from DocuShare. You must be logged in
to DocuShare to delete a bulletin board.
To delete a bulletin board:
1. Open the bulletin board that you want to delete.
2. Select
Delete
from the
Edit
pulldown menu.
3. If there are no objects in the bulletin board, the
Confirm Deletion
page appears. Select
the
Delete
button to delete the bulletin board.
If the bulletin board contains other objects, the
Delete
page appears. This page lists the
number of bulletin objects in the bulletin board that will be deleted. It also lists the
number of objects that will not be deleted because of insufficient access rights, or
because they appear in other locations.
•
To delete the bulletin board and its contents, select the
Delete Object and Contents
button.
•
To delete just the bulletin board, select the
Delete Just this Object
button.
Note:
If you change your mind about deleting this bulletin board, use the
Back
button on
your browser to close the Delete or Confirm Deletion page.
4. The
Delete Successful
page appears. Click the
Click here to continue
link.
The bulletin board is now deleted. You may need to
Reload
the page to see these changes.
Restoring a Deleted Bulletin Board
If you inadvertently delete a bulletin board from the DocuShare repository, the Site
Administrator can easily restore it for you. All deleted content is sent to a trashcan accessible
only to the Site Administrator. If you mistakenly delete a Bulletin Board, you must contact the
Site Administrator and provide him/her with the necessary information. The Site Administrator
is responsible for purging the trashcan on an asneeded basis. After purging, you will be unable
to restore items deleted, so be sure to notify the Site Administrator of deletion restorations as
soon as possible.
Editing the Location of a Bulletin Board
The
Edit Location
command allows a user to move a DocuShare object from one location to
another or allows the object to appear in multiple locations within the DocuShare repository.
DocuShare 2.2 Users Guide
82
You must have at least Writer access to the object to change its location.
The location of an object is displayed in the
Appears In
property, which is displayed at the end
of each
Properties
listing for an object. Using the Edit Location command allows you to edit the
Appears In
property.
This is a helpful command if you have created a Bulletin Board (or any other DocuShare object)
in the wrong location and want to move it instead of deleting it and then recreating it. It is also
helpful if you would like the same object to appear in one or more additional locations. All
DocuShare objects can appear in multiple locations at once. However, there is actually only one
physical copy of the object in the DocuShare database; the system simply creates additional
pointers or references to the object.
A negative side effect of this command is that if used incorrectly, you can orphan the object.
Orphaned objects still exist within the DocuShare repository but are not accessible to users. Only
a Site Administrator can recover orphaned objects.
To change the location of a bulletin board:
1.
Click the
Services
icon for the bulletin board whose location you want to change. The
Bulletin Board Services
page appears.
2.
Select
Edit Location
from the
Edit…
pulldown menu. The
Edit Bulletin Board
Location
page appears.
3.
For the
Appears In
field, a scrolling list is displayed that contains all DocuShare
collections to which you have at least Writer access. The bulletin board's current location
is highlighted.
•
To move an object, select the collection where you wish to move this object. The
previous location will be deselected.
•
To have an object appear in multiple locations, press the CONTROL key while
selecting the additional locations.
Note:
Use the CONTROL key for MS Windowsbased Operating Systems only.
Substitute the Command (or Apple key) key for the MacOS. UNIXbased systems
require no special key for this multiple list item selection.
Note:
Use caution when deselecting locations. Deselecting improperly can create
orphaned files. Be sure that at least
one
location is selected in the scrolling list before
selecting the
Update Locations
button.
4.
Click the
Update Locations
button.
The Services page for that bulletin board now appears and the new location(s) is/are displayed in
Appears In
. If you don't see this change reflected on the Services page, click
Reload
on your
browser to refresh the page display.
Adding a Bulletin
DocuShare 2.2 Users Guide
83
You can add a
Bulletin
to any bulletin board in DocuShare to which you have Writer access
permission. You must be logged in to create a Bulletin.
To add a Bulletin:
1.
Open the bulletin board where you want to add a bulletin. Select
Bulletin
from the
Add...
pulldown menu. The
Add Bulletin
page appears.
2.
Specify the bulletin information. Refer to the table below for descriptions of each field.
Note:
While creating the Bulletin, if you are unsure of the purpose of a field, you can
click on the highlighted field name for a brief Help description of the field.
3.
Click the
Apply
button.
The
Add Bulletin
page has the following properties:
Property Description
Title Specifies a descriptive title for the bulletin. The title can contain spaces and other
punctuation marks. You should assign a meaningful title to the bulletin. The default
title is New.
This is a required field.
Descriptio
n
Contains your message or notice. This field can contain HTML code to customize the
bulletin's appearance.
Note:
There may be additional properties displayed on this page that are not listed here. They are
specific to your DocuShare site. See your Site Administrator for details.
The bulletin is created in the DocuShare bulletin board and the
Services
page for the bulletin
appears.
You can verify that the bulletin was created by clicking the
Appears In
link to move you to the
default bulletin board view. If you don't see the collection, click
Reload
on your browser to
refresh the page display.
Note:
After creating the bulletin, you should view the
access permissions
for the bulletin to
make sure they provide the desired level of access for other users and groups. See the section
Viewing and Editing DocuShare Object Permissions in Chapter 3 for more information on
adjusting these permissions.
Editing Bulletin Properties
You can edit the properties of a bulletin at any time by selecting
Edit Properties
from the
Edit…
pulldown menu on the bulletin's Services
page.
You must be the owner of the bulletin or have at least Writer access permissions to edit bulletin
properties. You must also be logged in to DocuShare.
To edit the properties of a bulletin:
DocuShare 2.2 Users Guide
84
1.
Click the
Services
icon for the bulletin you want to edit. The
Bulletin Services
page
appears.
2.
Select
Edit Properties
from the
Edit…
pulldown menu. The
Edit Bulletin
page
appears.
3.
Edit the information. Refer to the property descriptions in the previous section for
information.
Note:
If you are unsure of the purpose of a field while editing the bulletin, you can click
on the highlighted field name for a brief Help description of the field.
4.
Click the
Apply
button. The
Bulletin Services
page for the bulletin appears. The bulletin
properties have now been updated to reflect your changes.
Note:
There may be additional properties displayed on this page that are not listed here. They are
specific to your DocuShare site. See your Site Administrator for details.
Viewing and Deleting Expired Bulletins
You can view and delete expired bulletins in a bulletin board. Only the owner of an expired
bulletin or a user with Manager access to the bulletin can delete the bulletin. You must be logged
in to DocuShare.
To view and delete expired bulletins:
1. Open the bulletin board.
2. Click
View Expired
. All expired bulletins for that bulletin board are displayed.
3. Select one or more bulletins and click
Delete Selected
. Click
Delete All
to delete the
entire list of expired bulletins. The
Delete Successful
page appears.
4. Click the
Click here to continue
link.
The bulletin is now deleted. You may need to
Reload
the page to see these changes.
Editing the Location of a Bulletin
Just as in other DocuShare objects, the
Edit Location
command allows a user to move a
DocuShare bulletin from one bulletin board to another or allows the bulletin to appear in
multiple bulletin boards within the DocuShare repository. There is only one physical copy of the
bulletin in the DocuShare database; the system simply creates additional pointers or references to
it.
You must have at least Writer access to the object to change its location. You must also be
logged in to DocuShare.
DocuShare 2.2 Users Guide
85
The location of an object is displayed in the
Appears In
property, which is displayed at the end
of each
Properties
listing for an object. Using the Edit Location command allows you to edit the
Appears In
property.
Editing the location of a bulletin assists in creating group or shared bulletin boards. You can
create a bulletin in your own bulletin board and then edit its location to appear in your bulletin
board and your workgroup's bulletin board.
A negative side effect of this command is that if used incorrectly, you can orphan the bulletin.
Orphaned objects still exist within the DocuShare repository but are not accessible to users. Only
a Site Administrator can recover orphaned objects.
To change the location of a bulletin:
1. Click the
Services
icon for the bulletin whose location you want to change. The
Bulletin
Services
page appears.
2. Select
Edit Location
from the
Edit…
pulldown menu. The
Edit Bulletin Location
page appears.
3. For the
Appears In
field, a scrolling list is displayed that contains all DocuShare bulletin
boards to which you have at least Writer access. The bulletin board's current location is
highlighted.
•
To move a bulletin, select the bulletin board where you wish to move this bulletin.
The previous location will be deselected.
•
To have a bulletin appear in multiple locations, press the CONTROL key while
selecting the additional bulletin board(s).
Note:
Use the CONTROL key for MS Windowsbased Operating Systems only.
Substitute the Command (or Apple key) key for the MacOS. UNIXbased systems
require no special key for this multiple list item selection.
Note:
Use caution when deselecting bulletin board. Deselecting improperly can create
orphaned files. Be sure that at least
one
location is selected in the scrolling list before
selecting the
Update Locations
button.
4. Click the
Update Locations
button.
The Services page for that bulletin now appears and the new location(s) is/are displayed in
Appears In
. If you don't see this change reflected on the Services page, click
Reload
on your
browser to refresh the page display.
DocuShare 2.2 Users Guide
86
10 Searching in DocuShare
Overview
DocuShare Search Page
Logical Operators
Reserved Characters
Saving Search Queries
Adding New Search Queries to a Collection
Viewing Saved Query Properties
Editing Saved Query Properties
Editing the Location of a Saved Query
Editing the Query
Deleting A Saved Query
Re
stor
ing a Deleted Saved Query
Overview
Every DocuShare object contains a set of associated attributes, which are sometimes also
referred to as
metadata
. These attributes include the object's title, summary, owner, description,
creation date, and keywords. For most objects, such as collections and bulletin boards, this set of
attributes is the object's complete information content. File objects, in addition, contain the user's
original file in its original format. Whenever a new object is created, or an existing object is
edited, it is indexed by DocuShare at that moment and made available for searching. For most
office documents, like Word, Excel and WordPerfect, their content is indexed in addition to their
metadata attributes. Your site administrator can tell you which file formats are currently being
indexed on your server.
For document content and every object’s title, summary and description, the DocuShare search
facility analyzes each word and indexes it in a way that enables you to find all variants of the
word. This is known as
stemming
. For example, DocuShare’s powerful stemming capability will
locate the words “bath,” “baths,” and “bathes” when you request the word “bath.” The other
metadata fields, including custom properties, are indexed for searching as well (with the
exception of float type properties which are not indexed).
DocuShare allows you to submit queries from two locations.
•
Simple keywordstyle queries may be issued from the DocuShare home page by typing one
DocuShare 2.2 Users Guide
87
or more words into the form and clicking on the Search button. It will return all objects that
have those words in any of their attributes, including file content.
•
Powerful structured queries may be issued from the DocuShare Search page. It allows you
to construct queries about specific attributes, for objects located within a given collection
and created during a limited interval of time.
The results of your query are returned as a collectionstyle listing. One notable difference is that
links to the collections in which each object appears are included. This enables navigation to the
related context of a query in addition to the specific objects that satisfied the query.
DocuShare Search Page
The DocuShare Search page allows you to build up sophisticated queries by selecting the desired
constraints and attribute values from a set of form categories. The constraints imposed by the
different categories are combined by multiple AND conjunctions to form the query. Within the
Where
category, you can use logical operators to build up queries about different object
attributes. For example, the following is a valid query:
•
Document Type
is
application/msword, and
•
Create Date
is after
1/1/97, and
•
Where
Title
contains
“market research” or Keywords
contains
“partners”
Object Type
This pulldown list allows you to limit the search to a specific type of object, such as
collections or files only. Selecting the special value
Any
allows you to search over all objects
in the repository.
DocuShare 2.2 Users Guide
88
Document Type
This field applies to File objects only, and lists all of the MIME Types currently supported by
your server. It allows you to limit search to a single type of file, such as only Word or PDF
documents. The Document Type constraint is combined with the Object Type constraint by
an AND conjunction. If
Object Type
is set to Any, selecting a value for Document Type will
automatically limit the search to objects of type File. If Object Type is set to an object type
other than File, selecting a value for
Document Type
will lead to an empty result because
nonfiles do not have a
Document Type
attribute.
Create Date
Allows you to search for content that was first created before or after a specified date, or
within a specified date interval. To search for content created before or after a specific date,
enter the date into one of the
Create Date
fields, select the appropriate relationship (before,
after, on, etc.) and leave the other field blank. To search for objects created within an interval
of time, enter the interval start and end dates in the two
Create Date
fields and select the
appropriate relationships.
Modified Date
Allows you to search for content that was last modified before or after a specified date, or
within a specified date interval. To search for content that was last modified before or after a
specific date, enter the date into one of the
Modified Date
fields, select the appropriate
relationship (before, after, on, etc.) and leave the other field blank. To search for objects that
were last modified within an interval of time, enter the interval start and end dates in the two
Modified Date
fields and select the appropriate relationships. When using the
Modified
Date
attribute, keep in mind that when an object is first created, its modified date equals it’s
create date.
Within
The
Within
category only appears on the form if you clicked on Search while viewing a
collection or its properties. It is used to limit search to only that collection and all of the
content it contains. A radio button is used to select between two possible values. By default,
the location constraint is selected. Selecting the radio button value for “Site” removes the
location constraint and searches over the entire repository.
Where
The
Where
category allows you to use logical operators to build up queries about specific
attributes, including file content. Selecting
Any Part
as the attribute value means that that
part of the query will return true if the specified value appears in any of the object's
attributes.
Maximum Results
Specifies the maximum number of objects to return. Results are always sorted, with the
highest match score first. Therefore, setting
Maximum Results
to 20 returns the 20 best
DocuShare 2.2 Users Guide
89
matches to your query.
Logical Operators
The queries that DocuShare builds based on your input are given to the Verity search engine.
Verity defines the four logical operators used in the
Where
category of the DocuShare Search
page, as follows.
AND
Searches for objects that contain all of the search elements you specify. The results are
relevanceranked. For example, the query:
Title contains marketing
And
Keywords contains technology
only returns objects having both “marketing” in their title and “technology” in their
keywords.
OR
Searches for objects that contain at least one of the search elements you specify. The results
are relevanceranked. For example, the query:
Title contains marketing
Or
Keywords contains technology
returns objects having either “marketing” in their title or “technology” in their keywords, or
both.
ACCRUE
Searches for objects that include at least one of the search elements you specify. The
ACCRUE operator scores results in a cumulative fashion the more search elements found,
the better the score. For example, the query:
Title contains marketing
Accrue
Keywords contains technology
returns objects having either “marketing” in their title or “technology” in their keywords.
Object having both elements will be given a higher score.
AND NOT
Searches for objects that do not include the search elements you specify. You can use AND
NOT to exclude documents, often in an attempt to reduce known sources of noise in the
search results. For example, the query:
Title contains marketing
And Not
Keywords contains technology
returns objects that have “marketing” in their title but do not have “technology” in their
keywords.
When you define a query using the logical operators, DocuShare groups the individual parts of
the query using the following precedence rules:
•
The
NOT
operator, as in
AND NOT
, always applies only to the next input string.
•
The
AND
operator has the highest grouping priority below
NOT
.
DocuShare 2.2 Users Guide
90
•
The
ACCRUE
operator has the highest grouping priority below
AND
.
•
The
OR
operator has the lowest grouping priority.
For example, the query:
Where
title
contains
test
OR
title
contains
practice
AND
summary
contains
homework
Is interpreted by DocuShare to mean:
(title
contains
test)
OR
((title
contains
practice)
AND
(summary
contains
homework))
Objects containing “test” in their title will be returned, as will objects containing “practice” in
their title and “homework” in their summary. Objects that contain “practice” in their title but do
not contain “homework” in their summary will not be returned.
Reserved Characters
The Verity search engine uses some characters for internal functions or to denote wildcard
patterns in your query.
Wildcard Characters
Character
Function
?
Specifies one of any alphanumeric character, as in ?an, which locates “ran,” “pan,”
“can,” and “ban.”
*
Specifies zero or more of any alphanumeric character, as in corp*, which locates
“corporate,” “corporation,” “corporal,” and “corpulent.” Do not use an asterisk (*)
to specify the first character of a wildcard string.
To use a wildcard character as a query string literal, precede it with a backslash (\). For example,
to search for “x*y” enter
x\*y
.
Special Characters
The following characters have special meaning to the Verity search engine and will not be
treated as literals in a query string:
•
comma ,
•
left and right parentheses ()
•
double quotation mark “
•
backslash \
•
at sign @
DocuShare 2.2 Users Guide
91
•
left curly brace {
•
left bracket [
•
less than sign <
•
backquote '
•
equals =
•
dash –
•
caret ^
•
pound #
•
exclamation point !
These special characters are typically ignored and treated as a space in searching.
Saved Queries
Saved Queries
allow users to store into a collection the query used in a search and reuse it again
at a later time. This is especially helpful when you have developed a complex query that will be
reused multiple times, such as a description of an important subject area that you want to track.
By saving the query, you can access the desired information directly, without having to reenter
the search information. New queries can also be defined and saved directly to a collection
through the collection’s
Add...
menu. Saved Queries are indicated by the
icon because they
behave much like a collection, but their contents are the result of a search invoked each time the
Saved Query is opened.
To save a search query:
1.
After performing a search, on the
Search Results
page click on the
Edit…
pulldown
menu and select
Save Search Query
.
2.
The
Save Search Query
page appears.
3.
Fill in the desired information under the Title, Summary, Description, Keywords, and
Appears In fields.
4.
Click
Apply
.
5.
The query is saved and the
Services
page appears.
To add a new search query
:
1.
In the location where you want to add the query, select
Saved Query
from the
Add...
pulldown menu. The
Add Saved Query
page appears. The
Add Saved Query
page is
DocuShare 2.2 Users Guide
92
similar in layout to the
Search
page; however, the
Add Saved Query
page contains four
additional fields:
Property Description
Title Specifies a descriptive title for the saved query. The title can contain spaces
and other punctuation marks.
This is a required field.
Summary (Optional) This field should contain a short description of the type of saved
query being submitted to the DocuShare repository. The contents of the
Summary field will appear below the object’s title on the page in which the
object appears.
Description (Optional) This field should contain a detailed description of the saved query.
Keywords (Optional) This field should contain any Keywords associated with this query.
Keywords help to categorize content and allow for more accurate searching if
trying to locate this object. Simply type in a series of words in the field.
2. The remainder of the fields contains the same parameters as the
Search
page. Fill in the
rest of the information according to your search requirements.
3. Click the
Apply
button. The
Saved Query Services
page appears.
Viewing Saved Query Properties
To view the properties of a saved query, you must access the
Saved Query Services
page. You
can do this by clicking on the
View Properties
option in the
Edit…
pulldown menu, or by
clicking on the
Services
icon to the right of the link. Saved Query properties include:
•
All of the properties listed in the previous section
•
The saved query’s identifying object number (handle), the owner of the saved query,
the date and time of creation and last modification
•
The subscription, query, and query’s scope
•
The location of this saved query within the collection hierarchy of the DocuShare site
(i.e., the
Appears In
property). All DocuShare objects may appear in multiple
locations.
DocuShare 2.2 Users Guide
93
Editing Saved Query Properties
You can edit the properties of a Saved Query by selecting
Edit Properties
from the
Edit…
pull
down menu, or by clicking on the Services icon. The
Edit Properties
page contains the
following properties:
Property Description
Title This field should contain the title of the object being submitted to the DocuShare
repository. The title should be short but descriptive and may contain spaces and other
punctuation marks.
This is a required field.
Summary (Optional) This field should contain a short description of the object being submitted
to the DocuShare repository. The contents of this field will be displayed beneath the
object's title when printing the contents of a Collection in which this object appears.
The Description field may be used to provide a more detailed description of the
object.
Description (Optional) This field should contain a detailed description of the object. For
Collections and other containertype objects, the contents of this field will be
displayed at the top of the page, just below the title and/or image associated with the
object. If desired, this field may contain HTML markup that will be inserted into the
page without modification.
Keywords This field should contain any Keywords associated with this object. Keywords help
to categorize content and allow for more accurate searching if trying to locate this
object. Simply type in a series of words in the field.
To edit properties of a saved query:
1. In the
Edit…
pulldown menu, click on
Edit Properties
.
Note:
If you are not automatically taken to the Edit Properties page, click the
Go
button.
2. Edit the saved query properties. Refer to the property descriptions from the above table
for information.
Note:
If you are unsure of the purpose of a field while editing subscription properties,
you can click on the field name for a brief Help description of that field.
3. Click the
Apply
button. The
Saved Query Services
page appears, with the properties
updated to reflect your changes.
DocuShare 2.2 Users Guide
94
Editing the Location of a Saved Query
The
Edit Location
command allows a user to move a DocuShare object from one location to
another, or allows the object to appear in multiple locations within the DocuShare repository.
You must have at least Writer access to the object to change its location.
The location of an object is displayed in the
Appears In
property, which is displayed at the end
of each
View Properties
listing for an object. Using the
Edit Location
command allows you to
edit the
Appears In
property.
This is a helpful command if you have created a saved query (or any other DocuShare object) in
the wrong location and want to move it instead of deleting it and then recreating it. It is also
helpful if you would like the same object to appear in one or more
additional
locations. All
DocuShare objects can appear in multiple locations at once. However, there is actually only one
physical copy of the object in the DocuShare database; the system simply creates additional
pointers or references to the object.
A negative side effect of this command is that if used incorrectly, you can unintentionally
orphan
the object. Orphaned objects still exist within the DocuShare repository but are not accessible to
users except by directly accessing their URL. A Site Administrator can help you recover
orphaned objects if you do not know their URL.
To change the location of a saved query:
1. Click the
Services
icon to the right of the saved query whose location you want to
change. The
Saved Query Services
page appears.
2. In the
Edit…
pulldown menu, select
Edit Location
. The
Edit Saved Query Location
page appears.
3. In the
Appears In
field, a scrolling list is displayed that contains all DocuShare
collections to which you have at least Writer access. The saved query’s current location
is highlighted.
•
To move an object, select the collection where you wish to move this object. The
previous location will be deselected.
•
To have an object appear in multiple locations, press the CONTROL key while
selecting the additional locations.
Note:
Use the CONTROL key for MS Windowsbased Operating Systems only.
Substitute the Command (or Apple key) key for the MacOS. Unixbased systems
require no special key for this multiple list item selection.
Note:
Use caution when deselecting locations. Deselecting improperly can created
orphaned files. Be sure that at least
one
location is selected in the scrolling list
before selecting the
Update Locations
button.
4. Click the
Update Locations
button.
DocuShare 2.2 Users Guide
95
The
Saved Query Properties
page for that query appears and the new location(s) is/are
displayed in
Appears In
property. If you don't see this change reflected on the
View Properties
page, click
Reload
on your browser to refresh the page display.
Editing the Query
You may change the search parameters of a query at any time. Changing the search parameters is
useful if you decide that, for example, you want to search for additional document or object types
using the same saved query.
To edit the query:
1. In the
Edit…
pulldown menu, select
Edit Query
.
Note:
If you are not automatically taken to the Edit Query page, click the
Go
button.
2. Edit the query search parameters.
3. Click the
Apply
button. The
Saved Query Services
page appears, with your changes
reflected.
Deleting a Saved Query
To delete a saved query:
1. Click on the
Services
icon to the right of the saved query you want to delete.
2. Select
Delete
from the
Edit
pulldown menu.
3. The
Confirm Deletion
page appears. Click on the Delete button to delete the saved
query.
Note:
If you decide that you do not want to delete the saved query, click the
Back
button on your browser to close the Delete or Confirm Deletion page.
4. The
Delete Successful
page appears. Click the
Click here to continue
link.
Restoring a Deleted Saved Query
If you inadvertently delete a saved query from the DocuShare repository, the Site Administrator
can easily restore it for you. All deleted content is sent to a trashcan accessible only to the Site
Administrator. If you mistakenly delete an object, you must contact the Site Administrator and
provide him/her with the required information. The Site Administrator is responsible for purging
the trashcan on an asneeded basis. After purging, you will be unable to restore items deleted, so
be sure to notify the Site Administrator of deletion restorations as soon as possible.
DocuShare 2.2 Users Guide
96
11 Using the DocuShare Windows Client
Overview
Mounting a DocuShare Server on Windows Explorer
Accessing a Mounted DocuShare Server via Windows Explorer
Viewing and Editing Files with the DocuShare Windows Client
New Function Buttons in the Windows Client
New Menus in the Windows Client
Working with DocuShare Files in the Windows Client
−
Adding, Copying, and Deleting Files or Folders
−
Versioning and Locking Files
−
Editing File Properties
Searching DocuShare with the Windows Client
Configuring Options
View the WorkInProgress Folder
Open/Save/Save As... Dialogs
Overview
The Windows Client allows you to work with a DocuShare repository of files (or several) from
within Windows Explorer. Once you mount the server and log in, DocuShare will appear as a
separate drive in the familiar Windows Explorer tree environment. When you click on the
DocuShare drive from Windows Explorer, DocuShare collections appear as folders, and files
appear as the appropriate icons. You can bypass normal upload procedures and copy files to a
DocuShare collection from your local or network drives, or you can drag and drop files from
DocuShare directly to your computer, avoiding the download step. Simply select the file (or
files) you want and drag it to the folder to which you wish to upload or download. It works the
same as when you drag files around within your computer or to and from network drives.
DocuShare 2.2 Users Guide
97
Mounting a DocuShare Server on Windows Explorer
The DocuShare Windows Client must be installed on your computer before you can mount a
DocuShare server on Windows Explorer. See Installing the Windows Client
,
Chapter 1. Once
you have installed the Windows Client, click the DocuShare icon as it appears in Windows
Explorer.
All DocuShare servers that have been mapped to the Windows Client will be displayed.
Initially, no servers are mapped.
To map a DocuShare server:
1.
Either select the
Add Server
icon or choose
Map DocuShare Server
from the Explorer
Tools
Menu. The Step 1 dialog box of the Map Server Wizard will appear.
2.
Under Home
URL
, type in the name of your DocuShare server (e.g.,
http://sales.acme.com). If you prefer, you can use the
Browse…
button to launch a web
browser for you to select the DocuShare server with. The DocuShare Windows Client
supports connections to servers via standard HTTP or SSL so either http:// or https://
should be used as the URL prefix.
3.
If a proxy server is needed, press the
Advanced
button. If the DocuShare server you are
using is local, do not use a proxy server.
4.
Press
Next
. The Step 2 dialog box appears.
5.
Enter your username under
Account Name
.
6.
Enter your password under
Password
. (If mapping as a
Guest
, leave the
Password
field
empty.)
7.
If you do not have an account on the DocuShare server, check the “Create a new
account” checkbox and enter the confirmation password, email address, and user name.
A new account will be created for you on the server with this user ID and password.
8.
Press
Next
. The Step 3 dialog box appears.
9.
Enter the name you want to appear in the Windows Client under
Folder Name in
Explorer
. Although this name can be different than the name of your DocuShare
website, you probably want to give it the same name or a related, meaningful name to
avoid any confusion with other servers.
10.
Enter a name under
Workinprogress directory name
that is at least four characters
long.
DocuShare 2.2 Users Guide
98
11.
Press
Next
. The Step 4 dialog box lets you review the information you entered in steps 1
through 3. If the information is correct, press Finish to create the server folder. If you
experience a login problem, see Chapter, 14, Troubleshooting.
At this point, the new folder for the server will appear in Windows Explorer under the
DocuShare icon. In addition to mapping servers, specific collections within servers can be
mapped into the DocuShare Windows Client root directory. A mapped collection allows the
collection to be accessed directly without having to walk down the server’s tree hierarchy. These
mapped collections must exist on a mapped server.
To map a DocuShare collection:
1.
Make sure the server that the collection resides on is already mapped.
2.
Select the
Add Collection
icon. The Map Collection dialog is displayed.
3.
Select the server on which the collection resides.
4.
Walk through the collection hierarchy and select the collection. Click
OK
.
The new folder for the mapped Collection will now appear under the DocuShare icon.
To remove a DocuShare server from the DocuShare Windows Client
:
1.
Select
Disconnect DocuShare Server
from the Windows Explorer
Tools
Menu.
2.
Select the DocuShare server you wish to disconnect.
3.
Click
OK
.
The server you selected for removal should no longer appear on the Windows Explorer interface.
If the server does still appear, select
Refresh
in the Windows Explorer
View
menu.
Accessing a Mounted DocuShare Server via Windows Explorer
To access a mounted DocuShare server via Windows Explorer:
1.
Doubleclick on the DocuShare icon that appears in your Windows Explorer tree
structure. See example below:
2.
Type your password in the dialog box, which may appear, then click
OK
. Remember that
your password is casesensitive. If you make a mistake and see an error message, try
entering your password again or see your Site Administrator.
DocuShare 2.2 Users Guide
99
3.
The DocuShare server then opens onto your Windows Explorer Interface, and you will
see the familiar folder pattern of collections and objects that make up the DocuShare site.
You can now point and click to open DocuShare collections on your DocuShare site as if they
were folders on one of your local or network drives.
Viewing and Editing Files with the DocuShare Windows Client
Viewing and editing DocuShare files on the Windows Client is similar to viewing and editing
files on one of your local drives in Windows Explorer. Collections appear as Windows Explorer
folders that may contain files, URLs, calendars, bulletin boards or other collections/folders. Files
will appear with their corresponding icons (e.g.,
for Microsoft Word files).
To open a DocuShare collection/folder in the Windows Client, simply doubleclick the folder
with your mouse. The contents of that collection/folder will then appear in the righthand side of
the Windows Explorer Interface. Remember that permissions still apply, so depending on your
access, you may not be able to view restricted collections or folders. See Chapter 3, DocuShare
Permissions for further information.
To open a DocuShare file, simply doubleclick on the file name. There are two ways to “open” a
DocuShare file. The default response to doubleclicking on the file is to open the corresponding
application with the file set to
read only
. This is called
browse
mode. Alternatively, you may
open the file for editing and save it back to DocuShare when you are done. This is called
check
out
. When you check out a file, the original copy on the DocuShare server is locked while you
edit the file so that others will not be able to create new versions while you are editing the
current version. Both options are available from the menu that appears when you click your
right mouse button on the file name. Which action is your default in response to a doubleclick is
configurable from the DocuShare settings screen (see Configuring Options).
The DocuShare Windows Client supports the following applications for check out:
•
Microsoft Word, Excel and PowerPoint, 95, 97, and 2000 editions.
•
Lotus WordPro 32
•
Lotus Freelance
DocuShare 2.2 Users Guide
100
•
Corel Presentations
•
Corel Quattro Pro 8.0
•
Corel WordPerfect 7.0, 8.0, and 9.0
•
Visio 5.0
•
Microsoft Notepad, Wordpad and Paint
Other applications may or may not correctly check out of DocuShare or save back to DocuShare.
See Chapter 14, Troubleshooting DocuShare.
You may also independently lock or unlock a file. When a file is checked out, it is automatically
locked. You may not unlock a checked out file. A locked file can only be browsed, and cannot
be checked out.
Saving the file in the corresponding editor will save the file locally. When you exit the
corresponding editor, the DocuShare Windows Client will automatically upload the saved local
file to the DocuShare server and unlock the file.
New Function Buttons in the Windows Client
Most of the function buttons on the Windows Client are the same as the function buttons in
Windows Explorer; however, there are a few differences. The table below gives a description of
the function buttons in the Windows Client.
Up one Level: Takes you one level higher in the tree structure. It works the same for
DocuShare as it does for Windows Explorer.
Large Icons: Displays large icons. It works the same for DocuShare as it does for
Windows Explorer.
Small Icons: Displays small icons. It works the same for DocuShare as it does for
Windows Explorer.
List: Displays icons in a list. It works the same for DocuShare as it does for Windows
Explorer.
Details: Displays icons in a list with details about the files. It works the same for
DocuShare as it does for Windows Explorer.
Thumbnail: Displays large icons of document files and thumbnail images of graphics
files.
Note:
Thumbnails are only available when connected to a DocuShare server running
version 2.1 or higher.
DocuShare 2.2 Users Guide
101
Edit: Opens an edit program for the file. The specific response depends upon the edit
program. For supported applications, DocuShare will open the application for editing
and offer to save the editing file back to the same DocuShare location when you close
the window. For unsupported applications, DocuShare will open the file in readonly
mode. See the Editor Support section for more details. It works the same for DocuShare
as it does for Windows Explorer, but you will be offered the ODMA option (see ODMA
Client).
Print: Prints the current file. It works the same for DocuShare as it does for Windows
Explorer.
Add Document: Adds a document to the current collection/folder. This function button
is unique to the DocuShare Windows Client.
Create New Version: Creates a new version of the file with which you are working.
This function button is unique to the DocuShare Windows Client.
Create New Collection: Creates a new collection within the open collection. This
function button is unique to the DocuShare Windows Client.
Delete: Deletes the selected file. It works the same for DocuShare as it does for
Windows Explorer, except that you must have Manager access to delete a file.
View Version History: Shows you the version history of the current document. This
function button is unique to the DocuShare Windows Client.
View Properties: Displays the properties of the selected file. It works essentially the
same for DocuShare as it does for Windows Explorer.
Undo: Undoes the last action. This Windows Explorer function is
not
supported in the
DocuShare Windows Client.
Map Server. Brings up the sequence of screens to map to another DocuShare server.
This button only appears when the Xerox DocuShare drive is selected.
Disconnect Server. Allows you to remove one of the currently mapped DocuShare
servers. This button only appears when the Xerox DocuShare drive is selected.
DocuShare 2.2 Users Guide
102
New Menus in the Windows Client
In addition to the Windows Explorer function buttons, you will notice various popup menus
when you rightclick your mouse within the Windows Client. As with the function buttons, these
menus closely resemble the standard Windows Explorer rightclick menus with a few
differences.
Whenever DocuShare content is selected, the Windows Explorer
Tools
menu contains an additional section for three DocuSharespecific
commands.
Map DocuShare Server…
allows you to connect to
additional DocuShare sites.
Disconnect DocuShare Server…
allows
you to remove currently mapped DocuShare sites. This is also useful if
you want to login as a different user.
Go to DocuShare URL…
brings
up a window in which you can enter a DocuShare location directly.
The window offers a partial URL as a hint that you must complete.
On Windows 2000, the
Find Files in DocuShare…
item is also
available under this
Tools
menu.
This menu appears if you rightclick your mouse in the All Folders
section (i.e., left side) of the Windows Client. Functions are an
abbreviated list of those found in Windows Explorer.
Open in Web Browser
launches an Internet Explorer window to the
selected server.
New
allows you to create a new folder (i.e., collection) or a new
document
.
You can also create new Calendar, Bulletin Board, and
URL objects.
Edit
allows you to copy the DocuShare URL or DocuShare Properties
URL for the folder onto the clipboard, along with the standard edit
operations of Cut, Copy, Paste, and Delete.
DocuShare 2.2 Users Guide
103
This menu appears if you rightclick your mouse in the Folder Contents
section (i.e., right side) of the Windows Client. Functions are mostly
the same as in Windows Explorer. The DocuShare functions are listed
below.
Open in Web Browser
launches an Internet Explorer window to the
selected collection.
New
allows you to create a new folder (i.e., collection) or a new
document
.
You can also create new Calendar, Bulletin Board, and
URL objects.
Edit
allows you to copy the DocuShare URL or DocuShare Properties
URL for the folder onto the clipboard, along with the standard edit
operations of Cut, Copy, Paste, and Delete.
View
lets you choose among the following: large icons, small icons,
list, details, or thumbnail image view.
This menu appears if you rightclick your mouse on a file in the Folder
Contents section (i.e., right side) of the Windows Client. Functions are
a mix of Windows Explorer and DocuShare. The DocuShare functions
are listed below.
Browse
opens the selected file.
Check Out
opens the selected file and locks it so others cannot use or
change this file while you have it active.
Print
opens the selected file and issues a Print request to the editor.
Open in Web Browser
launches an Internet Explorer window to view
the selected item.
Lock
locks the file.
Unlock
unlocks the file.
Version History
lets you view the version history of the file.
New
creates a new version of the file using the existing file.
Edit
allows you to copy the DocuShare URL or DocuShare Properties
URL for the object onto the clipboard, along with the standard edit
operations of Cut, Copy, Paste, and Delete.
View
lets you choose among the following: large icons, small icons,
list, details, or thumbnail image view.
Rename
lets you rename the file. This will change the file’s Title
DocuShare 2.2 Users Guide
104
property on the DocuShare server.
Properties
displays a window for viewing and editing the object’s
properties.
Working with DocuShare Files in the Windows Client
Working with DocuShare files on the Windows Client is much the same as working with regular
files from your local or network drives on Windows Explorer. Using standard Windows Explorer
drag and drop operations, you can copy files to a DocuShare collection from your local or
network drives, or you can copy files from DocuShare directly to your computer. You can also
copy and move DocuShare files from folder to folder within the DocuShare using draganddrop
operations. Other standard Windows Explorer features are available as well, such as Rename,
Delete, and Properties.
Adding, Copying, and Deleting Files or Folders
To add (i.e., upload) files from a local or network drive to a DocuShare folder (i.e., collection)
on the Windows Client, follow the steps below.
To add files or folders:
1.
Select the file(s) you wish to add with your mouse and drag it to the desired DocuShare
folder.
Note
: Remember that you must be logged in and have
Writer
permission to add files to
a DocuShare collection.
2.
A confirmation message box will appear. Click
Yes
.
The file will now appear in the DocuShare folder you designated. If you do not see the copied
file, rightclick your mouse in the contents area (i.e., right side of Explorer Screen) and select
Refresh
.
Note:
You can also add files to DocuShare via the ODMA Client. See Chapter 12, The
DocuShare ODMA Client for further information.
The above process works the same for adding folders from a local or network drive to a
DocuShare folder on the Windows Client. All contents of the added folder will be included.
To copy files from a DocuShare folder to a folder on your local or network drives:
1.
Select the file(s) you wish to copy with your mouse and drag it to the desired local or
network folder.
Note:
The
Confirm Item Copy
screen does not pop up for this type of action (i.e., a
download).
2. Use the same select and drag procedure as above to copy files from one DocuShare folder
(i.e., collection) to another.
DocuShare 2.2 Users Guide
105
The
Confirm Item Copy
screen will pop up if you copy files from one DocuShare server to
another, but otherwise the process is the same. Remember that you must have
Write
permission
to add files to a DocuShare collection even if the files are coming from another DocuShare
collection or server.
The above process works the same for copying folders from a DocuShare folder on the Windows
Client to a local or network drive. All contents of the added folder will be included.
Note:
Dragging files from DocuShare to the Windows Recycle Bin will not delete the file from
DocuShare. Files should only be dragged from DocuShare and dropped into regular file
locations.
To delete files from DocuShare on the Windows Client
:
1.
Select the file(s) with your mouse and press the Delete function button on the Windows
Client Interface or the Delete button on your keyboard.
Note
: Remember, you must have
Manager
access to delete files or folders from
DocuShare.
2.
A confirmation screen
will appear. Click
Yes
if you are certain you want to delete the file
or folder.
The file or folder is now deleted. You may need to select
Refresh
from the rightmouse menu to
reload the page and see the deletion.
Versioning and Locking Files
Versioning and Locking Files basically works the same way as it does in the web version (see
Chapter 5, DocuShare Files for indepth information). Follow the process below to create a new
version of a file on the DocuShare Windows Client.
To create a new version of a file:
1.
Click on the
Create New Version
function button at the top of the interface or choose
New
?
?
?
?
Version
from the mouse rightclick menu. The file must be selected for you to
use the rightclick menu.
You can also drag and drop a local file onto a file in DocuShare to create a new version.
Note:
You can not drop a DocuShare file onto another DocuShare file to create a new
version.
2.
The
Create New Document Version
dialog box appears:
DocuShare 2.2 Users Guide
106
3.
Enter the file name or select it by using the
Browse
key.
To view the
Version History
of a document on the DocuShare Windows Client, select the file
by rightclicking it and choose
Version History
from the menu. You can also view the version
history by clicking the
View Version History
function button at the top of the Windows Client
interface. Within the Version History Dialog, you can rightclick a version and choose version
specific actions from the menu such as
Browse
,
Copy
, and
Copy URL
.
To lock a file on the DocuShare Windows Client, select the file by rightclicking it and choose
Lock
from the menu that appears. A padlock icon will appear to the right of the document icon.
You can also check out
a document by selecting the document by rightclicking and choosing
Checkout
from the menu. This automatically opens the file and locks it so you can work on it.
See Chapter 12, The DocuShare ODMA Client for further information.
To unlock a file on the DocuShare Windows Client, select the file by rightclicking it and choose
Unlock
from the menu that appears. The padlock icon will disappear.
Editing File Properties
You can view and edit the properties of a file with the Properties Dialog.
To display the Properties Dialog
:
1.
Click on the
Properties
function button at the top of the interface or choose
Properties
from the mouse rightclick menu.
2.
The
Properties
dialog box appears:
DocuShare 2.2 Users Guide
107
3.
Inspect other tabs as required.
Searching DocuShare with the Windows Client
To search DocuShare with the DocuShare Windows Client
:
1.
Select
Find
→
→
→
→
Files on DocuShare
from the Explorer Tools Menu.
On Windows 2000, the
Find Files in DocuShare
item is available directly under the
Tools
menu. DocuShare Find is not integrated with the Windows 2000 Search interface
in DocuShare 2.2.
2.
The
DocuShare Find File
dialog box appears.
DocuShare 2.2 Users Guide
108
3.
Fill in your search criteria as necessary. The search can be issued across multiple servers,
or restricted to just a certain collection on a server.
4.
There are four tabs of criteria at your disposal:
Title & Location
,
Date Modified
,
Advanced Search
, and
Options
. These four tabs together mirror the search criteria
options from the web view.
5.
Click
Find Now
when you are ready to start the search.
6.
The Search Results appear underneath the
Find File
box.
7.
To copy found files to your PC, you can use the regular drag and drop method. To check
the properties of an item, rightclick on an item and select
Properties
from the menu. If
you edit the properties of an item in the search results, you’ll note that an exclamation
icon is displayed in the search results next to the item to denote it has been modified.
To exit the search dialog box, click on the X in the upperright hand corner.
DocuShare 2.2 Users Guide
109
Configuring Options
There are several options on the DocuShare Windows Client that you can configure. To access
the options, doubleclick the
DocuShare Client Properties
icon in the
Windows Control
Panel
. Alternatively, you can rightclick on the red Xerox
icon in the toolbar of your
Windows Explorer interface. (On most machines, the
will be located at the bottomright
corner – the Start button is usually in the bottom left corner.) When you rightclick on the icon, a
short menu appears:
Choose
Settings…
.
Note:
Checking “Disable ODMA
”
from this menu will turn off the ODMA option. “View WIP
Folder”
will show you information about the Work in Progress. “About DSClient”
gives you
license and version information on the DocuShare Windows Client.
After you select
Settings,
the
DocuShare Client Properties
dialog box appears.
Note:
The options shown as selected in the following examples are the DocuShare Windows
Client default options. Your Site Administrator can help you figure out the best settings for your
machine and requirements. The DocuShare Properties dialog offers various options regarding the
DocuShare Windows Client’s behavior.
DocuShare 2.2 Users Guide
110
ODMA Settings
•
When “Prompt for DocuShare Open/Save dialog” is checked, each time you open or save
a document, a DocuShare screen will appear asking if you want to open from or save to a
DocuShare server or your local drives. When not checked, Open and Save operations will
always assume that you want a DocuShare server. See the chapter on DocuShare ODMA
Client.
•
The “Always open at top level” option tells the DocuShare Windows Client where to start
when it opens a DocuShare collection listing for Oopen and Save operations.
Windows Explorer
•
DocuShare files may be opened for readonly viewing (Browse) or for editing
(Checkout). The “Doubleclick checks out a file” setting indicates which action you
prefer as the default when you doubleclick on a file. Both actions are available by
clicking on the right mouse button over the desired file.
•
If the “Default to OLE method to open and track a file” option is not enabled, the
Windows Client runs an explicit check on the OLE (Object Linking and Embedding)
registration for the editor application that is associated with a checked out file. It will then
determine if the editor application is capable of being started using an OLEbased launch
method.
This option is available only for NT4 and Windows 2000 users. The option is grayed in
Windows 95 and 98. The OLE registry check is always made under Windows 95 and 98.
Normally, this option should be left enabled under NT because NT provides OLE
packager support for nonOLE applications that the Windows Client can use to open the
file correctly. However, if the editor program you use does not support the OLE launch
method, and does not work with NT's OLE packager, you should uncheck this option.
Note that the default OLE launch method can be overridden by selecting a different
launch method using the File Type tab (see below). In addition, the default OLE method
is overridden if the file type supports ODMA.
•
The “Limit checkout to registered” option prevents the DocuShare Windows Client from
attempting to launch editor sessions for applications which have not explicitly been
certified for use with the Client. (A registered file type appears in the list under the
File
Types
tab when the “Common types only” option is enabled.)
Note:
If the appropriate editor for a file type is not installed on the local PC, attempting
to open the file will cause an error message saying that the proper editor registered with
the Windows system could not be found.
If disabled, the Windows Client will always attempt to launch an editor session.
However, because noncertified editors may not function properly with the DocuShare
Windows Client, this option should only be disabled with caution.
•
If “Limit checkout to registered” is enabled, nonregistered file types can be checked out
DocuShare 2.2 Users Guide
111
if the “Utilize generic checkout handler” option is selected. This setting instructs the
Windows Client to use a generic checkout handler to check out a file that is not explicitly
registered with the Client. This technique allows noncertified editors to be used while
minimizing the risk of failure.
This handler uses a simple processmonitoring method to track the life cycle of the editor
application. Since the Windows Client does not explicitly support the editor, you have to
tell the Windows Client when you are ready to check the file back into DocuShare. The
handler runs a small window with OK and Cancel buttons at the topleft corner of the
desktop. Click the
OK
button to initiate a checkin after you have finished editing the file
and closed the editor application. Click the
Cancel
button to discard any changes you
have made.
•
The “Show HTML tags” option instructs the Windows Client to display all HTML tags
used in the titles of DocuShare objects. By default, all HTML tags are removed for
display in the Windows Client.
The typical use of HTML in DocuShare properties is for formatting in the browser
interface. For example, a file title may contain <FONT> tags for rendering a part of the
title text in a typeface different from the default system font. With this option enabled,
the Windows Client will keep the <FONT> tags in the title text it displays in the
Windows Explorer, ODMA and any other Client components. Note that the raw HTML
tags will be displayed – the Windows Client makes no attempt to parse this HTML like a
browser.
Usually, this option should be left disabled so that the Client does not show HTML tags.
However, if you edit the properties of an object that originally had HTML formatting in
its title, you’ll lose that HTML formatting when you apply the properties change. Also
note that toggling this option requires a system reboot for the change to take effect.
•
The “Check new and changed items every X seconds” option toggles the setting of auto
refresh for collection listings. When this option is disabled, the Windows Client does not
perform any periodic autorefresh. To refresh the listing, you need to select the
Refresh
menu item in the Windows Explorer.
When this option is enabled, the Windows Client periodically performs a query in the
background and updates the listing for changed collections automatically. The auto
refresh feature should not be enabled if you experience slow or heavy network traffic or
if it interferes with document checkout or other DocuShare Client activity.
More advanced settings are available in Windows Explorer's Folder Options dialog,
which allow you to configure the way that Windows Client updates and caches the
collection listing data. Open the DocuShare folder in Windows Explorer, select the
Folder Options menu item from the View menu, and select the DocuShare tab.
Windows Common “Open/Save As” Dialogs
•
When the “Lock Common Dialog opened files” option is enabled, the Windows Client
locks files opened through the Common Dialog. If you do not want the Windows Client
to lock a particular file, you can uncheck the “Lock” option in the DocuShare
DocuShare 2.2 Users Guide
112
Informational box that appears next to the Common Dialog.
•
Checking “Allow entry from registered editors only” prevents access to DocuShare from
editors that have not explicitly been certified for use with the Windows Client when the
editor's native Open/SaveAs dialog is used. Refer to the README.TXT included in the
DocuShare Windows Client installation directory for the latest list of supported editors.
If the option is not checked, the Windows Client allows any editor to access DocuShare.
However, some editors may not be able to actually open the DocuShare folder. For
example, Microsoft Word raises an access/denied error if you try to open the DocuShare
folder through its native Open dialog.
General
The “Enable network event logs” field allows you to tell the DocuShare Windows Client to log
all error events. For any network errors, the Windows Client displays an exception report dialog
and shows the logged information under the “Event Log” tab.
FileTypes Tab
The File Types tab allows the Windows Client use of editor applications to be modified. Because
many different editors behave in different ways, the DocuShare Windows Client allows fine
tuning of this editor connection. .
Note that changes to these settings do not affect how the Windows Client opens files for
browsing. The Windows Client delegates the task of launching an associated editor application
for file browsing to Windows itself. Therefore, to modify the browser behavior, the Windows
file type settings must be modified through the Windows Explorer. Refer to a Windows user
guide for more details on editing file type associations in Windows.
DocuShare 2.2 Users Guide
113
•
“Available types in Explorer” is the list of file types that can be modified. If the
“Common types only” option is checked, the list only shows file types that are associated
with certified editor applications. Uncheck this option to list all available types registered
with Windows.
•
“File type details” consists of two file type specifiers (Extension and MIME type) and the
checkout method that will be used to open files of this type.
•
The file extension name under Extension is used by Windows and most editor
applications. The MIME type setting is used by DocuShare and other Internet
applications.
•
Under the checkout method, either the common name of the associated editor application
or a command line to run the application may appear.
You cannot edit the file type. The Windows file type (extension) is set when you first check in a
file. The file extension name is the last part of the filename you specified. The MIME type is
automatically assigned by DocuShare when the file is indexed. You can edit the MIME type
using the DocuShare Client. To do this, open the Properties dialog for the file and either enter a
new MIME type specifier, or select from the dropdown list.
If the file you check out does not contain a file extension, the DocuShare Windows Client uses
the MIME type setting to generate one. The Windows Client always uses the file extension to
determine which editor application to use.
Depending on the editor application, the Windows Client needs to use a different checkout
method. The selected method is shown under “Checked out using”. The program file or
command line that is used to run the editor program is shown below the selected method.
The DocuShare Windows Client uses the following checkout methods (also mentioned as editor
launch methods elsewhere in this document):
•
ODMA protocol
•
Custom handler
•
OLE protocol
•
DDE protocol
•
Process monitoring
•
None (file is uneditable)
These methods are listed according to the level of editor integration. You should select the
method for the highest level of which your editor application is capable. If the selected method
does not work for your editor program, change it to a lower method. If the file type does not
designate an editable document or media data file, you should select the None method to
disallow checkout.
DocuShare 2.2 Users Guide
114
Make sure that the file extension and MIME type settings are correct. Since the Windows Client
first looks at the file extension, if the file extension is not correct, the Windows Client may not
run the correct editor program even if a correct MIME type is given. To work around this
problem, download the file, give it the correct file extension name, and upload it as a new
version of the same file (using the New Version menu item or the drag and drop method). These
supported editor launch methods are described in more detail below.
The ODMA protocol allows the editor to gain direct control over the DocuShare file access. A
file opened using this protocol may be safely saved as a new document (using the File | Save As
menu item). The Windows Client can use the ODMA protocol if the file type is one of the
following:
•
MS Word 97 and 2000 document (extension .doc)
•
MS PowerPoint 97 and 2000 document (extension .ppt)
•
MS Office Binder 97 and 2000 document (extension .bnd)
•
Corel WordPerfect versions 8 and 2000 (extension .wpd)
•
Lotus Wordpro versions 8 and 2000 (extension .lwp)
An editor application may support ODMA in general, but if it does not support the ODMA
command line syntax, the ODMA protocol will not be used to check out a file directly from
Windows Explorer. Visio is one such editor application. In the case of Visio, the Windows Client
preselects the OLE protocol.
A “custom handler” is a special Windows Client program that was written specifically for
handling the tasks of opening a file of a particular file type and tracking its life cycle in a
particular editor application. The following are supplied by the Windows Client:
•
MS Excel 97 and 2000 worksheet (extension .xls)
•
Corel WordPerfect versions 7, 8 and 2000 (extension .wpd)
•
Corel Presentations versions 8 and 2000 (extension .shw)
•
Lotus Freelance versions 7 and 2000
Many popular editor programs support OLE (Object Linking and Embedding) to open and track
a file. For those editors, the protocol allows the editor to link with the Windows Client using the
OLE file linking protocol. When the OLE protocol is in use, the Windows Client does not need
to periodically query the editing state of the file. The OLE protocol is preferable to the DDE and
process monitoring methods. The latter methods require the Windows Client to perform periodic
state polling in the background in order to track the lifecycle of the checked out file. In NT4 and
Windows 2000, Windows can provide nonOLE applications with OLE packager support. The
packager enables a nonOLE application to act as if it supports the OLE file linking protocol and
allows notification linkage to be established between the Windows Client and the opened file
(via the packager's OLE handler).
DocuShare 2.2 Users Guide
115
The DDE protocol may be selected if the editor application supports the standard DDE system
topic for opening a file. DDE permits an inquiry to be performed by the Windows Client about
the current editing state of the file. The Windows Client makes this inquiry periodically and uses
the queried information to update the filetracking status.
If the editor application does not support any of the above methods, the Windows Client can use
the Process Monitoring method to track the editor. When this method is selected, the Windows
Client periodically checks the process state of the editor. However, because this method does not
allow the Windows Client to track the file state itself (e.g., closure of the file window in the
editor window), the Windows Client defers checkin until the entire editor application closes.
This means that if the editor holds multiple file windows and you close one of the file windows,
that closed file does not trigger immediate checkin. Only when you close the whole application
does the Windows Client run the checkin dialog. Therefore, when this method is selected, you
must exit the editor application in order to initiate a DocuShare checkin.
When you select the ODMA, custom handler, or process monitor method, you will be asked if
you want to open the file using an editor program that is different from the currently assigned
editor. Select
Yes
to map the file type to a different editor. A list of remappable file types will be
presented. Select a desirable file type. The next time you check out a file of that file type, the
Windows Client will use the remapped file type to find an editor program. Note that the
Windows Client uses this file type remapping mechanism to reassign some common file types
to nondefault editors (e.g., editors selected by Windows). For example, the Windows Client uses
WordPad to open text (.txt) files although the default text editor is Notepad.
Folders Tab
•
The “Save Local folder” field sets the default folder on your PC used for storing a local
DocuShare file. For example, if a checked out file fails due to a network problem while it
DocuShare 2.2 Users Guide
116
is being uploaded to DocuShare, the Windows Client allows you select an emergency
folder to save the file locally. The folder you enter in this field will be the default for this
emergency save. Use the
...
button to select a different folder. If you directly edit the
folder's path specification, make sure that the path is correct in syntax and that the folder
exists.
•
The “Automatically clean” option tells the Windows Client to delete temporary work
files it created in the cache and work folders when the current Windows session
terminates. Check this option to delete temporary files.
Note that the checkbox is gray. The checked state means that the all work folders
including the ODMA subfolder will be cleaned. The gray state means that all work
folders except the ODMA subfolders will be cleaned. The unchecked state means that
work folders are not cleaned when Windows terminates. If there are any transient or
orphaned files left, they will not be deleted automatically. To manually clean work
folders, use the
Clean
button.
•
The icon list under “Work folders” shows the base work folders of the DocuShare
Windows Client. To see subfolders, doubleclick on the icon or name of a folder. The
folder expands to a tree of nested subfolders. A brief description and status of the selected
folder is shown under “Description” and “Status” fields.
•
To see the contents of a folder, select the
Open
button. The contents will be displayed
using a Windows folder window. You should not manipulate (e.g., rename or delete) any
of the files in the folder window unless you are certain that the file is not being managed
by the DocuShare Windows Client. To verify if the file is being managed by the
DocuShare Windows Client, open the DocuShare File Monitor window. If the file is
listed there, do not do anything. Sometimes the File Monitor loses record of a checked
out file (e.g., due to an abnormal termination of the editor) and the working copy of the
file becomes orphaned. In such a case, you may move or delete the file.
•
The
Move
button lets you move the selected folder to a different location. The current
location is described under the “Status” field. You can move the base work folder and
cache folder; however, you are not allowed to move the data folder.
•
The
Delete
button allows you to delete the selected work folder. All contents of the folder
will also be deleted.
•
The
Clean
button lets you clean up a work folder. Only work files that have been logged
by the Windows Client will be deleted.
Note:
These folders can only be moved or deleted if the Windows Client has not been
used during the Windows Session. If you want to move or delete one of the folders but
the buttons are disabled in the Settings dialog, reboot Windows and access the Settings
dialog directly through the Windows Control Panel.
DocuShare 2.2 Users Guide
117
View the WorkInProgress Folder
The DocuShare Client WorkInProgress (WIP) Folder tracks all activity in the Windows Client.
The DocuShare File Monitor (displayed above) allows you to manage the contents of the WIP
folder. Each file that is being edited, locked, or cached in the DocuShare Client temp directory is
listed. These files can be copied directly to the local file system, unlocked, or deleted from the
WIP Folder.
For diagnostics, the DocuShare Client activity log is accessible through the WIP window. A
hidden pane at the bottom of the WIP window (signaled by the cursor changing above it) can be
pulled up to reveal the activity log.
Columns of the WIP list
•
Title
– Shows the document title and file type icon of the file. If the file is locked, a
padlock is placed next to the title.
•
Editor window
– Shows the name of the editor's executable module, the name of the
editor class, or the editor's window title.
•
Modified
–
Yes
indicates that the workinprogress copy of the file has been modified,
and
No
indicates that the local copy has not been modified since the checkout time or
since the last checkin.
•
Last checkin
–
Shows the time of the last checkin. If no checkin has been performed,
this column shows “N/A.”
•
File handle
– Indicates the number of DocuShare file handles assigned to the file being
edited. If no handle number is shown, the local file has not been checked in yet, or the
file is orphaned. A file may become orphaned if the DocuShare File Monitor window was
closed inadvertently while you were still editing (that is, a system error happened which
caused Windows to shut down).
•
Collection
– Indicates a DocuShare collection to which the checkedout file belongs.
DocuShare 2.2 Users Guide
118
•
Server address
– Shows the home URL of the DocuShare server.
•
File location
– Shows the full path name of the file being edited.
Activity Log
The activity log maintains a chronological listing of events that occur with regard to the
DocuShare File Monitor. This activity log is in a hidden window pane at the bottom of the
DocuShare File Monitor window. The activity log may be viewed by dragging the frame of the
hidden window pane upwards. You can locate the upper frame of the hidden window pane by
moving your cursor over the lower part of the main window. The frame will be indicated when
the cursor changes into the frame drag cursor (i.e., two horizontal lines with arrows pointing
vertically).
Monitor Menu
•
Exit
– Terminates the DocuShare File Monitor application.
Edit Menu
•
Copy
– Copies text from the activity log.
•
Clear All
– Clears the activity log.
View Menu
•
List
– Shows the file titles and icons only.
•
Details
– Shows other information.
•
Settings…
– Starts the DocuShare Client Settings dialog.
•
Events
– Enables/disables activity logging (grayed when the focus is on the WIP list).
•
Refresh
– Forces rescanning of the WIP folder and updating of the WIP list.
•
Status bar
– Shows/hides the status bar at the bottom of the main window.
Document Menu
•
Lock
– Locks the DocuShare file on the server associated with a selected file in the
workinprogress folder. A file checked out from Explorer is automatically locked.
However, a file opened through the ODMA Interface or the Windows Open/Save As
dialog may not be checked out (unless you checked the Lock option). In such a case, you
may use this menu item to create the lock manually.
•
Unlock
– Unlocks the source file.
•
Save Local
– Lets you save a selected file to a local folder in your machine from the
workinprogress folder.
DocuShare 2.2 Users Guide
119
•
Check In
– Allows you to check in a selected file. If the file is not assigned with a file
handle, the file may only be uploaded as a new document.
•
Stop
– Cancels an ongoing upload process.
•
Delete
– Deletes the local copy from the workinprogress folder. If the source file is
locked, deleting will remove the lock.
Help
•
Contents
– Allows you to view the file.
•
About DocuShare Client…
– Enables you to view the version information for the
DocuShare Client.
Buttons
•
Check In
– Allows you to check in a selected file. If the file is not assigned with a file
handle, the file may only be uploaded as a new document.
•
Stop
– Cancels an ongoing upload process.
•
Save Local
– Lets you save a selected file to a local folder in your machine from the
workinprogress folder.
•
Delete
– Deletes the local copy from the workinprogress folder. If the source file is
locked, deleting will remove the lock.
•
List
– Shows the file titles and icons only.
•
Details
– Shows other information.
Remarks
The DocuShare File Monitor lists all files that are currently held in the workinprogress folder.
You can use the monitor window to find or review what files have been checked out and what
states those files are in. For example, you may see that a file was last checked in at 4:00 pm
and is still being edited using Microsoft Word. You do not need to start the DocuShare File
Monitor manually – it will be started automatically when you check out a document the first
time. The DocuShare File Monitor window is usually hidden from view. To view the workin
progress list, doubleclick on the DocuShare File Monitor icon on the taskbar.
When you check out a DocuShare file via the Windows Explorer, a copy of the file is
downloaded to a workinprogress directory and is indexed by the DocuShare File Monitor for
editor tracking and checkin purposes. After it locks the file, the DocuShare File Monitor starts
an editor program associated with the document type of the file. When you close the edited file
or exit the editor program, the DocuShare File Monitor prompts you to save the file back to
DocuShare. You may fill in optional fields and click on
Check In
to start the upload process.
At this point, you may decide to save the file as a new document in DocuShare instead of
DocuShare 2.2 Users Guide
120
saving it back as a new version of the checked out file. If you do, select Save As, and you will
be prompted with a new document checkin form.
If you do not want to save the file (despite the edit changes you made), select
Cancel
. The
DocuShare File Monitor invalidates the file handle assigned to the canceled local file. The
DocuShare File Monitor then asks you if it is OK to delete the local copy that you were
working on. If you want to keep the file, select
No
. If the WIP folder is not open, it will then
open. Highlight the file in the list, and select Save Local from the Document menu (or from the
tool bar). You may also select
Check In
to save the file as a new DocuShare document.
Remember that, once you cancel, the original file handle is lost. You cannot save it back as a
new version of the checked out file. If you still need to save it as a new version, follow these
steps: Save the file to a local directory using Save Local, start Explorer, go to the file to
replace, select New>Version from the context menu, and open the local file you saved.
Another note regarding check in cancellation: The DocuShare File Monitor leaves the file
locked when you cancel. Should you decide to save it to a local folder, be sure to either unlock
the file or delete it using the respective menu items of the DocuShare File Monitor. The
DocuShare File Monitor will notify Explorer of a lock status change for display updating.
Although a canceled file may be unlocked from Explorer, you will continue to see a padlock in
the WIP folder because the DocuShare File Monitor is not notified. When you delete the file,
the DocuShare File Monitor displays an error message indicating that the unlock failed.
You do not need to close a checkedout file (or exit the editor program) to initiate a checkin.
If you want to save an interim version, you can do so by first selecting Save in the editor and
then by selecting Check In from the DocuShare File Monitor. Note however, that depending on
how the editor manages an open file, the file may be marked nonshareable, and the Check In
command may fail.
To close the DocuShare File Monitor window, either click on the (X) close box at the upper
right hand corner or select
Close
from the system command menu (rightclick on the
DocuShare File Monitor title bar to get this menu). Under normal circumstances, you should
not select Exit from the Monitor menu. The DocuShare File Monitor application exits
automatically when the Windows session is shut down, restarted, or a new user logs in.
Open/Save/Save As... Dialogs
DocuShare 2.2 Users Guide
121
Desktop applications that support the Window’s Common Dialog will have access to
DocuShare through their Open and Save/Save As… dialogs. The DocuShare folder can be
selected and the DocuShare collection hierarchy can be traversed. An informational side box is
presented to help navigate through DocuShare. The
Mode:
field notes whether the action will
result in a checkin, checkout (lock and open), or browse.
About Controls
Top area
– Displays Help text regarding what to do, depending on the currently selected item.
Mode
– Indicates file access mode and data direction depending on the currently selected item.
Possible modes are:
•
Select server – open the selected server folder.
•
Open collection – open the selected collection.
•
Browse – open the selected file without locking it.
•
Check out – open the selected file and lock it.
•
Check in document – check in a file as a new document in DocuShare.
•
Check in version – check in a file as the latest version of a DocuShare document.
Files you selected
(bottom area) – Shows the name(s) of the selected item(s).
Lock
(check box) – Check to lock the selected file. Available in the Open mode. Grayed in the
Save mode. Note that this option is preselected by the “Lock Common Dialog opened files”
option in the DocuShare Windows Client Properties dialog.
File name
– User specifies the title of a document to open or save. The file name field is grayed
when in the Open mode. A file must be selected from the directory list. The name field becomes
editable in the Save mode. When viewing a DocuShare collection, the field is grayed regardless
of the mode.
Files of type
– User specifies a file type. The types are made available by the editor program.
DocuShare 2.2 Users Guide
122
To check out an existing file for editing from DocuShare and then save it back:
1.
Select
Open
from the File menu of the editor application.
2.
Navigate to the DocuShare folder.
3.
Go to the DocuShare collection that holds the file. If you have not logged onto the server,
you will be prompted to enter a password.
4.
Check the Lock option located in the DocuShare Informational box. If you do not want to
lock the document, leave it unchecked.
5.
Select the file. The
Mode:
line should read “Check Out Single” (or “Check Out
Multiple” for multiple file selection). In addition, the “Files you selected” area should
mention the file you just selected.
6.
To load the file into the editor, click on
OK
or doubleclick on the file name.
7.
The DocuShare Client downloads a copy of the file from the server (locking it if you
enabled the Lock option), and places it in a workinprogress folder. To view the
document's workinprogress status, doubleclick on the DocuShare File Monitor icon in
the system tray. The WIP folder opens to show files that have been checked out and/or
are currently being edited.
8.
Make your changes. While editing, you may select
Save
from the File menu. Note that
Save writes out the changes you have made to the local copy of the file in the workin
progress folder. It does not cause an actual checkin with the server.
9.
To save the file back to DocuShare, select
Close
from the File menu.
10.
DocuShare Client produces a form for checking in a new document version. This may
take a few moments.
11.
Fill in optional revision comments in the Version Comment field.
12.
Click on
Check In
.
13.
The DocuShare Client uploads the modified copy of the file with your comments and
unlocks the file.
14.
Once the document is saved back, the DocuShare Client deletes the local copy from its
workinprogress folder.
15.
If you view the document history in Explorer, your latest version appears in the list. Note
that two new versions appear if you have made two checkins, one from the first Save
and the other from closing the document window.
Note that while browsing DocuShare collections, the file name field of the Open dialog is
grayed. You are not allowed to type an arbitrary file name. You must select a name from
the shown list.
DocuShare 2.2 Users Guide
123
To save a local file to DocuShare:
1.
Load the document into the editor. Make your changes.
2.
Select
Save As
from the editor's File menu.
3.
In the Save As dialog, navigate to a destination DocuShare collection.
4.
The Mode description should read “Check In Document.”
5.
Type in a file name. If you have selected a name from the list shown previously, deselect
it by clicking somewhere in the blank area. The “Files you selected” area should be
blank.
6.
Click
OK
.
7.
Your editor program saves the file to a workinprogress folder of the DocuShare Client.
The document appears in the WorkInProgress Files list of the DocuShare File Monitor
window.
8.
The DocuShare Client produces a form for checking in a new document. This may take a
few moments.
9.
Fill in the summary and other optional fields.
10.
Click
Check In
.
11.
The DocuShare Client uploads the new document to the server.
12.
You may continue editing. If you do, however, you should lock the document from the
DocuShare File Monitor window. The Save As mode does not lock the checkedin
document automatically.
13.
Close the document. If the document has been modified since the first checkin, the
DocuShare Client again prompts you with a checkin form.
14.
Once the document is saved, the DocuShare Client deletes the local copy from its work
inprogress folder.
If an error occurs while uploading the file, or if you cancel the upload in progress, DocuShare
Client prompts you to open the DocuShare File Monitor window (if not already open), review
the status, and take action if necessary to resolve the problem. From the DocuShare File
Monitor window, you may attempt to check in again, or save to a local folder on your machine.
If you have already closed the editor application, you should also delete the finished file from
the workinprogress list. Note that when you exit from Windows, all leftover workinprogress
files are deleted automatically.
DocuShare 2.2 Users Guide
124
To overwrite an existing DocuShare document with a new version:
Follow the steps for saving a local file to DocuShare. Instead of typing a new name in the Save
As dialog, however, select an existing name from the list. The Mode line should read “Check In
Version.” In addition, the “Files you selected” area should display the name you selected.
Limitations
You may not save a file in the DocuShare Client root folder or in any server folder. An error will
result.
After you check out a document, you may want to save it as a different DocuShare document.
You can do this by following the above procedure for saving a local document. However,
because of the way that the DocuShare Client tracks the document's location, the original
document continues to be shown in the DocuShare File Monitor window after it is saved as a
new document. If you have edited and saved the original document again after the initial check
in, when you close the second document (the new one that you created with the Save As dialog),
you may be prompted for checking in not only the second document, but the original document
as well. Should this happen, you can either continue with the check in, or let the DocuShare
Client discard the original.
When you use the Open or Save As menu the second time, the dialog box may show the current
contents of a previously accessed workinprogress folder of DocuShare Client (e.g.,
Temp_Folder_C123). While nothing prevents you from doing so, you should not open a file
from or save a new one to that folder. The folder is temporary and is used by the DocuShare
Client for storing workinprogress files that are mapped to a certain DocuShare collection. If
you do save a file (by mistake) into this temporary directory, DocuShare Client asks you if you
want to check it in. If you say yes, your file will be uploaded. However, doing so causes the
DocuShare Client to not receive notification regarding the editor window's identity. This leads to
a condition where a directly saved file is never removed from the WorkInProgress Files list
even after the editor window is closed. You need to manually remove it. To do this, open the File
Monitor window and execute Delete from the Document menu.
Nonstandard functions are not supported. Some editor applications add custom buttons and/or
other controls to the Windows Open/Save As dialog box. The DocuShare Client does not support
them. Use of such a function may lead to an error.
Some of the buttons in the dialog box are grayed when browsing a DocuShare server.
Specifically, the Create New Folder button and the two List and Details buttons are grayed. To
use these functions, rightclick to pop up the context menu, and select the respective items.
Some context menu items that are available in Explorer are not available in the Open/Save As
dialog. They include Add Document, Lock, and Unlock.
You can find the complete list of tested applications that work with the DocuShare Client
through the application’s Open/Save As dialogs in the README documentation. An application
not listed may not work correctly.
DocuShare 2.2 Users Guide
125
12 DocuShare ODMA Client
Overview
Opening a DocuShare File Using the ODMA Client
Checking In an Edited File to DocuShare
About DocuShare Document Titles, File Names, and File Extensions
Maximum Number of ODMAManaged Documents
Supported Applications and Known Problems
Differences Between the Common Dialog and ODMA Interfaces
Overview
The Open Document Management API (ODMA) Client works in conjunction with the Windows
Client and Windows Explorer to make managing your documents easier. With the DocuShare
ODMA interface, you can access DocuShare from within the editor application you use. In other
words, the ODMA Client allows DocuShare to be one of the locations from which you can open
files and to which you can save files.
Opening a DocuShare File Using the ODMA Client
The ODMA Client also allows you to open a DocuShare file through an editor application. Using
Microsoft Word as an example editor program, follow the steps below.
To open a file in DocuShare using ODMA:
1.
Choose
File
?
?
?
?
Open
in Microsoft Word and the
Open DocuShare Document?
dialog
box will appear.
DocuShare 2.2 Users Guide
126
2.
If you choose
No
, the standard Microsoft Word
Open
dialog box appears, allowing you
to browse Windows Explorer to select the file you wish to open. If you choose
Yes
, a
dialog box for DocuShare opens as shown below:
3.
Select the DocuShare server you wish to browse. If you have only one server, select that
one. The collections on that DocuShare server will then appear in the next dialog box. If
you are not already logged in, you will have to enter your User Name and password when
prompted.
DocuShare 2.2 Users Guide
127
4.
Browse the collections/folders until you find the folder you want to edit, and doubleclick
the file to open it. You have now checked the file out of DocuShare. Think of it as
borrowing the file.
5.
If you checked the
Lock
checkmark, DocuShare will lock the file and load it into
Microsoft Word. You can then edit the file as you wish.
Note
: Remember, when editing a DocuShare file in an editor application (e.g., Microsoft
Word), you are not actually editing the file online in DocuShare. Therefore, using the
Save
command while editing a file does
not
save the file back to DocuShare.
Save
will
only save the file to your local computer. You must use
Close
or
Save As
to upload the
file back to DocuShare. See the next section for more information.
You can also open a DocuShare file through Explorer by doubleclicking on the file (or selecting
Check Out
from the
rightclick
menu), and thereby launching the editor application from
Explorer.
About Controls
•
File Open button
– Takes you back to the application's native Open (or Save As) dialog.
•
Left dropdown list
– Lists the currently browsed collection, its parent collection, and so
on.
•
Up One Level button
– Takes you back to the parent collection.
DocuShare 2.2 Users Guide
128
•
Right dropdown list
– Lists the supported ODMA file types. Select a specific type to
limit the file listing to files of that type only.
•
Document
– Specifies the title of a selected document.
•
Summary
– Displays the summary text attached to a selected document in the Open
mode, or lets you enter summary text in the Save mode.
•
Lock checkbox
– Enabled for Open only. Locks the document on DocuShare and opens
the document for editing; otherwise, the document is opened for browsing only (i.e.,
ReadOnly mode).
Checking In an Edited File to DocuShare
When you are finished editing a document using the ODMA Client, you may save the file locally
on your computer, or check the updated file back into DocuShare. Think of checking the file in
as returning it.
Save
alone will
not
check the file back in to DocuShare. Follow the steps below
to check in an edited file to DocuShare.
To check a file back into DocuShare:
1.
Select
Close
to close the edited file.
2.
You will be prompted as to whether you want to save changes. Choose
Yes
(unless you
do not want to save changes). The
Check In Updated Document
dialog box appears:
DocuShare 2.2 Users Guide
129
3.
Click on
Check In
. Enter any version comments you wish in the corresponding field.
Note
: You can choose the
Save As
option to give the updated file a new name on
DocuShare, or you can cancel.
4.
You will see an updating dialog box appear as the document gets uploaded to the
DocuShare server. The updated file is now checked back in to DocuShare with any edits
you made.
The
Discard
button will unlock the file and discard the edits. The
Save Local
button will
allow you to save the file to the local file system. In either case, the file stored in DocuShare
will not be affected.
About DocuShare Document Titles, File Names, and File Extensions
When you type a name in the Save DocuShare Document dialog to save a file, you are actually
giving the file a DocuShare “title.” DocuShare maintains another file property called “file
name.” The DocuShare Client does not actually use the file name. Rather, when the DocuShare
Client needs a file name to make a file transfer (in Explorer for example), it generates a path
name that concatenates the workinprogress directory path, the DocuShare title, and the
extension part of the DocuShare file name. It then runs the resultant path name through a
validation routine to remove any illegal characters, and to curtail the name length to within the
range that Windows permits.
In the Save DocuShare Document dialog, you may or may not specify a file extension as part of
the title. If you do not, the DocuShare Client automatically uses a file extension name associated
with the editor application you are using. The DocuShare Client then generates a “file name” by
concatenating the title you supplied with either the extension you supplied as part of the “title”
specification, or the extension it generated. You see this generated file name in the
File name
field
in a checkin dialog box. For example, if you save a Word 97 file and call it “Business
proposal” without specifying any extension, the file name that is generated is “Business
proposal.doc”.
A problem arises if you try to save a file of a nonstandard type. For instance, you may save a
Word template file and call it “Entry automation macro.” The file should be given the extension
“.dot”. However, because the DocuShare Client always uses the same file extension for a given
editor (in this case, “.doc” for Word), the template file would be given the incorrect extension of
“.doc”. When you see the file name in the checkin dialog, it reads “Entry automation
macro.doc”. In such a case, you need to edit the file name in the checkin dialog and assign the
correct extension name before selecting the Check In button. You can avoid this problem if you
first type “Entry automation macro.dot”. The DocuShare Client simply copies the title to the file
name field and the correct extension will be forwarded to the server.
If you have missed the chance to correct the extension, you can:
1.
Open the collection in Explorer.
2.
Drag and drop the file onto a local folder in your machine.
DocuShare 2.2 Users Guide
130
3.
Correct the extension name.
4.
Copy it back to the collection.
Simply renaming the title from inside the collection view is not enough. Doing so will not affect
the file name including the extension. In addition, when you do this in Explorer, make sure you
can see the file extension. If the extensions are not displayed, use Explorer's Options to correct
the view settings.
Maximum Number of ODMAManaged Documents
An application working with the DocuShare Client via ODMA may open up to 16 documents (in
practice, this number is 14 or less because several of the document slots are used for transient
purposes). If you are a user of a Corel 8 application, you will not be able to consecutively open
and/or save a document more than 14 times within the lifetime of the application's process. If
you attempt to open more, the DocuShare Client will alert you when you have reached the limit.
Restarting the application will clear this effect (the document counter is reset).
Supported Applications and Known Problems
Refer to the README documentation.
Differences Between the Common Dialog and ODMA Interfaces
Although the Windows common dialog interface of DocuShare Client is similar in functionality
to the DocuShare Client's ODMA interface, the checkin and checkout processes are controlled
differently. Because of this, you may encounter a checkin prompt from the ODMA interface at
an unexpected time. For instance, the common dialog interface does an actual checkin and
uploads the file to the server when you perform a Save As. The ODMA interface, on the other
hand, defers the actual checkin and upload of the file until you close the document.
DocuShare 2.2 Users Guide
131
13 PaperPort Link to DocuShare
Overview
PaperPort Preferences
Upload Parameters
Overview
The PaperPort Link to DocuShare is a plugin for the popular Visioneer PaperPort Desktop that
is bundled with many desktop scanners. The Link is available for download from the DocuShare
HelpDesk. It is a selfcontained installer that does not require the DocuShare Windows Client to
be previously installed.
If you are familiar with PaperPort desktop links, the actions for using the DocuShare plugin will
be easy to identify and use. Items, usually documents, normally appear on the PaperPort desktop
as the result of a scanning operation. In Xerox DocuCentre systems, the ScantoFile facility can
place items on the PaperPort desktop. Once on the PaperPort desktop, items can be processed by
dragging them onto one of the link icons on the link bar displayed at the bottom of the PaperPort
Desktop. Installing the PaperPort Link to DocuShare creates its own link icon. For more
information on the PaperPort Desktop and links, refer to the online help for the PaperPort
Desktop and the online help for the PaperPort Link to DocuShare for more information.
The PaperPort Link to DocuShare allows items to be uploaded directly from the PaperPort
Desktop into DocuShare. Items in DocuShare can not be retrieved back to the desktop through
the Link. If installed on a machine with the DocuShare Windows Client, mapped DocuShare
servers will be accessible and shared by both the Link and Windows Client.
The PaperPort Link to DocuShare has two dialog window boxes,
Link Preferences
and
Upload
Parameters
. Each has its own Help information.
PaperPort Preferences
To view the PaperPort Link to DocuShare Preferences:
DocuShare 2.2 Users Guide
132
1.
Rightclick on the DocuShare Link and select
Preferences
in the popup window to open
the Link Preferences window.
2.
Set the default format for the files to be uploaded to DocuShare.
3.
Specify the more frequently used Collections to upload files to. These Preferred
Collections will be available for quick selection from the Upload dialog.
4.
Logging can also be enabled from the Preferences Dialog.
Upload Parameters
To upload a file to DocuShare:
DocuShare 2.2 Users Guide
133
1.
Drag a document from your PaperPort Desktop and drop it onto the DocuShare Link to
open the Upload Parameters window.
2.
Specify whether the file should be uploaded as a new file or as a new version of an
existing file.
3.
If uploading as a new file, select the Collection for the file to be uploaded to from among
the Preferred Collections. If you don’t see the Collection you want, use the Browse
button to connect to the server and select it. If uploading as a new version, use the
Browse button to locate the file you wish to update.
4.
Fill in the title, author, summary, and keywords fields for the new file.
5.
Specify what format of the file should be uploaded.
6.
Press
OK
to start the upload.
DocuShare 2.2 Users Guide
134
14 Troubleshooting DocuShare
Below are some common usage questions or problems and suggested solutions. For other
questions not addressed here, or late breaking information, please consult the End User FAQ at
http://www.xerox.com/products/docushare/faqs.html.
Problem Solution
I can't create an account on
DocuShare.
Your Site Administrator may have restricted account creation to
either other DocuShare users or to the Site Administrator. Contact
your DocuShare Site Administrator.
I can't log in to DocuShare.
Make sure you are using a browser that supports logging in to a
system. Use Internet Explorer 2.0 or higher, or Netscape
Navigator 2.0 or higher. Also be sure that this browser supports
cookie files and that cookie files are enabled for your browser.
Some users report this problem when their browser is not set to
refresh the page with every visit to the page. In those cases, they
are actually logged in and are seeing out of date pages.
I forgot my DocuShare user
name.
View your User Services. Your user name will be displayed there.
You can view the User Services page even if your are not logged
in.
I forgot my DocuShare
password.
Do not create another user account. Call your DocuShare Site
Administrator to reset your password.
When I try to add a file to
DocuShare, I do not see the
Browse
button that I need to
use to locate the file.
You are not using a browser that supports the file upload standard.
Install the
DocuShare File UpHelper Application
. Also adjust
your
Use Helper for Upload
User property.
I have the DocuShare File
UpHelper Application
installed on my computer,
but when I click the
Add
File
button, the UpHelper
does not start. Instead I get
the Create File page.
Adjust your
Use Helper for Upload
User properties. To ensure
use of the UpHelper, set that user property to either
Always
or
When Necessary
.
I have the DocuShare File
UpHelper Application
installed on my computer,
but when I click the
Add
File
button, I get a dialog
box that tells me that my
Your browser is not configured to recognize the UpHelper
Application.
If you are using Internet Explorer, reinstall the UpHelper
application and select
Yes
when the installation program asks to
configure your browser.
If you are using Netscape, you must manually configure your
DocuShare 2.2 Users Guide
135
browser doesn't know what
to do with the program.
browser to recognize UpHelper.
The Netscape window hangs
when I try to upload a file
into DocuShare.
Check to see if the file is open in it’s associated application (for
example, Word or PowerPoint). If it is, close the file in its editor
and try the upload again. (This is a suspected bug in the Netscape
Windows interaction.)
I uploaded a file into
DocuShare. Everything
seemed to work properly, but
my file is not there.
Check your browser's proxy settings. You should not be using a
proxy server to access your DocuShare server.
I uploaded a file into
DocuShare and received an
error saying it had an invalid
index or was unable to open
the collection.
If you return to the collection into which the file was being added,
you should find that the file was correctly uploaded. If so, the
problem was with the search indexing step that occurs after your
file has been uploaded. The file is stored but not indexed. Contact
your Site Administrator to report the problem.
When I click on the title of a
file in DocuShare, I get the
message "Unknown File
Type You have started to
download a file of type
application/...."
Make sure your browser is configured to use a helper application
to view this type of file.
I am using Internet Explorer.
When I click on a PDF file in
DocuShare, I just get a blank
page. The file does not seem
to open.
This is a known interaction problem between the Internet Explorer
browser and Acrobat (PDF) files. Contact your Site Administrator
for assistance.
I added HTML markup to an
object's properties and now
the page won't display
properly.
DocuShare allows you to put HTML markup in textbased
properties such as an object's Description or Summary. You
should limit use of HTML to simple formatting commands like
font changes and lists. Including header commands like
<HTML>
,
<HEAD>
, or
<BODY>
will most likely interfere with DocuShare's
own HTML commands, leaving a page that is either blank or very
poorly formatted. You should also avoid using any markup in
Title and Summary properties that affects the vertical layout, such
as IMG and list directives, because those two properties are
displayed in contexts that assume simple strings.
I can't find something I'm
looking for in DocuShare.
There are a variety of techniques for quickly locating content.
These include:
•
Using the advanced Search tools to describe the content.
DocuShare 2.2 Users Guide
136
•
Using the What’s New? Feature if you know the content
was recently added.
•
Using the Contents feature to get a view of a collection’s
contents that is several levels deep.
I am logged in and I need to
access a DocuShare object,
but when I do, I get a
message that says "Not
Authorized.”
Contact the owner of that object to have them extend Reader
access permission to you.
I accidentally deleted a
collection without deleting
the objects it contained. I
can't find those objects.
The objects from the collection are still in the DocuShare
database. You can directly access an orphaned object if you know
its unique address (for example,
http://sales.acme.com/dscgi/ds.py/Get/File128). Otherwise, call
your DocuShare Site Administrator to locate an orphaned object.
I moved a collection to a new
location. Now I can't find the
collection in the new location
or the old location.
You have accidentally orphaned the collection. The collection is
still in the DocuShare database. You can access it if you know its
unique address (for example,
http://sales.acme.com/dscgi/ds.py/Get/File128). Otherwise, call
your DocuShare Site Administrator to locate an orphaned object.
I thought I deleted an object
from a collection in
DocuShare, but when I
navigate to the collection
page I still see the object.
If you are using the browser Back button, Go list, or Bookmarks to
navigate, you may have accessed a cached version of the
collection page. Click
Reload
in the browser to refresh the page.
I logged in, moved through
the DocuShare site and then
used the Back button on my
browser a few times. Now
my logged in status says I'm
Guest
?
You have accessed a cached version of the collection page. Click
Reload
in the browser to refresh the page and your login status.
Back to top