

 Walk the Walk
1.
Click on the word DocuShare.
2.
Click on the EduTech School District category.
3.
Find your school district’s collection in the list of collections.
You may or may not see any objects in the collection.
THE
OBJECTS

 Talk the Talk
Objects are the items that you will see in DocuShare. These objects include Collections, Files, Calendars, Bulletin Boards, Links to web pages, and Individual Users. Each of these objects are represented with an icon, as shown to the right.
When you view the contents of DocuShare you will see a list of folders. In DocuShare these folders are referred to as Collections. Everything in DocuShare’s content section is structured inside these collections.

PERMISSIONS
 Talk the Talk
Each object has a permission or access control listing. Permissions are the authorization level that a defined set of users or groups has to view, delete or modify a DocuShare object. These object permissions are not assigned or maintained by the Site Administrator; rather the owner of the object or any user maintains them with Manager level access to the object.
Who Has Rights?
Who Has Rights?
When a user has created an object, the user determines who will have the right to read or add items to the object that is created. These rights will give you access to that object depending on what level is given. The levels are as follows: Reader, Writer, Manager, and Administrator.
Reader – Can view an object but cannot add or delete to the object; very limited access.
Writer – Can view as well as add an item to an object but can only delete those items that the user has added.
Manager – The creator of the object. Can add, delete as well as delete any item that is added by a user who was given writer rights to the object.
Administrator – Oversees everything that is added to DocuShare and can delete any object that is created within DocuShare.
 If “anyone” has permission to see a collection, users with Internet access can view its contents, but not add anything. If a collection is “private”, only those given permission can view the contents and if given access, add files, bulletins, calendar items and websites.
VIEWING
OBJECTS
 Talk the Talk
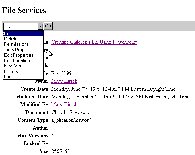
 When you open a collection you will see the objects inside the collection. The Object will have a title. In some cases a brief description of what is within the object is also shown. The owner of the object is on the right side of the title as well as the date that the object was posted on DocuShare. The size of the object will also be listed. There are three icons next to each object. The icons will allow you to view more details about the object as well as let you view the object without actually downloading the object.
PROPERTIES/
SERVICES

 Talk the Talk
Every object in DocuShare has properties. Properties are the describing features of an object, such as title, summary, description, owner, date of creation, keywords, etc. Most properties, such as “title”, can be edited, while others, such as “creation date”, cannot. You can view the properties for any object by either accessing its Services link or, when in the object, using the Edit drop-down box. Any user with Writer level access can edit the properties of an object.
You would also use the Services link to:
·
Add a new version of a file already posted in DocuShare
·  To review who has permission to the object
·
To look at the history of a file
If you are the owner of the object (you uploaded or created it) you use the Services link to:
·
Delete the object
·
Edit/change the object’s location
·
Edit the object’s properties or permissions
 Walk the Walk
1. Click on the DocuShare title next to your name to get back to the Nine Categories.
2. Click on EduTech Services.
3. Click on EduTech Training.
4. Click on EduTech Training – Participants Collection.
5. Click on the Services Icon for Creating Children’s Literature Using PowerPoint.
6. Click on the Edit Dialog box and view the Permissions.
&
Note that when you click on the Delete button that you will receive a message telling you that you are not authorized to Delete this object because you are not the owner of the object. You can only delete those objects that you have posted to DocuShare.
ADDING A
FILE TO A
COLLECTION
 Talk the Talk
Adding a file to DocuShare is called Uploading. DocuShare provides a file repository on an internal network server that is accessed through the Web browser. You can add files to this repository from your computer. Conversely, you can also download copies of these files from the repository and open or save them to your computer. You can also delete file from the repository, manage multiple document revisions and lock files for safe, collaborative authoring.
Files are downloaded from the DocuShare repository simply by clicking on the filename. If your browser is properly configured to open a file of this application type, the file’s native application will open and the file will display. You can then choose to save the file to your own computer, print out a copy from the application, or just view the file and close it when finished.
WEB
BROWSERS
 Talk the Talk
DocuShare only provides a repository for these file types. Because you are using a Web browser to access the files in this repository, it is the configuration of your Web browser and the 3-character file extension in the file’s name that control how these files are handled. They can be opened within the browser or application window or saved directly to your computer. For most of the proprietary application formats, your Web browser requires helper applications to view these files properly. In most cases, these are the same applications that were originally used to create these files (example: Microsoft Word). Your browser must be configured to use these helper applications to view these files. This is essential for successful use of DocuShare.
&
Downloading does not transfer the actual file to your computer, only a copy. The original copy of the file remains in the DocuShare repository until it is deleted.
 Walk the Walk
1. In the collection where you want to add the file, click the Add dialog box and click on File. The Add File page appears.
2. 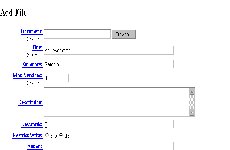 Click the Browse button. The Browse dialog box appears.
3. Browse for the file on your computer and select the file to add.. Double click on the file or click on the Open button.
4. Fill out the fields that follow.
5. Click Apply.
After a file is added to DocuShare, a File Services box will appear as shown on page 9.
If everything is the way you wish it to be, click on the collection it appears in to see your file in the collection.
&
While adding a file, if you are unsure of the purpose of a field (a box requesting input from you), you can click on the highlighted field name for a brief Help description of the field.
CHECKING
OUT, AND
LOCKING A
FILE
 Talk the Talk
Occasionally there are situations when many people are working collaboratively on creating a document. In this case there would be one Owner (the person who posts the original file) and many people with Write permission (given to them by the Owner when the file is posted).
Example: Mary Beth compiles the monthly school newsletter, but several other staff members in her school district contribute articles or information. Mary Beth adds a draft copy of the newsletter to a collection in DocuShare and gives Persons A and B Write permission to the file.
Person A checks out a copy of that file to her workstation by clicking on the Checkout icon. Checking Out the file automatically locks the file so no can upload another version until Person A has uploaded her new version.
Person B wants to edit the latest version of the file. However because of the padlock icon, she knows that someone else is currently editing the file. When you place your cursor over the padlock, you can see who has checked it out. Person B needs to wait until that person has uploaded her changes to the file.
Person A adds new information and saves the file to her hard drive. The Versioning feature of DocuShare is then used to post anew version of the newsletter file. The file is now reading for Person B’s editing
Mary Beth can then go to the file’s Services and check the history of her newsletter to see that Person A has added a new version of that file.
&
Only the owner of the file or users with Write permission can upload a new version of a file. Users must be logged in to DocuShare to use the versioning feature.
BULLETIN
BOARDS

 Talk the Talk
Think of DocuShare bulletin boards as a place where users can post notices or messages or maintain a running history of an exchange of ideas.
Users who are logged into DocuShare and who have Writer permissions to a bulletin board can add new bulletins. These bulletins appear in reverse chronological order. The bulletin’s creation date and author are automatically added.
 Walk the Walk
1. Go to the your collection that has a bulletin board icon.
2. Open the Bulletin board by clicking on its Title.
3.  Click Bulletin in the toolbar in the Add drop down list. The Add Bulletin page appears.
4. Fill out the page, then click Add Bulletin.
&
The bulletin is added, and the Bulletin Services page appears. You can verify that the bulletin is added by clicking the Appears In: Link, which returns you to the Bulletin Board. If you don’t see the bulletin, click the Reload on the browser to refresh the page.
CALENDAR
 Talk the Talk
You can use DocuShare online calendars as a private calendar or as a shared, group calendar (depending on who has rights to the calendar). The calendar opens automatically to the current month or week (depending on the default view selected) with the current day highlighted.
 Walk the Walk
1. Click on the Calendar icon within the collection.
2. If the calendar is in month view, click the date for the event. If the calendar is in week view, click the Add button.
3.  Select Event.
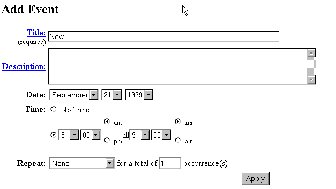
4. Add Event page appears.
5. Specify the information on the page.
6. Click Apply.
DELETING AN
EVENT
 Talk the Talk
Only the owner of a calendar event (the user who added it to Docushare) or a user with Manager permission for the event can delete it from DocuShare. For repeating events, you can specify to delete all of the events in the series, or just the selected event.
 Walk the Walk
1. Open the calendar that contains the event you want to delete.
2. Click the date that contains the event.
3. Click the Edit button and select Week View.
4. By the event click the Services button.
5. Click the Edit button and select Delete.
6. Click on the Delete button. The Confirm Deletion page will appear.
INTERNET
ADDRESSES (
URL’
S)
 Walk the Walk
1. In the collection where you want to add a URL, click the arrow next to the Add drop box and select URL.
2. The Add URL page appears
3. Fill in the URL information. Note: While creating the URL, if you are unsure of the purpose of a filed, you can click on the highlighted field name for a brief Help description of the field.
4. Click on the Apply button on the bottom of the page.
Back to top
Page 3
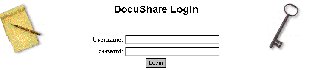 If you are not logged in to DocuShare and you try to perform a restricted operation, such as accessing a protected file or submitted information, you will see a “Not Authorized” message. You will also be provided an opportunity to log in at this time.

 Click the Edit arrow button. Select Change Password.
 Double click on your user name on the Navigation Bar.
 Every DocuShare object contains a set of associated attributes, which are sometimes referred to as meta-data. These attributes include the object’s title, summary, owner, description, creation date, and keywords. For most objects, such as collections and bulletin boards, this set of attributes is the object’s complete information content. File objects, in addition, contain the user’s original file in its original format. Whenever a new object is created, or an existing object is edited, it is indexed by DocuShare at the moment and made available for searching. For most office documents, like Word, Excel, and WordPerfect, their content is indexed in addition to their meta-data attributes.
 A list will appear with all those items that have been added to DocuShare within the time frame that you requested.