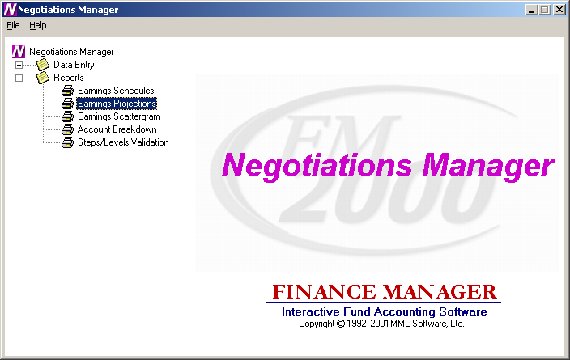
1. Upon selecting the Negotiations button from the Finance Manager main window, the Negotiations Manager window displays.
  2. The Negotiations system is divided into two main areas: Data Entry and Reporting. Use the tree on the left-hand side of the window to expand the Data Entry and Report functions to display the options within each area.
  3. Data Entry – Open the Data Entry tree to display the data entry functions. The Data Entry functions include Earnings Schedule Maintenance and Earnings Projections. The Schedules function is used to create and maintain an unlimited number of salary matrices that store contractual, supplemental (i.e., Longevity, Credit Hours, etc.), hourly, and per diem salary information associated with specific bargaining units and employee types. The Earnings Projections function is used to project salary and benefit costs.
  4. Negotiation Schedules
  5. Schedules Browser
  6. Drop-Down Menus


Negotiations Manager


Upon selecting the Negotiations button from the Finance Manager main window, the Negotiations Manager window displays.


Back to top


The Negotiations system is divided into two main areas: Data Entry and Reporting. Use the tree on the left-hand side of the window to expand the Data Entry and Report functions to display the options within each area.

Back to top


Data Entry – Open the Data Entry tree to display the data entry functions. The Data Entry functions include Earnings Schedule Maintenance and Earnings Projections. The Schedules function is used to create and maintain an unlimited number of salary matrices that store contractual, supplemental (i.e., Longevity, Credit Hours, etc.), hourly, and per diem salary information associated with specific bargaining units and employee types. The Earnings Projections function is used to project salary and benefit costs.
Reports – Open the Reports tree to display the reporting functions. The Report functions include Earnings Schedule Report, Earnings Projections Report, Earnings Scattergram Report, Account Breakdown Report, Steps/Levels Validation, and Earnings Projection Letters.

Back to top


Negotiation Schedules
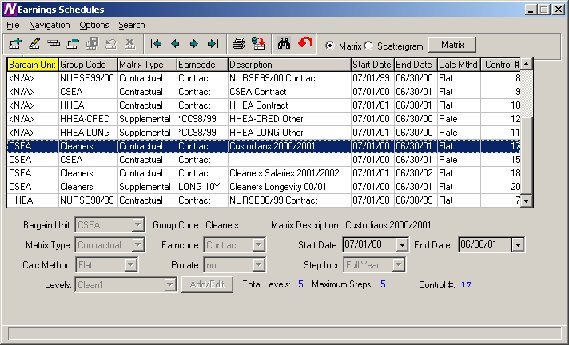
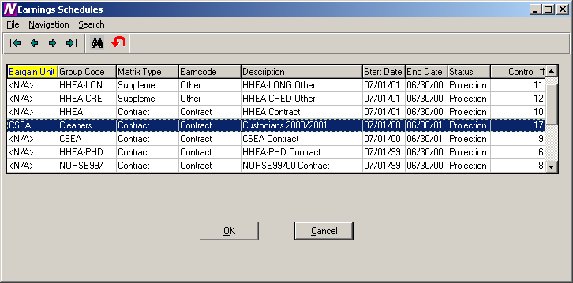
To access the Schedules function, select the Earnings Schedule option from the Negotiations Manager Data Entry tree menu.


The Schedules function is used to create and maintain an unlimited number of salary matrices that store contractual, supplemental (i.e., Longevity, Credit Hours, etc.), hourly, and per diem salary information associated with specific bargaining units and employee types. The current and future salary matrix assigned to the bargaining unit and employee type may be used in making future salary projections. The future salary projections may then be used to produce reports, generate retroactive payments, and make salary increases for the upcoming fiscal year.
 

Back to top


Schedules Browser
The Salary Schedule browser displays the following information: Bargain Unit, Group Code, Matrix Type, Earncode, Matrix Description, Start Date, End Date, Calculation Method, and Control Number. To change the manner in which information is displayed in the browser, simply click once on the column title (Bargain Unit, Group Code, Matrix Type, etc.). The column title is highlighted in yellow to indicate the selected sort option.
 
Data in a browser is normally sorted in either numerical ascending order or in alphabetical order. To reverse the order, that is to sort in numerical descending order or in reverse alphabetical order, click on the column title a second time.
 
To change the starting point of the information in the browser, right-click on the column heading to display the Search menu window or use the Search button to begin the search process.


Back to top


Drop-Down Menus
The following drop-down menus are displayed on the window:
 
File  This menu provides access to options that allow you to add and maintain salary schedule information.
 
Navigation  This menu provides access to the First, Previous, Next, and Last options that allow you to locate specific records in the browser.
 
 
The navigation options can be accessed through the buttons at the top of the window or through the Navigation drop-down menu.
 
Navigation Buttons Function
   
First            This option is used to highlight the first record in the browser.
   
Previous      This option is used to highlight the previous record in the browser. For example, if there are five records in the browser and your cursor is highlighting the third record, select the Previous button to highlight the previous (second) record.
   
Next This option is used to highlight the next record in the browser. For example, if there are five records in the browser and your cursor is highlighting the third record, select the Next button to highlight the next (fourth) record.
   
Last This option is used to highlight the last record in the browser.
   
Print This option is used to print a report of one or more earnings schedules. Pressing the Print button displays the Print Selection pop-up box.
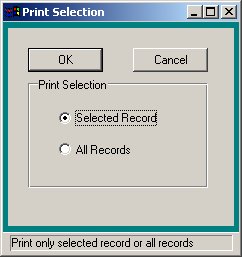


Use this window to select the schedule records that you wish to include in the report.
1.  Choose the Selected Record option if you want to report on only the earnings schedule that was highlighted in the browser. Choose the All Records option if you want the report to include all existing earnings schedules.
2.  Press the OK button to continue the Print process or press Cancel if you do not want to continue the Print process.
The Print Field Selection window displays.
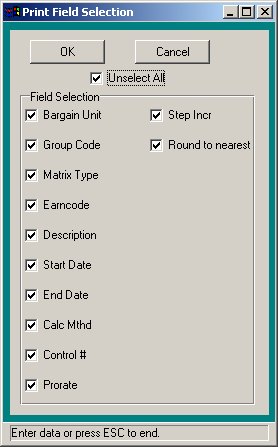


Use this window to select the information that you wish to include for each schedule record in the report.
1.  Flag each individual field that you wish to include on the report with a check. You must choose at least one field to print. To include all fields, check the Select All check box. (To remove the check flag from all fields, check the Unselect All check box.)
Press the OK button to continue the Print process. The Report Output window displays. This window provides the options of previewing the report, sending the report to the default printer, saving the report to a file, or exporting the report information to Excel.
Press Cancel if you do not want to continue the Print process.
   
Refresh This option is used to refresh the window to reflect any recent changes that may have been made in any of the salary schedules.
   
Start Search This option is used to search for a specific record in the browser.
   
Clear Search This option is used to clear out any previously defined search criteria and restore the browser to its original values.

 
Action Buttons Function
   
Add This option is used to add a new salary schedule.
   
Update This option is used to update an existing salary schedule.
   
Copy This option is used to copy information from an existing salary schedule, increase or decrease salary information as needed, and save it to another newly created schedule.
   
Delete This option is used to delete an entire salary schedule.
   
Save This option is used to save information entered while adding, updating, or copying salary schedule information.
   
Reset This option is used to reset the window back the last saved version.
   
Cancel This option is used to cancel the Add, Update or Copy functions.
   
Exit This option is used to exit the Schedules function.

 
Use the Schedules function to add or maintain salary schedule information.
 
Field Description
   
Bargaining Unit Enter the code that uniquely identifies the bargaining unit. Bargain Unit Codes are defined in the Bargain Unit Maintenance File in Human Resources. Use the drop-down menu to select from a listing of valid Bargain Unit codes.
   
Group Code Enter the free-form text (up to 10 characters) that identifies an employee type or group code associated with the specified bargaining unit. This code should allow you to recognize the employee group and bargaining unit associated with the schedule. Example: Clerk00/01 is the salary schedule for Clerks for the fiscal year 2000/2001.
   
Matrix Description Enter the free-form text (up to 30 characters) that further identifies the salary schedule.
   
Matrix Type Indicate the salary schedule type. Valid entries are: Contractual, Annualized Daily, Annualized Hourly, Supplemental, Hourly, and Per Diem. Use the drop-down menu to select from a listing of valid codes. You may also type in C, A, S, H, or P or use the up/down arrow keys to change the matrix type.
   
Earncode Indicate the appropriate earnings code based on the previously selected matrix type.
If the Matrix Type is Contractual, Annualized Daily, or Annualized Hourly, the Earncode defaults to Contract and cannot be changed.

If the Matrix Type is Supplemental, the Earncode may be any one of the supplemental earnings codes (i.e., Longevity, Credit Hours, etc.) defined in the Earnings Code File. Use the drop-down menu to select from a listing of valid codes.
If the Matrix Type is Hourly, the Earncode defaults to Reg Pay and cannot be changed.

If the Matrix Type is Per Diem, the Earncode defaults to Per Diem and cannot be changed.
   
Start Date Enter the effective starting date of the salary schedule. You may simply type the date (in MM/DD/YY format) or use the drop-down menu to select the date from the on-line calendar.
   
End Date Enter the effective ending date of the salary schedule. You may simply type the date (in MM/DD/YY format) or use the drop-down menu to select the date from the on-line calendar.
   
Calc Method Indicate the calculation method for the salary schedule. Valid entries are Rate or Flat amount. If the Matrix Type is Annualized Daily or Annualized Hourly, the Calculation Method defaults to Rate. If the Matrix Type is Contract, the Calculation Method defaults to Flat. If the Matrix Type is Hourly or Per Diem, the Calculation Method may be a Rate or Flat.
If the Calculation Method is Rate, the amount is extended to a decimal value. Example: 24.80.

If the Calculation Method is Flat, the amount is a flat dollar amount with no decimal extension. Example: 46,029.
   
Prorate NOTE: This field is only active if the Calculation Method is Flat.
Enter Y if the salary is to be prorated. Enter N if the salary is not to be prorated.
   
Step Incr Indicate the step increment for the salary schedule. Valid entries are: Full Year or Half Year. Use the drop-down menu to select from a listing of valid increments. You may also type in F or H or use the up/down arrow keys to change the step increment. For example, if you indicate Half Year and 10 steps, the steps will be .5, 1.0, 1.5, 2.0, 2.5, 3.0, 3.5, 4.0, 4.5, and 5.0 (ten half steps).
   
Levels Use the drop-down menu to view the existing levels associated with the schedule. Use the Add/Edit button to add and maintain the levels and steps associated with the schedule.
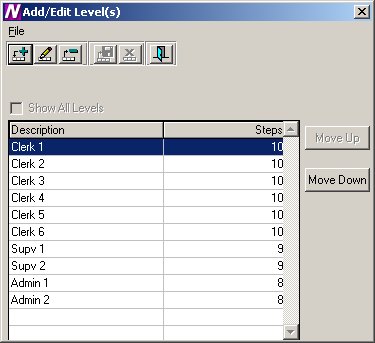


To Add a Step and Level for the Schedule:
1.  Select the Add button.
2.  Enter the level description (up to 30 characters). Example: Clerk 1, Nurse 1, Admin.
NOTE:  It is recommended that you enter the Level Description using upper and lower case lettering.

3.  Enter the number of steps associated with the level. Each level may have a different number of steps.
4.  Press the Save button. NOTE: It is critical that you also press the Save button at the Matrix level (Earnings Schedule window) because you are updating the Matrix when you add or change step/level information.
 
To Update a Step and Level for the Schedule:
1.  Select the record that you wish to update.
2.  Press the Update button.
3.  Make changes as needed.
4.  Press the Save button. NOTE: It is critical that you also press the Save button at the Matrix level (Earnings Schedule window) because you are updating the Matrix when you add or change step/level information.
 
To Delete a Step and Level for the Schedule:
1.  Select the record that you wish to delete.
2.  Press the Delete button.
3.  Press the Exit button to return to the Earnings Schedule window. Press the Save button.
 
To Move a Step and Level within the Schedule:
1.  Select the Move Up or Move Down button.
The column(s) selected are shifted accordingly within the salary matrix.


Earnings Schedules
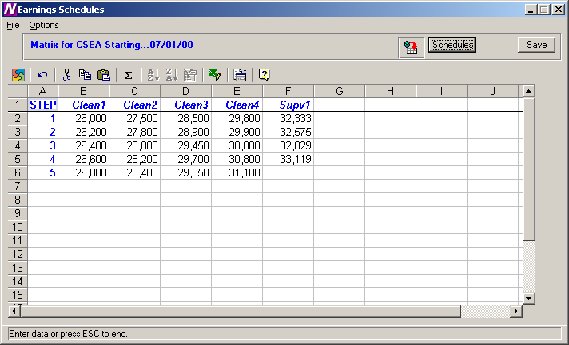
The Earnings Schedules window displays after selecting the Matrix radio button and pressing the Matrix push button.


The Earnings Schedules window is used to indicate the appropriate salaries for each step and level created. The steps are displayed down the window and the levels are displayed across the window.
 
The system will only provide access to those cells in the spreadsheet where a step exists for the corresponding level. All other cells will be locked if you attempt to enter salary information where a step does not exist for a level. In the example above, level Supv1 only has 8 steps. Therefore, the cells for level Supv1, steps 9 and 10, are locked and cannot be accessed.
 
To Enter Salary Information:
1.  Use the up/down arrows to move to each level within the step. Use the Enter key or up/down arrows to move to each step within the level.
NOTE: After entering/modifying information in a cell, it is required that you move off that cell before pressing the Save key. If you type a salary in a cell and do not move your cursor off that cell before pressing Save, the information in that particular cell is not saved.
2.  When you have finished entering salary information, press the Save button.
 
NOTE: After you have completed entering the salary information for the schedule, go to Employee Type Maintenance and make sure that the correct Bargaining Unit is attached to the employee type. Then go to the Schedule folder in Employee Type Maintenance and link the appropriate schedules to the employee type. You should have one schedule with a status of “Current” and another with a status of “Next”. The system will use the schedule that has a status of “Next” to make the salary projection.
 
 
To Refresh the Salary Information on the Window:
This option is used to refresh the window to reflect any changes that another user may have made to the salary information.
1.  Press the Refresh button at the top of the window.
 
 
To Export the Salary Information to Excel:
1.  Press the Export to Excel button in the button bar at the top of the window.
NOTE: The information is displayed on your screen in an Excel spreadsheet. You may change any information in the spreadsheet as needed, but any changes saved while in Excel are NOT saved in Finance Manager.
 
 
To Return to the Schedules window:
1.  Press the Schedules button.
 

Copying a Schedule
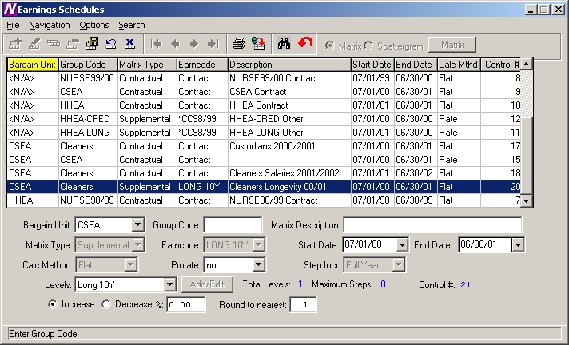
The Copy Schedule function is used to create a variation of a similar existing schedule and make any adjustments to that schedule. Replicated schedules may be modified by a percentage increase or decrease and rounded to the nearest specified dollar amount.


To Copy a Schedule:
1.  Highlight the desired schedule in the browser and select the Copy record button.
2.  Change the Bargain Unit, Group Code, Matrix Description, Start/End Dates, Status, and Prorate flag as desired.
3.  Set the radio button to either increase or decrease the salaries by a specified percentage. Then indicate the percentage increase or decrease.
4.  Indicate the manner in which the system should round the salaries. Enter 1 to round to the nearest dollar. Enter 100 to round to the nearest hundred dollars. Otherwise, leave this field blank if you do not wish to round.
The system creates a new schedule that is a replica of the selected schedule. At this point, you may change the level names or any other information as necessary.

Scattergram
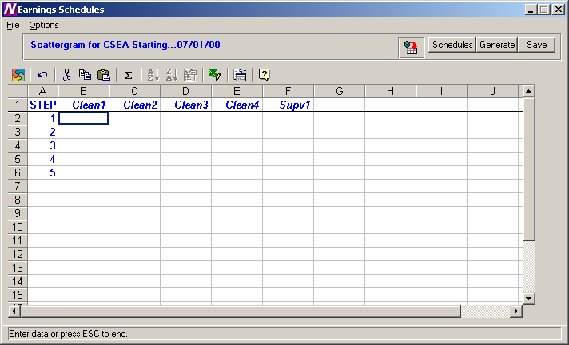
After a salary schedule is created, it may be used to generate and view a scattergram of the salary matrix for selected employee types. A scattergram displays the number of full-time equivalent employees at each step and level position in the salary matrix.
 
From the Earnings Schedules window, highlight the appropriate salary matrix in the browser. At the top right-hand side of the window, select the Scattergram radio button. Press the Scattergram push button.


The above window displays the steps and levels associated with the selected salary matrix.
 
To Create a Scattergram:
1.  Select the Generate push button.
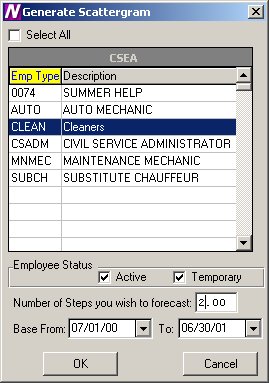
2.  The Generate Scattergram window displays:


The Generate Scattergram window displays a listing of all employee types associated with the bargaining unit defined in the matrix.
3.  Use the browser to select the appropriate employee types for which you wish to create the scattergram. Press the Control key to select more than one employee type. Check the Select All check box if you wish to include employees in all employee types when creating the scattergram.
4.  Use the check boxes under Employee Status to indicate whether you wish to include those employees who are Active and/or those who are Temporary.
5.  Enter the number of step increases that you wish to forecast. For example, to project a scattergram for two years in the future when employees receive a step increase each year, enter 2.
6.  Enter the fiscal year base starting and ending date range.
7.  Press OK to generate the scattergram.


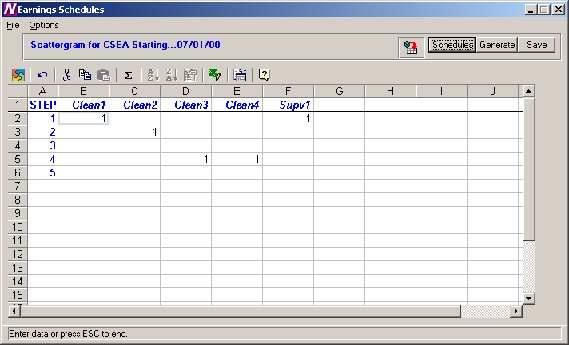
The scattergram shows the number of FTEs associated with each step and level in the salary matrix. Press the Save button to save the scattergram information.
 
Use the Refresh button to refresh the window to reflect any changes that another user may have made to the scattergram.
 
To return to the salary schedules window, press the Schedules push button.


Earnings Projections
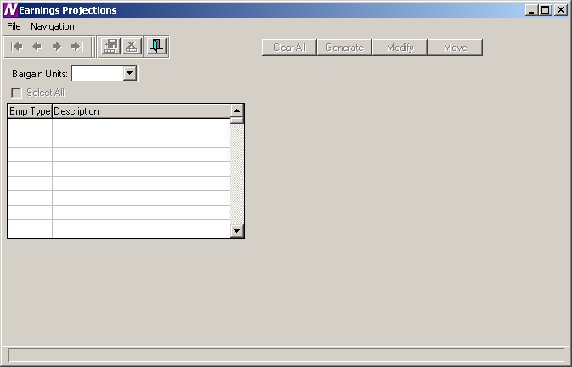
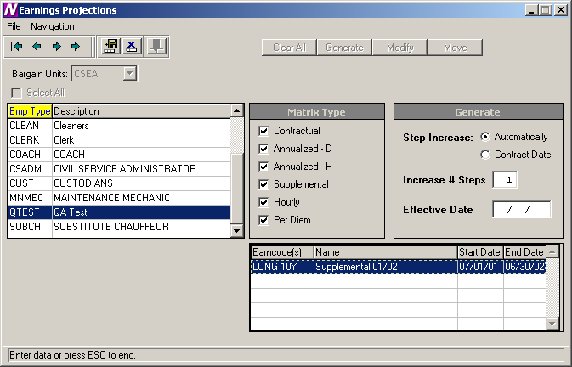
To access the Projections function, select the Earnings Projections option from the Negotiations Manager Data Entry tree menu.


The Earnings Projections function is used to verify existing salary information and make salary projections with the existing salary schedules. The system looks in Employee Type Maintenance to find the schedule that has a status of “Next” to make the salary projection. The system only creates a projection if the Renewable flag is checked on the Earnings or Other Earnings window in Employee Maintenance. 
 
To Begin the Earnings Projection Process:
1.  Use the drop-down menu to select the bargaining unit for which salary information is to be projected.
The Earnings Projection window displays a listing of all employee types associated with the selected bargaining unit.
2.  Use the browser to select the appropriate employee types for which you wish to project earnings. Press the Control key to select more than one employee type. Check the Select All check box if you wish to include employees in all employee types when projecting earnings.
3.  Press the Generate push button.
Upon selecting the Generate option, the Matrix Type and Generate windows are displayed. The Matrix window contains the valid matrix types (Contract, Annualized, Supplemental, Hourly, and Per Diem) and those salary matrices that exist for the bargaining unit are preceded by a check mark.


4.  Uncheck those matrix types that are not to be included in the earnings projection.
5.  In the Generate window, indicate whether the step increase is to be automatic or by contract date. An Automatic step increase will increase every employee by one step at the beginning of the year. A Contract Date step increase will create a step increase on the increment date noted on the Employee Appointment window in Employee Maintenance.
6.  Indicate the number of steps to be increased.
7.  Enter the effective date of the earnings projection.
8.  If you chose Matrix Type “Supplemental”, select the earncodes that you wish to project.
9.  Press the Save button.
 
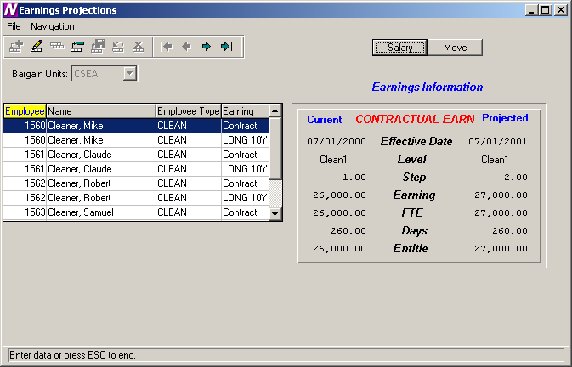
To display the Earnings Information window for each employee, press the Modify button.


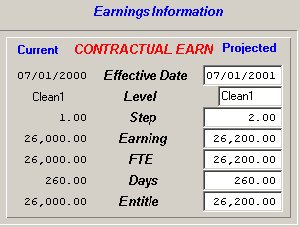
The above window displays the projected salary amounts based on the criteria selected. Use this window to update the projected salary level, step, and earning amount if needed.
 
To Update Earnings Information:
1.  Highlight the appropriate employee record in the browser on the left-hand side of the window.
2.  Press the Update button .


3.  Update the Projected Effective Date, Level, Step, Earnings, FTE, Days, and Entitlement as necessary.
4.  Press the Save button.

Moving Salary Information to Payroll
After the salary information have been projected and carefully reviewed, you may now move the projected salaries into Payroll. The move should only take place after the final fiscal year payroll has been printed and posted.
 
1.  Press the Move button.
2.  The system displays the question “Has the final Fiscal Year End Payroll been Completed and Posted?”.
If it has been completed and posted, choose Yes and continue the Move process.
If you have not yet printed and posted your final payroll, choose No. You should print and post the final payroll before the move can take place.

 
The new salary information can be seen on the Earnings and Other Earnings windows in Payroll Manager. The effective dates of the earnings and the new step are updated accordingly.

Earnings Schedule Report
To access the Earnings Schedule Report, select the Earnings Schedule option from the Negotiations Manager Reports tree menu. The Earnings Schedule Report function is used to print the salary matrix information associated with a selected earnings schedule(s). Use this window to select the appropriate earnings schedule(s) that you wish to print.


To Print the Earnings Schedule Report:
1.  Highlight the schedule that you wish to print. Use the Ctrl key to select more than one schedule.
2.  Select the OK button.
3.  From the Report Output window, select the desired reporting output destination.
 
The Earnings Schedule Report displays the bargain unit, group code, matrix type, status, date range, and control number. The salaries are then displayed for each step and level.


05/18/01 FINANCE MANAGER CSD PAGE 1
*****************************************************************************************************************************************************
 
CSEA CUSTODIANS 2000/2001 Contractual:Contract Status:Active Date Range 07/01/00 - 06/30/01 Control #:17
 
STEP Clean1 Clean2 Clean3 Clean4 Supv1
 
1 26,000 27,500 28,500 29,800 32,333
2 26,200 27,800 28,900 29,900 32,575
3 26,400 28,000 29,450 30,000 32,829
4 26,600 28,200 29,700 30,800 33,119
5 26,800 28,400 29,850 31,100
 
Report Completed 11:07 AM


Earnings Projection Report
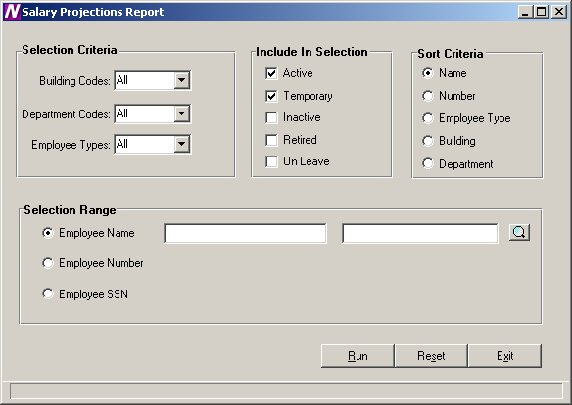
To access the Earnings Projection Report, select the Earnings Projection option from the Negotiations Manager Reports tree menu. The Earnings Projection Report function is used to print the projection information entered through the data entry function. Use this window to select the reporting criteria that you wish to use.


To Print the Earnings Projection Report:
1.  Define the Selection Criteria.
You may choose to print a report for employees in one or multiple buildings, departments, or employee types. The system defaults to All buildings, departments, and employee types. To print a report for employees in selected buildings, department, or employee types, use the drop-down menu to change the option to Selection. The system displays the lookup magnifying glass which allows you to select one or more buildings, departments, or employee types. In the lookup browser, highlight the appropriate codes that you wish to include in the report. Use the Ctrl key to select more than one code. Press the OK button when you have finished selecting all codes in the lookup browser. The system returns you to the criteria selection window where you can specify additional reporting criteria.

2.  Use the Include in Selection portion of the window to flag the appropriate employee status to be included in the report. The system automatically defaults Active and Temporary employees as the selection. You may also choose to include employees that are Inactive, Retired, or On-Leave by inserting a check mark in the box preceding those employee statuses.
3.  Use the Sort Criteria portion of the window to select the manner in which information is to be sorted on the report. Information may be sorted in any one of the following ways:
alphabetical order by Employee Name
numerical ascending order by Employee Number
alphabetical order by Employee Type
numerical/alphabetical order by Building Code
numerical/alphabetical order by Department Code

4.  Use the Selection Range portion of the window to specify those employees who are to be included in the report. You may print a report for a specific range of employee names, employee numbers, or social security numbers.
Move the radio button to the desired selection range. Then use the starting and ending fields to type in the range of employee names, employee numbers, or social security numbers. If desired, use the lookup button to select one or a range of employees.

5.  After all reporting criteria has been specified, press the Run button. From the Report Output window, select the desired reporting output destination.


To Reset the Earnings Projection Reporting Criteria:
1.  Select the Reset button.
The system will reset the report criteria back to the original default values.


05/24/01 FINANCE MANAGER CSD PAGE 1
************************************************************************************************************************************************************************************
 
Contract Salary Projection Listing
 
Name Emp# Emp Earn Code Old Old Old Old New New New Eff Date New FTE Total Total Chks Total
Type Step Level FTE% Base Step Level FTE% Base Amount Base Actual Per Pay
------------------------------------------------------------------------------------------------------------------------------------------------------------------------------------
Cleaner, Claude 1561 CLEAN Contract 2.00 Clean2 50.00 27,800.00 3.00 Clean2 50.00 07/01/01 28,000.00 14,000.00 28,000.00 14,000.00 26.00 538.46
 
Cleaner, Robert 1562 CLEAN Contract 4.00 Clean3 100.00 29,700.00 5.00 Clean3 100.00 07/01/01 29,850.00 29,850.00 29,850.00 29,850.00 26.00 1,148.08
 
Cleaner, Samuel 1563 CLEAN Contract 4.00 Clean4 100.00 30,800.00 5.00 Clean4 100.00 07/01/01 31,100.00 31,100.00 31,100.00 31,100.00 26.00 1,196.15
 
Cleaner, Steve 1560 CLEAN Contract 1.00 Clean1 100.00 26,000.00 2.00 Clean1 100.00 07/01/01 26,200.00 26,200.00 26,200.00 26,200.00 26.00 1,007.69
 
Cleaner, Thomas 1564 CLEAN Contract 1.00 Supv1 100.00 32,333.00 2.00 Supv1 100.00 07/01/01 32,575.00 32,575.00 32,575.00 32,575.00 26.00 1,252.88


Earnings Scattergram
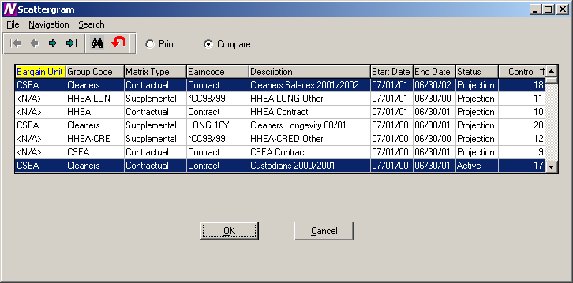
To access the Earnings Scattergram Report, select the Earnings Scattergram option from the Negotiations Manager Reports tree menu. The Earnings Scattergram Report function is used to print one or more scattergrams or to compare scattergrams created through the data entry function. Use this window to select the appropriate schedule that you wish to use.


To Print Scattergrams:
1.  Highlight the schedule(s) that you wish to use. Use the Ctrl key to select more than one schedule.
2.  Select the Print radio button at the top of the window.
3.  Select the OK button.
4.  From the Report Output window, select the desired reporting option.
 
The Earnings Scattergram Report displays the number of FTEs within each step and level.
 
 
To Compare Scattergrams:
1.  Highlight the schedules that you wish to use. Use the Ctrl key to select more than one schedule.
2.  Select the Compare radio button at the top of the window.
3.  Select the OK button.
4.  From the Report Output window, select the desired reporting output destination.
 
The Scattergram Comparison Report displays the total number of FTEs and total salary amount for each scattergram and schedule. The report concludes with the differences in the number of employees and the salary amounts between the scattergrams.


05/23/01 FINANCE MANAGER CSD PAGE 1
*****************************************************************************************************************************************************
 
CSEA CUSTODIANS 2000/2001 Contractual:Contract Status:Active Date Range 07/01/00 - 06/30/01 Control #:17
 
STEP Clean1 Clean2 Clean3 Clean4 Supv1
 
1 1.00 1.00
2 .50
3
4 1.00 1.00
5


05/23/01 FINANCE MANAGER CSD PAGE 1
*****************************************************************************************************************************************************
 
CSEA CUSTODIANS 2000/2001 Date Range 07/01/00 - 06/30/01 Control #:17
 
Total Employees : 5 Total Amount : $132,733.00


CSEA CLEANERS SALARIES 2001/2002 Date Range 07/01/01 - 06/30/02 Control #:18
 
Total Employees : 5 Total Amount : $151,000.00


Differences Employees : 0 Amount : $18,267.00
 
Report Completed 4:17 PM


Account Code Breakdown
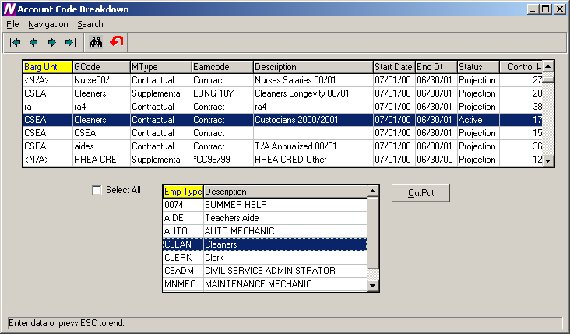
To access the Account Code Breakdown Report, select the Account Code Breakdown option from the Negotiations Manager Reports tree menu. The Account Code Breakdown Report function provides a listing of budgetary account code information that may be printed after salary projections have been made. Use this window to select the appropriate salary schedule and employee type that you wish to use.


To Print the Account Code Breakdown Report:
1.  Highlight the schedule that you wish to use.
2.  Select the employee types that you wish to use. Use the Ctrl key to select more than one employee type or check the Select All box to include all employee types.
3.  Press the Output button.
4.  From the Report Output window, select the desired reporting output destination.
 
The Account Code Breakdown Report prints the costs of the projected salary in account code order. Within each account code, the report includes the employee name, employee number, employee type, earning code, account percentage, and amount expensed to the account code.
 
The report provides totals for each account and fund. The report concludes with a grand total of earning amounts.


05/29/01 FINANCE MANAGER CSD PAGE 1
**********************************************************************************************************************************
 
PROJECTED EARNING AMOUNTS BY ACCOUNT
 
Account Employee Name Emp# Emp Type Earning Account% Amount
==================================================================================================================================
 
A 1240.165-10 - OFFICE OF THE SUPERINTEN:NON-INST INCENTIVE SECRE
-----------------------------------------------------------------
 
Cleaner, Robert 1562 CLEAN Contract 75.00 22,387.50
------------
ACCOUNT TOTAL 22,387.50


A 1310.161-10 - NON INSTRUCTIONAL OT
------------------------------------
 
Cleaner, Steve 1560 CLEAN Contract 50.00 13,100.00
------------
ACCOUNT TOTAL 13,100.00


A 1430.150-10 - PERSONNEL:INSTRUCTIONAL SALARIES
------------------------------------------------
 
Cleaner, Samuel 1563 CLEAN Contract 100.00 31,100.00
------------
ACCOUNT TOTAL 31,100.00


A 1430.161-10 - NON INSTRUCTIIONAL OT
-------------------------------------
 
Cleaner, Claude 1561 CLEAN Contract 100.00 14,000.00
------------
ACCOUNT TOTAL 14,000.00


A 1620.162-10 - PLANT MAINTENANCE:NON-INSTRUCTIONAL SUMMER
----------------------------------------------------------
 
Cleaner, Steve 1560 CLEAN Contract 50.00 13,100.00
------------
ACCOUNT TOTAL 13,100.00


05/29/01 FINANCE MANAGER CSD PAGE 2
**********************************************************************************************************************************
 
PROJECTED EARNING AMOUNTS BY ACCOUNT
 
Account Employee Name Emp# Emp Type Earning Account% Amount
==================================================================================================================================
 
------------
ACCOUNT TOTAL 32,575.00
 
------------
FUND TOTAL 133,725.00
 
------------
GRAND TOTAL 133,725.00
 
Report Completed 4:38 PM


Steps/Levels Validation
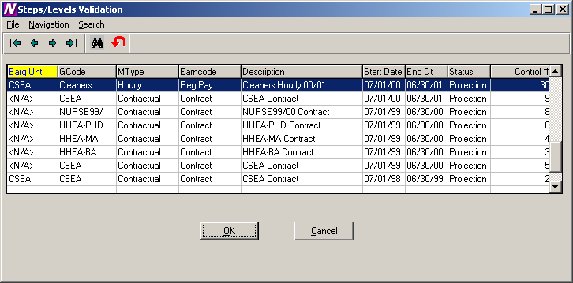
To access the Steps/Levels Validation Report, select the Steps/Levels Validation option from the Negotiations Manager Reports tree menu. The Steps/Levels Validation Report function provides a utility which checks each employee record to ensure that the employee is assigned to a valid step and level. If the system finds employees who are not assigned to a valid step and level within a selected salary matrix, a report is produced indicating the errors found. Use this window to select the appropriate salary matrix that you wish to use.


To Run the Step/Level Validation Process:
1.  Highlight the salary matrix that you wish to use.
2.  Select the OK button.
3.  From the Report Output window, select the desired reporting option.
If no errors are found, the system displays a message box indicating that all employees are at a valid step and level.
If errors are found, a report is generated which includes the following information: employee type, employee number, employee name, earning code, and invalid salary step and level.


05/29/01 FINANCE MANAGER CSD PAGE 1
********************************************************************************************************
 
Employee Earnings at an Invalid Salary Step and Level - By Employee Type By Employee Number
 
 
Emp Type Emp Num Emp Name Earning Step Level
--------------------------------------------------------------------------------------------------------
CLEAN 1571 Jackson, Mark Reg Pay 1 Hrly Cln
 
Report Completed 3:13 PM


Earnings Projection Letters
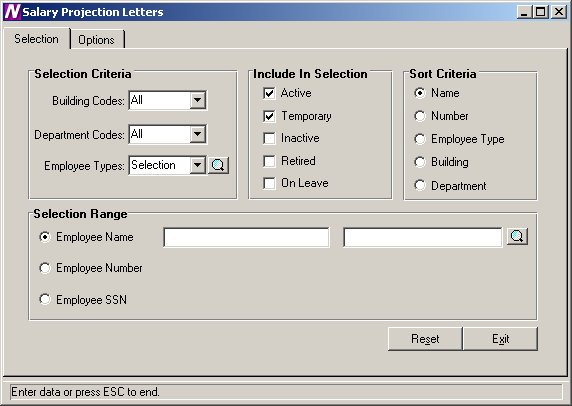
To access the Earnings Projection Letters, select the Earnings Projection Letters option from the Negotiations Manager Reports tree menu. The Earnings Projection Letters function provides the ability to print a salary letter after salaries are projected. Use the Selection window to select the reporting criteria that you wish to use.


To Select Earnings Projection Letter Criteria:
1.  Define the Selection Criteria.
You may choose to print a report for employees in one or multiple buildings, departments, or employee types. The system defaults to All buildings, departments, and employee types. To print a report for employees in selected buildings, department, or employee types, use the drop-down menu to change the option to Selection. The system displays the lookup magnifying glass which allows you to select one or more buildings, departments, or employee types. In the lookup browser, highlight the appropriate codes that you wish to include in the report. Use the Ctrl key to select more than one code. Press the OK button when you have finished selecting all codes in the lookup browser. The system returns you to the criteria selection window where you can specify additional reporting criteria.

2.  Use the Include in Selection portion of the window to flag the appropriate employee status to be included in the report. The system automatically defaults Active and Temporary employees as the selection. You may also choose to include employees that are Inactive, Retired, or On-Leave by inserting a check mark in the box preceding those employee statuses.
3.  Use the Sort Criteria portion of the window to select the manner in which information is to be sorted on the report. Information may be sorted in any one of the following ways:
alphabetical order by Employee Name
numerical ascending order by Employee Number
alphabetical order by Employee Type
numerical/alphabetical order by Building Code
numerical/alphabetical order by Department Code

4.  Use the Selection Range portion of the window to specify those employees who are to be included in the report. You may print a report for a specific range of employee names, employee numbers, or social security numbers.
Move the radio button to the desired selection range. Then use the starting and ending fields to type in the range of employee names, employee numbers, or social security numbers. If desired, use the lookup button to select one or a range of employees.

5.  After all reporting criteria has been specified, use the Options window to indicate the additional text and information that is to be displayed on the letter.


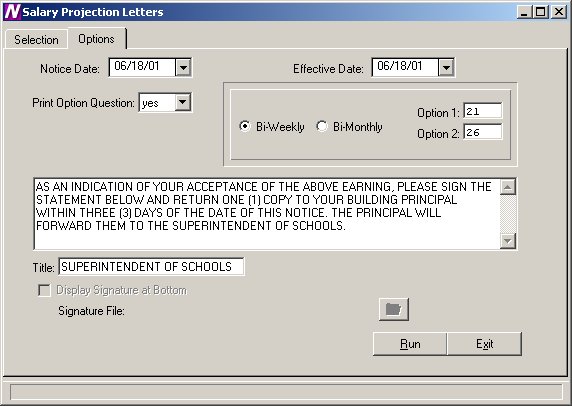
Use this window to indicate the additional text and information that is to be displayed on the letter.
 
To Enter Projection Letter Options:
1.  Enter the date (in MM/DD/YY format) that is to be displayed on the letter or notice. This date displays to the left of the school official’s signature line.
2.  Enter the effective date of the letter.
3.  Set the Print Option Question field to Yes if you want the letter to include the payment options section (for example, 26 equal payments or 21 equal payments). Then specify the check options.
Set the Print Option Question field to No if the payment options portion is to be excluded from the letter.

4.  Use the default letter text or change it as needed.
5.  Enter the title of the individual who is signing the Projection Letter.
6.  Press the Run button. From the Report Output window, select the desired reporting output destination.


FINANCE MANAGER CSD
45 RESEARCH WAY
EAST SETAUKET, NY 11733
 
 
Claude Cleaner SOC SEC NUMBER: 282-34-0983
18 Meadow Lane PRIME LOCATION: <N/A>
Plainview, NY 11803


YOU ARE HEREBY NOTIFIED THAT YOUR ANNUAL SALARY FOR THE 2000 - 2001 SCHOOL YEAR
AS Cleaners IS:
 
 
START DATE END DATE EARNING STEP LEVEL SALARY
---------- -------- ------------------------------ ----- -------- ----------
07/01/01 06/30/01 CONTRACTUAL EARNING 3.00 CLEAN2 14,399.00
07/01/01 12/31/00 LONGEVITY CSEA 10YRS 3.00 LONG 10Y 153.00
 
TOTAL SALARY FOR 2000-2001 SCHOOL YEAR 14,552.00
 
AS AN INDICATION OF YOUR ACCEPTANCE OF THE ABOVE SALARY. PLEASE SIGN THE
STATEMENT BELOW AND RETURN ONE (1) COPY TO YOUR BUILDING PRINCIPAL WITHIN
THREE (3) DAYS OF THE DATE OF THIS NOTICE. THE PRINCIPAL WILL FORWARD THEM TO
THE SUPERINTENDENT OF SCHOOLS.


THANK YOU FOR YOUR COOPERATION IN THIS MATTER
 
 
DATE: 06/18/01 BY:_____________________________________
SUPERINTENDENT OF SCHOOLS
 
******************************************************************************
 
I ACCEPT THE ABOVE SALARY AND FURTHER STATE THAT I AM PROPERLY QUALIFIED FOR
THE POSITION I HOLD.
 
I REQUEST THAT THE ABOVE SALARY BE PAID TO ME IN (CHECK ONE):
(NOTE: THIS OPTION MAY NOT BE CHANGED DURING THE SCHOOL YEAR)
 
( ) 21 EQUAL PAYMENTS
 
( ) 26 EQUAL PAYMENTS


DATE: ______________ EMPLOYEE'S SIGNATURE: _________________________


Back to top


Finance Manager  1  May 2001