
BUDGET MANAGER


BUDGET MANAGER
|
BUDGET MANAGER
BUDGET MANAGER User Types
There are two types of users of the BUDGET MANAGER System - Budget User and Budget Administrator.
Budget Users – These individuals have access to only those budget codes that are linked to them through the User Account Chart Range routine. Refer to User Account Chart Range later in this document. They will also only have access to those budgets for which they are defined as Budget Users. Refer to Add Budget User later in this document. Those individuals defined as Budget Users will have an icon displayed to the left of the budget preparer name that will not reflect a key. The user icon for a Budget User displays as follows: ![]() .
.
Budget Administrators – These individuals have access to all account codes in every fund. They will also have access to all budgets within BUDGET MANAGER. Refer to New Budget Administrator later in this document. Those individuals defined as Budget Administrators will have an icon displayed to the left of the budget preparer name that will reflect a key. The user icon for a Budget Administrator displays as follows: ![]() .
.
Permissions Related to BUDGET MANAGER
The following permissions in SYSTEM MANAGER are utilized within BUDGET MANAGER.
BDM Appropriation Status
BDM Detail Notes Report
BDM Pivot Table Report
BDM Revenue Status
BDM User Account Chart Range
Run, Add, Update, Delete, View, and/or Print permissions should be established for each user and administrator through SYSTEM MANAGER prior to using the BUDGET MANAGER System.
Upon selecting the Budget button from the FINANCE MANAGER main window, the BUDGET MANAGER window displays.
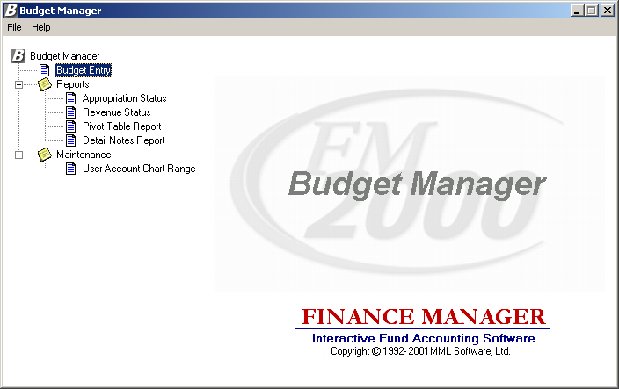
The BUDGET MANAGER system is divided into three main areas: Budget Entry, Reporting, and Maintenance. Use the tree on the left-hand side of the window to expand the Reports and Maintenance routines to display the options within each area.
Budget Entry – Double click on the Budget Entry option to display the window where the budget information is to be created and maintained.
Reports – Double click on the Reports tree to display the reporting routines. The Report routines include the Appropriation Status, Revenue Status, Pivot Table Reports, and Detail Notes Report.
Maintenance – Double click on the Data Entry tree to display the maintenance routines. The Maintenance routines include User Account Chart Range which is used to create and maintain a listing of those accounts to which a user has access.
User Account Chart Range
To access the User Account Privilege Setup routine, double click the User Account Chart Range option from the Budget Manager Maintenance tree menu.
NOTE: The options that you have access to within this routine are driven by the permissions set in User Maintenance for the following: BDM User Account Chart Range.
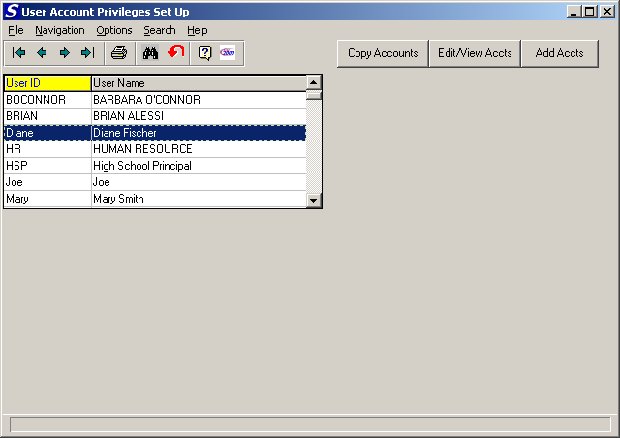
The User Account Privileges Setup routine is used to associate users with specific account codes that they are authorized to use. For example, certain users may have access to all account codes, while others only have access to specific account codes within specific funds.
The User Account Privileges Setup window displays a listing of all users of the FM2000 System. Use this window to select the appropriate user record.
NOTE: If a user is defined as a Budget Administrator, that user automatically has access to all account codes in every fund. (See System Manager – User Maintenance for more information.)
Drop-Down Menus
The following drop-down menus are displayed on the window:
File This menu provides access to the Exit option that allows you to exit the routine.
Navigation This menu provides access to the First, Previous, Next, and Last options that allow you to locate specific records in the browser.
Options This menu provides access to the Print option that is used to print a listing of users and their corresponding account privileges.
Search This menu provides access to the Start and Clear Search options.
Help This menu provides access to on-line help and the system information window that reflects the Progress patch and code version that is running.
The navigation options can be accessed through the buttons at the top of the window or through the Navigation drop-down menu.
| Navigation Button | Function |
| First |
This option is used to highlight the first record in the browser. |
| Previous |
This option is used to highlight the previous record in the browser. For example, if there are five records in the browser and your cursor is highlighting the third record, select the Previous button to highlight the previous (second) record. |
| Next |
This option is used to highlight the next record in the browser. For example, if there are five records in the browser and your cursor is highlighting the third record, select the Next button to highlight the next (fourth) record. |
| Last |
This option is used to highlight the last record in the browser. |
| Print |
This option is used to print a listing of users along with the range of account codes to which the user has access. Pressing the Print button displays the Print Selection pop-up box.
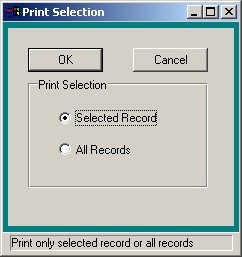
Use this window to select the user records that you wish to include in the report. 1. Choose the Selected Record option if you want to report on only the selected user and the accounts linked to that user. Choose the All Records option if you want the report to include all users and their account links. Press the OK button to continue the Print process or press Cancel if you do not want to continue the Print process. |
| Start Search |
This option is used to search for a specific record in the browser. |
| Clear Search |
This option is used to clear out any previously defined search criteria and restore the browser to its original default values. |
| Help |
This option is used to access the on-line help for the BUDGET MANAGER product. |
| About FM2000 |
This option is used to display general FM2000 system information including the name of the licensee, Progress patch and serial numbers, memory availability, last release date, last modified date of program running. |
| Action Button | Function |
| Copy Accounts | This option is used to copy those accounts associated with one user to another user. Refer to Copying Accounts later in this document. |
| Edit/View Accts | This option is used to modify or view the accounts linked to a selected user. Refer to Adding, Editing, and Viewing Accounts on the next page. |
| Add Accts | This option is used to link specific accounts to a selected user. Refer to Adding, Editing, and Viewing Accounts on the next page. |
Adding, Editing, and Viewing Accounts
The Add and Edit/View Accounts windows are used to create and maintain the specific Revenue and/or Appropriation accounts to which a user has access. Access can be restricted to specific account codes by using ranges of funds, functions, objects, locations, and programs to create the account links. Users may have links to different accounts within the various FM2000 products. The selected user name is displayed in red at the top of the window.
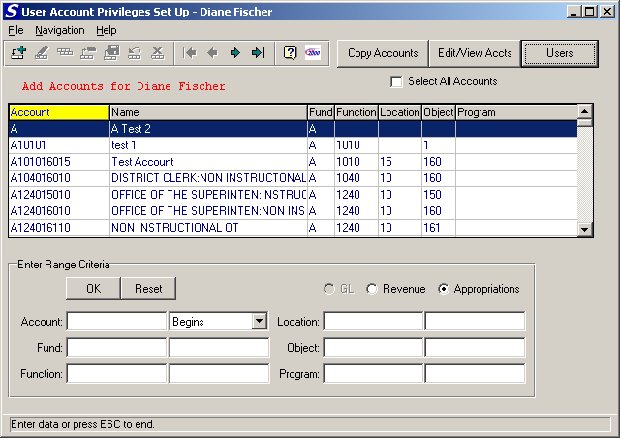
The Add Accounts browser contains a listing of those accounts that are not already linked to the selected user. Use the bottom of the window to search for a specific account or range of accounts that you wish to link to the user. NOTE: You must create chart links for each account type for each user.
To Search For and Add Accounts to a Selected User:
1.
On the User List window, select the user to whom you wish to add/link accounts.
2.
Click the Add Accts button. The Add Accounts browser displays a list of those accounts that are not already linked to the selected user. Set the radio buttons to the appropriate account type (Revenue or Appropriation). The accounts associated with the selected type displays in the browser.
The information in the browser can be sorted numerically by account code, alphabetically by account description, alphabetically by fund, numerically by function, numerically by location, numerically by object, or numerically by program. To change the manner in which information is displayed in the browser, simply click on the column title (Account, Name, etc.). The column title is highlighted in yellow to indicate the selected sort option.
You may enter very general search criteria or enter specific search criteria that will let you narrow in on a certain account or series of account codes. Enter search criteria in any one or a combination of multiple search fields. For example, you may choose to narrow the search criteria to accounts in only fund A. You can also choose to further narrow the search criteria to display accounts in fund A that have a function code of “A2110”.
To link all account codes to a user, advance to step 6. To link certain accounts to a user, advance to step 3.
3.
To display a specific range of accounts, type in a portion of the account code in the Account field. Then select one of the options from the drop-down menu.
Begins – Type in a portion of the account code in the Account field; select Begins. Press OK. The browser displays those account codes that begin with the criteria you entered. For example: If you type the letter “C”, select Begins, and press OK, the browser displays those account codes that begin with the letter “C”.
Equals – Type in the complete account code in the Account field; select Equals. Press OK. The browser displays the exact match of the criteria entered. For example: If you type “A211015009” (as shown in the sample screen above), select Equals, and press OK, the browser displays only that account code.
Contains – Type in a portion of the account code in the Account field; select Contains. Press OK. The browser displays those account codes that contain the search criteria that you entered. For example: According to the sample screen above, if you type “15”, select Contains, and press OK, the browser displays accounts A211015009 and A211015109.
4.
Use the Fund, Function, Location, Object, and Program fields to narrow the search of accounts.
Fund – Enter the starting and ending fund codes to be displayed. Leave these fields blank to display accounts in all funds.
Function – Enter the starting and ending function codes to be displayed. Leave these fields blank to display accounts associated with every function code.
Object – Enter the starting and ending object codes to be displayed. Leave these fields blank to display accounts associated with every object code.
Location - Enter the starting and ending location codes to be displayed. Leave these fields blank to display accounts associated with every location code.
Program - Enter the starting and ending program codes to be displayed. Leave these fields blank to display accounts associated with every program code.
5.
Press the OK button to begin the search process.
6.
Highlight the account code that you wish to link to the selected user.
Use the Control key and mouse to select multiple account codes that you wish to link to the user.
Use the Shift key and mouse to select a sequential series of account codes that you wish to link to a user.
Check the Select All Accounts checkbox to highlight all account codes in the browser.
7.
Click the add account button ![]() .
.
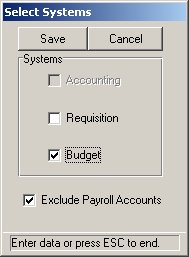
The Select Systems window is displayed.
8.
Place a check in the checkbox preceding the application to which you are creating the account link for the user. You may select more than one application at a time.
9.
Use the Exclude Payroll Accounts field to indicate whether the user should have access to those account codes designated as Payroll codes. Payroll codes are those codes that begin with either 1 or 8 in the Object portion of the account code.
If the Exclude Payroll Codes option is checked, the user will NOT have access to any account codes that begin with 1 or 8 in the Object.
If the Exclude Payroll Codes option is not checked, the user will have access to those account codes that begin with 1 or 8 in the Object.
10.
Press the Save button to create the account links.
The selected accounts are removed from the browser. Click on the Edit/View Accts button to see the accounts that you just added.
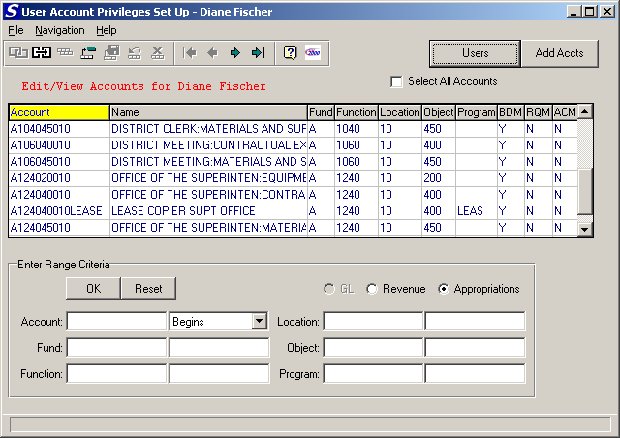
The browser reflects the account link that the user has in each FM2000 product (BDM – Budget Manager, RQM – Requisition Manager, ACM – Accounting Manager).
To Search For and Update/View Accounts to a Selected User:
1.
On the User List window, select the user whose accounts you wish to view or modify.
2.
Click the Edit/View Accts button. The browser displays a listing of those accounts that are already linked to the user along with the product for which the account link was created. On the Edit/View Accounts window, set the radio buttons to the appropriate account type (Revenue or Appropriation). The accounts associated with the selected type displays in the browser.
The information in the browser can be sorted numerically by account code, alphabetically by account description, alphabetically by fund, numerically by function, numerically by location, numerically by object, or numerically by program. To change the manner in which information is displayed in the browser, simply click on the column title (Account, Name, etc.). The column title is highlighted in yellow to indicate the selected sort option.
You may enter very general search criteria or enter specific search criteria that will let you narrow in on a certain account or series of account codes. Enter search criteria in any one or a combination of multiple search fields. For example, you may choose to narrow the search criteria to accounts in only fund A. You can also choose to further narrow the search criteria to display accounts in fund A that have a function code of “A2110”.
To update/view all account codes for a user, advance to step 6. To update/view certain accounts for a user, advance to step 3.
3.
To display a specific range of accounts, type in a portion of the account code. Then select one of the options from the drop-down menu.
Begins – Type in a portion of the account code in the Account field; select Begins. Press OK. The browser displays those account codes that begin with the criteria you entered. For example: If you type the letter “C”, select Begins, and press OK, the browser displays those account codes that begin with the letter “C”.
Equals – Type in the complete account code in the Account field; select Equals. Press OK. The browser displays the exact match of the criteria entered. For example: If you type “A211015009” (as shown in the sample screen above), select Equals, and press OK, the browser displays only that account code.
Contains – Type in a portion of the account code in the Account field; select Contains. Press OK. The browser displays those account codes that contain the search criteria that you entered. For example: According to the sample screen above, if you type “15”, select Contains, and press OK, the browser displays accounts A211015009 and A211015109.
4.
Use the Fund, Function, Location, Object, and Program fields to narrow the search of accounts.
Fund – Enter the starting and ending fund codes to be displayed. Leave these fields blank to display accounts in all funds.
Function – Enter the starting and ending function codes to be displayed. Leave these fields blank to display accounts associated with every function code.
Object – Enter the starting and ending object codes to be displayed. Leave these fields blank to display accounts associated with every object code.
Location - Enter the starting and ending location codes to be displayed. Leave these fields blank to display accounts associated with every location code.
Program - Enter the starting and ending program codes to be displayed. Leave these fields blank to display accounts associated with every program code.
5.
Press the OK button to begin the search process.
6.
Highlight the account code that you wish to edit/view for the selected user.
Use the Control key and mouse to select multiple account codes that you wish to modify/view. Use the Shift key and mouse to select a sequential series of account codes that you wish to edit or view.
Check the Select All Accounts checkbox to highlight all account codes in the browser.
7.
Press the Update account button.
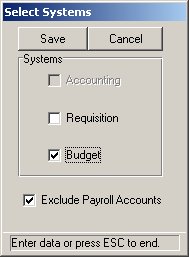
The Select Systems window is displayed.
8.
Place a check in the checkbox preceding the application to which you are modifying/creating the account link for the user. You may select more than one application at a time.
9.
Use the Exclude Payroll Accounts field to indicate whether the user should have access to those account codes designated as Payroll codes. Payroll codes are those codes that begin with 1 or 8 in the Object portion of the account code.
If the Exclude Payroll Codes option is checked, the user will NOT have access to any account codes that begin with 1 or 8 in the Object.
If the Exclude Payroll Codes option is not checked, the user will have access to those account codes that begin with 1 or 8 in the Object.
10.
Press the Save button to modify/create the account links.
The Edit/View Accounts browser is updated to reflect the changes made.
To Search For and Delete Accounts for a Selected User:
1.
On the User List window, select the user whose accounts you wish to view or modify.
2.
Select the Edit/View Accts button. The browser displays a listing of those accounts that are already linked to the user along with the product for which the account link was created. On the Edit/View Accounts window, set the radio buttons to the appropriate account type (Revenue or Appropriation). The accounts associated with the selected type displays in the browser.
The information in the browser can be sorted numerically by account code, alphabetically by account description, alphabetically by fund, numerically by function, numerically by location, numerically by object, or numerically by program. To change the manner in which information is displayed in the browser, simply click on the column title (Account, Name, etc.). The column title is highlighted in yellow to indicate the selected sort option.
You may enter very general search criteria or enter specific search criteria that will let you narrow in on a certain account or series of account codes. Enter search criteria in any one or a combination of multiple search fields. For example, you may choose to narrow the search criteria to accounts in only fund A. You can also choose to further narrow the search criteria to display accounts in fund A that have a function code of “A2110”.
To delete all account codes for a user, advance to step 5. To delete certain accounts for a user, advance to step 3.
3.
To display a specific range of accounts, type in a portion of the account code in the Account field. Then select one of the options from the drop-down menu.
Begins – Type in a portion of the account code in the Account field; select Begins. Press OK. The browser displays those account codes that begin with the criteria you entered. For example: If you type the letter “C”, select Begins, and press OK, the browser displays those account codes that begin with the letter “C”.
Equals – Type in the complete account code in the Account field; select Equals. Press OK. The browser displays the exact match of the criteria entered. For example: If you type “A211015009” (as shown in the sample screen above), select Equals, and press OK, the browser displays only that account code.
Contains – Type in a portion of the account code in the Account field; select Contains. Press OK. The browser displays those account codes that contain the search criteria that you entered. For example: According to the sample screen above, if you type “15”, select Contains, and press OK, the browser displays accounts A211015009 and A211015109.
4.
Use the Fund, Function, Location, Object, and Program fields to narrow the search of accounts.
Fund – Enter the starting and ending fund codes to be displayed. Leave these fields blank to display accounts in all funds.
Function – Enter the starting and ending function codes to be displayed. Leave these fields blank to display accounts associated with every function code.
Object – Enter the starting and ending object codes to be displayed. Leave these fields blank to display accounts associated with every object code.
Location - Enter the starting and ending location codes to be displayed. Leave these fields blank to display accounts associated with every location code.
Program - Enter the starting and ending program codes to be displayed. Leave these fields blank to display accounts associated with every program code.
5.
Highlight the account code(s) that you wish to delete for the selected user.
Use the Control key and mouse to select multiple account codes that you wish to delete.
Use the Shift key and mouse to select a sequential series of account codes that you wish to delete.
Check the Select All Accounts checkbox to highlight all account codes in the browser.
6.
Press the delete account button ![]() .
.
7.
Confirm that this is the correct account record(s) that you wish to delete. Choose Yes to delete the selected account codes; press No if you do not wish to delete the account codes.
The Edit/View Accounts browser is updated to reflect the deleted account records.
To Reset the Search Criteria:
1.
Press the Reset button.
The browser is restored to the original default account codes.
Copying Accounts
The Copy Accounts routine is used to copy all accounts links from a selected user to one or more other users.
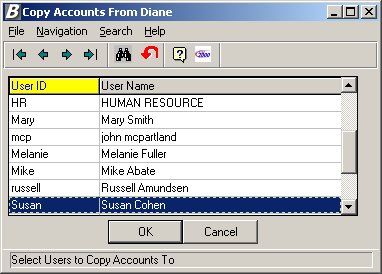
The above window displays after selecting the user from which the account links are to be copied and selecting the Copy Accounts button. Use the window to select the name(s) of the user(s) to which account links are to be copied.
To Copy All Accounts:
1.
Select the user(s) to which account links are to be copied.
2.
Select the OK button.
Once all accounts have been copied to the selected user(s), the system displays a message indicating that the copy is complete. You may view the account links for each user by selecting the user name from the User List and clicking the Edit/View Accts button.