Your First PowerPoint Show
•
Open PowerPoint
•
Select
Blank Presentation
•
Chose
Title Slide
from the new slide menu. (Note the description of each slide in
the lower right corner of the dialog box.)
•
Follow the directions in the boxes. Add a title and a subtitle, if you wish. (Note
that you are typing in a “text box” and not directly on the background.)
•
Click on
Insert
in the menu bar and click
New Slide.
•
Select the
Bulleted List
slide.
•
Add a title and type some “talking points”
•
Click on
Insert
in the menu bar and click
New Slide.
•
Select the
Text & Clip Art
Slide.
•
Add a title; add some “Talking Points”; add a piece of Clip Art.
A look at the buttons
In the lower left corner note five buttons:
The
normal
view
The
outline
view
The
slide
view
Slide Sorter
view
Slide show
Click on each button to see what each does.
Run your slide show. Boring?
Transitions
There are two
major
types of transitions. The first is from slide to slide. And the second
is between or among the elements (objects) on any given slide.
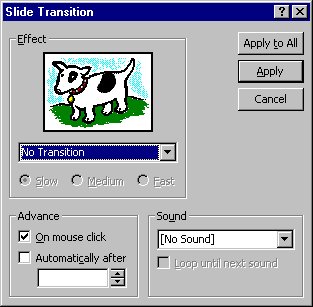
Click on
Slide Show
on the Menu Bar, scroll to Slide Transition and click once.
Click on triangle (arrow) under the dog and select a transition.
Note the way the “dog slide” turns into a “key slide.”
Experiment with different transitions and find one that you
like.
Now click
Apply to All
and run your show again.
Experiment some more with different transitions. If you can’t
choose, then select
Random Transition
.
Go to the slide sorter view and double click the
bulleted list
slide.
Click on the bulleted list.
Click on
Slide Show
on the menu bar and click
Preset Animation
. Choose something
from the list—typewriter works well. Run this slide again. Note the changes. Try some
different transitions.
The presets are nice but you can really make an impact with the
custom animation
. Go to
Slide Number Three.
•
Click on
Slide Show
on the menu bar and
•
Click
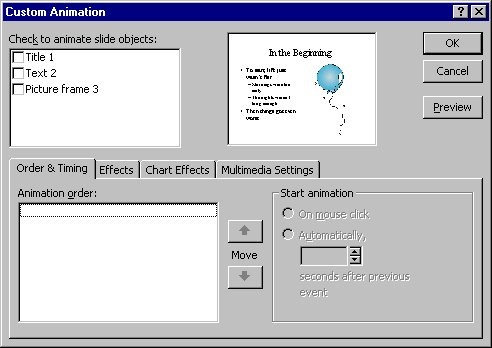
Custom Animation
There are several choices to make in this box.
•
Order and Timing
Order
Start choice
•
Effects
Entry Animation
Sound
Dim or Not
Order
First put a check (
) in the box next to
Title
1—notice the box that is now around
the title in the upper right corner of the dialog box. Now put a check next to text
2, and then a check next to picture frame 3. Click Preview Experiment with
different orders.
Start and Timing
On mouse click is the default. Select Title 1 and click automatically and chose 2
seconds. Do the same with Text 2 and Picture frame3. Click Preview.
Effects
Click Title 1. Click the
Effects
tab. Click triangle next to
no effect
. Select
Crawl
.
Click
Preview
. Change
from bottom
to
from right
.
Preview
again. Experiment
with other entry animations
Click Text 2. Click
dissolve
. Under introduce text click by letter. Experiment.
Try some sounds. After animation click more colors and choose a color.
Click Picture frame 3. Click and choose
Crawl
and
From Bottom
.
Backgrounds
Now black and white is nice but color would be better.
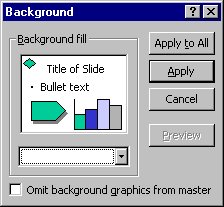
Click on
Format
from the Menu Bar.
Click on
Background
.
Click on the triangle under Background fill.
Click on
Fill Effects
.
Click on the
Gradients tab
Click on
preset
.
Find
Ocean
.
Click through
shading styles
. Choose one and
Click
OK
.
Click on
Apply to All
Run your slide show.
Click on
Format
from the Menu Bar
Click on
Background
Click on the triangle under
Background fill
Click on
Fill Effects
Click on the Textures tab
Select a texture
Click
OK
Click
Apply to All
Run your slide show
Click
Format
Click
Apply Design Template
Click
Dad’s Tie
or
Stratigic
Run your show and note the differences between the tile slide and the others.
Experiment with other
Templates
.
If you would like to see an online tutorial click here: http://www.actden.com/pp/
Back to top


