Bottle cap
· A CD that is no longer needed for other purposes.
· Household silicone caulk or glue.
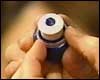
· A bottle cap from a disposable water bottle, the type with a push/pull shutoff valve (picture at right).
· Balloons
CAUTION! Safety is the MOST IMPORTANT thing to pay attention to!
This activity should be performed following all instructions here, as well as all the instructions for the supplies, tools used and work area used. Please note that some caulks and glues require adequate ventilation and skin protection. Follow the label on the product you use.
Instructions
1
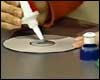
Picture 1a
Picture 1b
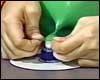
In a well-ventilated area, glue the bottle cap to the center of one side of the CD (Pictures 1a and 1b). Let the glue dry.
2
Be sure the valve is closed.
3
Picture 3
Inflate the balloon and twist the end closed. Do not tie the balloon off. (Picture 3)
4
Picture 4
Place the open end of the balloon over the bottle cap and untwist the balloon. (Picture 4)
5
Picture 5
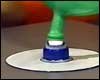
Place the CD on a smooth flat surface and open the valve. (Picture 5)
6
Picture 6
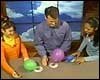
The CD should freely move about, riding on the cushion of air from the balloon! (Picture 6)