Timesheets
To access the Timesheets function, select the Timesheets option from the Processing drop-down menu or simply select the Timesheet  button on the Payroll Manager Main window.

The Timesheets function allows you to group and enter payroll period data by employee number, employee name, employee type, account, earning code, units, pay rate, amount, retirement system, date, building, department, or social security number. These various methods of data input help to expedite the payroll process. Blank timesheet input worksheets can be printed and distributed to various departments. Once the worksheets are completed and returned to the Payroll Department, the data can be easily entered. Once entered into the system, the data is transferred to the current payroll checks.
Overview
Overview
The Timesheet routine allows you to perform the following activities:
Set User Preferences allows you to customize the look of the Timesheet Entry window for each user who inputs timesheet records.
Data Entry and Maintenance allows you to add, update, or delete a timesheet records for employees. This also provides quick entry of timesheet units for each earnings record.
Printing allows you to print completed timesheet data so that you may verify your entries before transferring the data to the current payroll. This also allows you to generate blank timesheet input worksheets.
Transfer allows you to transfer timesheet data to the current payroll checks.
Utilities allows you to create, initialize, or purge timesheet entries for all employees associated with a specific group (Account, Earnings, Building, Department, Employee Type, Employee).
Set User Preferences
Set User Preferences
The look of the Timesheet Entry window can be customized for each user who inputs timesheet records. You can customize the columns that will show on the window by selecting the User Preferences  option that displays in the toolbar at the top of the window. Upon selecting the User Preferences option, the Set User Preferences window displays.
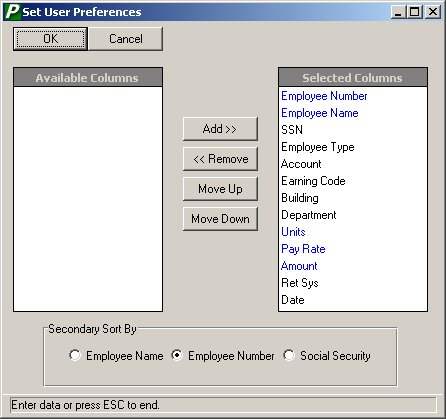
When you first access Timesheets, all available columns are selected for you. Use the Set User Preferences window to remove columns and change the order in which columns are displayed on the Timesheet Entry window. You only need to set user preferences one time. After you change user preferences, the Timesheet Entry window will have the selected defaults for the user until you change the preferences again.
The data highlighted in Blue under the Selected columns section of the window cannot be removed. This means that the Employee Number, Employee Name, Units, Pay Rate, and Amount columns must always be displayed on the Timesheet Entry window. You may, however, choose to change the order in which the required columns are displayed on the window. You have the option of removing any or all other column information (SSN, Employee Type, Account, Earning Code, Building, Department, Retirement System, and Date) from the Timesheet Data Entry window. The order in which the column names are displayed on the Selected Columns viewer is the order in which the columns are displayed in the Timesheet Entry browser.
To Remove a Column:
To Remove a Column:
1.
Click on a column name under the Selected Columns viewer. To select more than one column, hold down the Ctrl key and highlight the appropriate column names.
2.
Choose the <<Remove button.
The selected column name(s) is moved to the Available Columns viewer. Each time the user logs into the Timesheet routine, only the columns indicated in the Select Columns viewer are displayed.
To Add a Column:
To Add a Column:
1.
Click on a column name under the Available Columns viewer. To select more than one column, hold down the Ctrl key and highlight the appropriate column names.
2.
Choose the Add>> button.
The selected column name(s) is moved to the Selected Columns viewer. Each time the user logs into the Timesheet routine, only the columns indicated in the Select Columns viewer are displayed.
To Move Columns:
To Move Columns:
1.
Click on a column name under the Selected Columns viewer. To select more than one column, hold down the Ctrl key and highlight the appropriate column names.
2.
Choose the Move Up or Move Down button.
The selected column name(s) is shifted up or down in the Selected Columns viewer. When you return to the Timesheet Entry window, the column names are displayed in the order that they appear on the Selected Columns viewer in Set User Preferences.
To Set a Secondary Sort Option:
To Set a Secondary Sort Option:
The primary sort option is specified by highlighting the desired column title in the Timesheet browser. A secondary sort option is available when using a primary sort of Employee Type, Account, Earnings, Building, Department, or Amount. The Secondary Sort By option, which is defined in the Set User Preferences window, can be by Employee Number, Employee Name, or Social Security Number. For example, if the primary sort is by Account Code, you may also choose the Employee Number secondary sort by radio button. In this scenario, all timesheet records will be sorted in numerical ascending order by Account Code. Within each account code, records are sorted in numerical ascending order by Employee Number.
Timesheet Data Entry
Timesheet Data Entry
The Timesheet Entry browser contains a listing of those timesheet records that were manually added or automatically set up through the Utilities setup routine. This routine facilitates the Payroll Timesheet process in that the user can simply go down the list of timesheet entries and enter the proper number of units to be paid.

Timesheet Browser
Timesheet Browser
The Timesheet Entry browser displays the column information that is set up for each user in the Set User Preferences routine. The Timesheet Entry routine allows you to group and enter payroll period data by employee number, employee name, social security number, employee type, earnings, account, building, department, etc. These various methods of data input help to facilitate and expedite the payroll process.
Building Permissions
Building Permissions
Your building permissions, as defined in the Building Range fields in the User Maintenance routine in System Manager, determine the information displayed in the Timesheet browser. If your building range permissions in User Maintenance is EL (Elementary School) to EL (Elementary School), the Timesheet browser only displays timesheet records for employees in the Elementary School.
Filter
Filter
Use the filter to restrict the display of timesheet information in the browser. For example, you may wish to display only timesheet records for employees whose last names start with A through H.
Select the Filter  button. The Filter window is displayed.

Using the Filter:
Using the Filter:
1.
Enter the appropriate ranges in the filter starting and ending fields.
Example 1: To display timesheet records for employees whose last names start with A through H, go to the Name field and type A in the starting field and HZ in the ending field.
Example 2: To display only those timesheet records for Overtime Pay, go to the Earning field and type OT Pay in both the starting and ending fields.
Use the drop-down menus in the Units, Pay Rate, and Amount fields to further restrict the browser display.
Greater Equals – Select this option to display amounts greater than or equal to the units, pay rate, or amount entered.
Greater Than – Select this option to display amounts greater than the units, pay rate, or amount entered.
Equals – Select this option to display amounts equal to the units, pay rate, or amount entered.
Less Than – Select this option to display amounts less than the units, pay rate, or amount entered.
Less Equals – Select this option to display amounts less than or equal to the units, pay rate, or amount entered.
2.
Press the Filter button. The system returns the Timesheet browser, restricting data displayed to the criteria specified on the Filter window.
Removing the Filter Criteria:
Removing the Filter Criteria:
1.
Select the Filter  button. The Filter window is displayed.
2.
Press the Show All button.
The system returns the Timesheet browser and removes any filter criteria previously selected.
Sorting
Sorting
To change the manner in which information is displayed in the browser, simply click on the column title (i.e., Empl #, Name, SSN, Emp Type, Account, Earning, Building, etc.) to change the sort. The column title is highlighted in yellow to indicate the selected primary sort option. A secondary sort option is available when using a primary sort of Employee Type, Account, Earnings, Building, Department, or Amount. The secondary sort option, as set up in Set User Preferences, can be by Employee Number, Employee Name, or Social Security Number. For example, if the primary sort is by Account Code and the secondary sort is by Employee Number, all timesheet records will be sorted in numerical ascending order by Account Code. Within each account code, records are sorted in numerical ascending order by Employee Number.
Searching
Searching
In addition, you may use the Search field to change the starting point of timesheet records contained in the browser. For example, if your primary sort is by Earnings and you wish to display those timesheet records for Overtime Pay first, type “OT PAY” in the Earning search field that displays to the above right of the browser. Press the binoculars to have the browser start with timesheet records for overtime earnings.
Refreshing
Refreshing
You may press the Refresh  button at any time while in the Timesheet Entry routine. The system will refresh the timesheet browser with any new timesheet information that another user may be entering.
Copying a Timesheet Record
Copying a Timesheet Record
The Copy feature is used to copy an existing timesheet record from one employee to another. The Copy option should be used when all or most of the timesheet information is the same for the employee to which you are copying the timesheet record.
1.
Highlight the timesheet record in the browser that you want to copy.
2.
Press the Copy  button. The Timesheet Copy window displays.
3.
Enter the number identifying the employee to which the timesheet record is to be copied.
4.
Change the copied employee type, building, department, entry date, earning code, account code, units, pay rate, and/or retirement system code as needed.
5.
Press the Save button.
To Use the Timesheet Quick Pay Entry Window:
To Use the Timesheet Quick Pay Entry Window:
1.
Click on the appropriate column title in the browser to indicate how the timesheet data is being grouped and inputted. Employee timesheet records can be sorted in any one of the following methods: by Employee Number, Name, Social Security Number, Employee Type, Account, Earning, etc. The column heading in the browser is highlighted to reflect the selected primary sort for timesheet entry.
2.
Optionally select a secondary sort for timesheet entry by flagging the appropriate radio button in the Set User Preferences routine. For primary sort methods Employee Type, Account, Earnings, Building, Department, or Amount, a secondary sort by employee number, employee name, or social security number may be specified. For example, if timesheets are entered alphabetically by employee name within each building, click the Building column title and set the Secondary Sort By radio button in Set User Preferences to Employee Name.
3.
The Search button can be used to restrict the browser to specific timesheet entries based on the primary sorting option selected. For example, if you only wish to display timesheet records associated with those employees in the Elementary School Building, click the Building column title, type “Elementary” in the Building Search field, and press the OK button.
4.
To enter pay units, do one of the following: Double-click on the desired Units field in the browser or highlight the appropriate record and press the F5 key. The record that you are updating is highlighted. Enter the appropriate number of units to be paid for each employee and press Enter, Tab, or the Down Arrow key. The system multiplies the number of units by the pay rate and automatically calculates the extended pay amount.
NOTE: If the Units and Amount fields are highlighted in red, the values have already been transferred to payroll. In this case, update to the units and amount values are not permitted. Use the Enter Additional Earnings function to make any necessary changes.
As you continue to record timesheet units, the system displays a running total of the extended amounts for the entries in the selected group and for all timesheet records.
5.
To exit the timesheet quick data entry mode, click anywhere within any one of the rows in the browser or press the F10 key.
NOTE: Once timesheet data has been transferred to the current payroll and checks are printed and posted, the Units and Amount values are zeroed out. When appropriate, the units for the next pay period may be entered.
Printing Timesheet Reports
Printing Timesheet Reports
The Printing window is used to print completed timesheet data in order to verify your entries. It is important to review all entries and make any necessary changes before timesheet data is transferred to the current payroll. This window also allows you to generate blank timesheet input worksheets.
To print timesheet information, press the Print  button in the toolbar at the top of the Timesheet Entry window. The Timesheet Printing window displays.

To Print Timesheet Reports:
1.
Use the folders on the left-hand side of the window under Selection Method to indicate how the timesheet data is being grouped and printed. Employee timesheet records can be sorted in any one of the following methods: by Account Code, Earnings Code, Building, Department, Employee Type, or Employee Number.
2.
Click on the column title to change the sort order of the information contained in the browser. Use the Search field to change the starting point of information contained in the browser.
3.
Once the timesheet print method has been specified, use the browser to select specific entries to be printed.
Select the criteria from the browser list by clicking on the data to be included in the printed timesheets. Each selection is highlighted. Hold the Ctrl key and click in the browser to select more than one item. (To deselect an item, click on the item to remove the highlight.)
OR
Check the Select All box if you wish to print all timesheet data associated with the selected group.
4.
Define the timesheet reporting criteria.
Include All Entries Even if Amount is Zero –
Flag the YES radio button if you wish to include all timesheet entries including those that have zero amounts.
Flag the NO radio button if you only wish to include those timesheet entries where the amount is not zero.
Include Entries Updated by User(s)
This option allows you to print those timesheet entries that were entered by the user who is currently logged into the system or timesheets records entered by all users.
Flag the radio button that is next to the user name if you wish to print timesheet data that was entered only by that user.
Flag the All radio button if you wish to include timesheet data that was entered by all users.
Include Entries for Date(s) –
Flag the Specific radio button if you wish to include timesheet data that was entered during a specific date range. Then indicate the timesheet entry date range.
Flag the All radio button if you wish to include all timesheet entries regardless of their entry dates.
5.
Select the OK push button to generate the report.
All Timesheet Reports contain the following information: employee number, employee name, account number, earnings code, building, department, employee type, pay rate, units, extended pay amount, transfer flag (indicating whether the timesheet information has been transferred to the current payroll), timesheet entry date, and initials of the individual who entered the timesheet information. Subtotals are provided for each group and for the entire timesheet.
A sample report is shown on the following page.
05/26/02 FINANCE MANAGER CSD PAGE 1
********************************************************************************************************************************
TIMESHEETS BY BUILDING
ENTERED
EMP# NAME Account Earning Dept Type UNITS PAY RATE AMOUNT TRANSF DATE BY
================================================================================================================================
<N/A> - NONE ASSIGNED
1567 Hourly, Hal A124016110 REG PAY <N/A> 2016 80.000 12.000 960.00 YES 05/19/02 MGR
1588 Hourly, Howard A131016110 OT PAY <N/A> AUTO 8.000 19.500 156.00 NO 05/26/02 sc
1588 Hourly, Howard A162016010 REG PAY <N/A> AUTO 80.000 13.000 1,040.00 NO 05/26/02 sc
1590 Laughton, Patricia A131016010 REG PAY <N/A> SEC10 75.000 13.000 975.00 NO 05/26/02 sc
1575 Multiple, Mary A131016010 REG PAY <N/A> AUTO 20.000 9.615 192.30 YES 05/19/02 MGR
1591 Oliver, Pat A104016010 REG PAY <N/A> TEAID 60.000 11.000 660.00 YES 05/19/02 MGR
Total <N/A> 323.000 3,983.30
DO - HHS DISTRICT OFFICE
1572 Andrews, John A143016110 REG PAY <N/A> CLEAN 60.000 9.390 563.40 NO 05/26/02 sc
1318 FRYE, MATTHEW J. A162016210 REG PAY <N/A> SUM-H 75.000 7.500 562.50 NO 05/26/02 sc
1105 TOWLER, SARAH A131016110 REG PAY <N/A> STUD 80.000 8.000 640.00 NO 05/26/02 sc
Total DO 215.000 1,765.90
FGL - FGL ELEM SCHOOL
1571 Jackson, Mark A124016110 OT PAY ENG CLEAN 10.000 12.750 127.50 YES 05/19/02 MGR
1571 Jackson, Mark A124016510 REG PAY ENG CLEAN 80.000 8.500 680.00 YES 05/19/02 MGR
Total FGL 90.000 807.50
MAIL - US POST OFFICE-MAIL
1439 AGUILAR, ANNABELLA A124016510 REG PAY <N/A> SUB-T 40.000 25.060 1,002.40 YES 05/19/02 MGR
Total MAIL 40.000 1,002.40
O&M - CUST-CHAUF WEEKLY
1470 BRICKMAN, AARON A162016210 REG PAY <N/A> SUM-H 80.000 7.000 560.00 NO 05/26/02 sc
370 FLYNN, THOMAS A162016210 REG PAY <N/A> SUM-H 75.000 7.500 562.50 NO 05/26/02 sc
1467 GRADY, KEVIN A162016210 REG PAY <N/A> SUM-H 80.000 7.000 560.00 NO 05/26/02 sc
Total O&M 235.000 1,682.50
----------- ----------
Grand Total 903.000 9,241.60
TOTAL TIMESHEETS BY BUILDING
ACCOUNT CODE HOURS DAILY OTHER AMOUNT
-------------------- ---------- --------- --------- --------- ----------
A104016010 <N/A> 60.000 0.000 0.000 660.00
A124016110 <N/A> 80.000 0.000 0.000 960.00
A124016110 FGL 10.000 0.000 0.000 127.50
A124016510 MAIL 40.000 0.000 0.000 1002.40
A124016510 FGL 80.000 0.000 0.000 680.00
A131016010 <N/A> 95.000 0.000 0.000 1167.30
A131016110 DO 80.000 0.000 0.000 640.00
A131016110 <N/A> 8.000 0.000 0.000 156.00
A143016110 DO 60.000 0.000 0.000 563.40
A162016010 <N/A> 80.000 0.000 0.000 1040.00
A162016210 DO 75.000 0.000 0.000 562.50
A162016210 O&M 235.000 0.000 0.000 1682.50
Report Completed 9:10 AM
Printing Blank Input Sheets
This option prints blank timesheet input worksheets for selected or all Hourly or Per Diem employees or those associated with selected accounts, earnings, buildings, departments, or employee types.
1.
Use the folders on the left-hand side of the window under Selection Method to indicate which timesheet input worksheets are to be printed. Employee timesheet worksheets can be printed in any one of the following methods: by Account Code, Earnings Code, Building, Department, Employee Type, or Employee.
2.
Once the print method or group has been specified, use the browser to select specific criteria for the print blank timesheets process.
Click on the column title to change the sort order of the information contained in the browser. Use the Search field to change the starting point of information contained in the browser.
Select the criteria from the browser list by clicking on the data to be included in the printed blank timesheets. Each selection is highlighted. Hold the Ctrl key and click in the browser to select more than one item. Select the criteria from the browser list by clicking on the selected account(s), earning(s), building(s), department(s), employee type(s), or employee(s). Each selection is highlighted. (To deselect an item, click on the item to remove the highlight.)
OR
Check the Select All box if you wish to print blank timesheets for all employees associated with the selected group.
3.
Check the Print Blank Input Sheets checkbox.
4.
Press the OK button.
The Blank Timesheets display the employee number, employee name, account number, earning type (Reg Pay, Per Diem, OT Pay, etc.), and pay rate. Use the worksheets to enter the appropriate number of units worked for each employee. Once the worksheets have been completed, these worksheets may be used to quickly input timesheet data on the Timesheet Data Entry window.
A sample blank timesheet is shown on the following page.
05/26/02 FINANCE MANAGER CSD PAGE 1
*************************************************************************************
BLANK TIMESHEETS BY EMPLOYEE TYPE
EMP# NAME ACCOUNT EARN TYPE UNITS PAY RATE
=====================================================================================
CLEAN - Cleaners
1572 Andrews, John A143016110 REG PAY ___________ 9.390
1573 Brown, John A162016410 REG PAY ___________ 11.000
1571 Jackson, Mark A124016110 OT PAY ___________ 12.750
1571 Jackson, Mark A124016510 REG PAY ___________ 8.500
Total CLEAN ___________
Grand Total ___________
Report Completed 9:17 AM
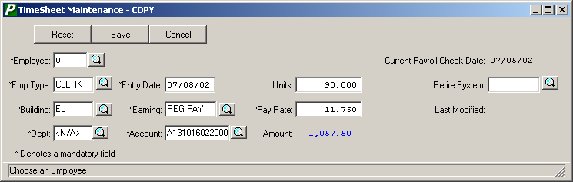
Timesheet Maintenance
Timesheet Maintenance
The Maintenance routines are used to add, update, or delete a timesheet record for an employee. If you already have used the Setup Entries by Account option under Timesheet Utilities, those timesheet records are displayed on the Timesheet Pay Entry window.

| Field
|
Description
|
| |
|
| Employee
|
(Required) The number that uniquely identifies the employee. If necessary, use the Employee Lookup browser to select the appropriate employee. The system defaults the employee name and social security number. NOTE: This field is not modifiable in Update mode.
|
| |
|
| Current Payroll Check Date
|
This field defaults to the current pay period check date as defined in the Payroll Parameters File and is not modifiable.
|
| |
|
| Emp Type
|
(Required) This field defaults to the employee type associated with the hourly or daily appointment. If no hourly or daily appointment exists, this field defaults to the employee type defined on the Information window in Employee Maintenance. You may change the default value if necessary. If needed, use the Employee Type Lookup browser to select the appropriate code.
|
| |
|
| Building
|
(Required) This field defaults to the building code defined on the Information window in Employee Maintenance. You may change the default value if necessary. If needed, use the Building Code Lookup browser to select the appropriate code.
|
| |
|
| Dept
|
(Required) This field defaults to the department code defined on the Information window in Employee Maintenance. You may change the default value if necessary. If needed, use the Department Code Lookup browser to select the appropriate code.
|
| |
|
| Entry Date
|
(Required) This field defaults to the current system date and may be changed if necessary.
|
| |
|
| Earning
|
(Required) Enter the appropriate earnings code for the employee. Valid codes are:
R – Regular Pay
O – Overtime Pay
U – Doubletime Pay
I – Differential Pay
X – Extra Pay
D – Per Diem Pay
To display more earnings codes, use the Earnings Code Lookup browser to select the appropriate code.
NOTE: The Earning field can not be modified in Update mode. You may not use the Contract, Contract-Adjust, Docked, or Retro earnings codes in Timesheets.
|
| |
|
| Account
|
(Required) This field is used to indicate the account number from which the earning is being expensed.
�
If the Earnings Code selected is Regular Pay, this field defaults to the Regular Account code defined on the Earnings window in Employee Maintenance.
�
If the Earnings Code selected is Overtime Pay and the employee is an Hourly employee, this field defaults to the Overtime Account code defined on the Earnings window in Employee Maintenance.
�
If the Earnings Code selected has a default account code as defined in the Earnings Code Maintenance File, the system defaults the appropriate account code.
|
| |
|
| Units
|
The number of units to be paid to the employee. Based on the earnings code, enter the number of days or hours.
|
| |
|
| Pay Rate
|
(Required) This field is used to indicate the employee’s hourly or daily pay rate.
�
This field defaults to the pay rate associated with the earnings code as defined on the Earnings window in Employee Maintenance. If the Earnings code is for Overtime or Doubletime Pay, the system calculates the appropriate pay rate based on the hourly pay factors defined in the Set Payroll Parameters function.
�
If the earnings selected is a “Fixed Amount” type as defined in the Earnings Code Maintenance File, the system defaults the fixed amount associated with that earning.
|
| |
|
| NOTE: If the employee is to be paid a flat dollar amount, enter 1 (one) in the Units field and the flat dollar amount in the Pay Rate field.
|
| |
|
| Amount
|
This field is for display purposes only and is not modifiable. The system multiplies the number of units by the pay rate and automatically calculates the extended pay amount.
|
| |
|
| Retire System
|
This field defaults to the employee’s retirement system code, as defined on the Retirement window in Employee Maintenance.
|
| |
|
| Last Modified
|
This field is for display purposes only and is not modifiable. Each time the timesheet record is modified, the last modified field is changed to reflect the date the record was changed.
|
Adding a Timesheet Record
Adding a Timesheet Record
1.
Select the Add  button on the Timesheet Entry window.
2.
Enter all appropriate timesheet information.
3.
Select the Save button on the Timesheet Maintenance window to lock in the new information.
Editing a Timesheet Record
Editing a Timesheet Record
1.
Highlight the appropriate timesheet record in the browser on the Timesheet Entry window.
2.
Select the Update  button.
3.
Make changes by typing over the existing data.
4.
Select the Save button on the Timesheet Maintenance window to lock in the new information.
Deleting a Timesheet Record
Deleting a Timesheet Record
1.
Highlight the appropriate timesheet record in the browser on the Timesheet Entry window.
2.
Select the Delete  button.
3.
Confirm that this is the correct record that you wish to delete. Click Yes to delete the record. Click No if you do not wish to delete the record.
Transfer
Transfer
The Transfer routine is used to transfer timesheet data to the current payroll checks. If a payroll record does not exist for the employee, a payroll record is created. If a payroll record does exist for the employee, the payroll record is updated with the earnings entered into timesheets.
NOTE: This function should only be used after the timesheet data has been entered and verified. Use the Printing routine to print a timesheet report to ensure that all data is correct before generating the timesheet transfer process.
To transfer data to payroll, press the Transfer  button on the Timesheet Pay Entry window. The Transfer pop-up window displays.

To Transfer Timesheet Data:
1.
Select YES if you wish to transfer timesheet data. Otherwise, select NO.
2.
A message box displays asking you to confirm that you wish to proceed with the timesheet transfer process at this time. Press YES to proceed or NO if you want to cancel the transfer process.
3.
Once data has been transferred, the system displays an Information box stating that the transfer is complete.
The timesheet entries on the Timesheet Pay Entry window are displayed in red, indicating that the data has been transferred to the current payroll. The transferred payroll records can be viewed using the Display/Modify Current Payroll Checks or Enter Additional Earnings function. At this point, updates to the units and amount values are not permitted on the Timesheet Pay Entry window. Use the Enter Additional Earnings function to make any necessary changes.
Utilities
Utilities
The Utilities routine is used to create, initialize, or purge timesheet entries for selected or all employees associated with a specific group (Account, Earnings, Building, Department, Employee Type, Employee).
To create, initialize, or purge timesheets, press the Utilities  button on the Timesheet Pay Entry window. The Timesheet Utilities window displays.

Setup Entries Utility
Setup Entries Utility
This utility creates a new timesheet entry for all employees with Hourly or Per Diem appointments based on a specified date range. If any new employees were hired since the last payroll was run, this utility will create a timesheet entry for those employees. This utility can also be used to create a new timesheet entry for hourly or per diem employees at the start of the fiscal year.
You may also use the setup routine to setup timesheet records for those employees who were paid in a selected past payroll date. If this option is selected, the system will only setup timesheet records for those employees who had timesheet earnings and were paid on the specified past payroll date. This option can be especially useful for creating timesheet records for those employees who do not have appointments.
The Timesheet Dec Pos field in Payroll Parameters can be used to indicate whether the Overtime Pay rate is to be set up using a two- or three-decimal extension.
1.
Use the folders on the left-hand side of the window under Selection Method to indicate how the timesheet entries are to be set up. Employee timesheet records can be set up in any one of the following methods: by Account Code, Earnings Code, Building, Department, Employee Type, or Employee.
2.
Once the setup method or group has been specified, use the browser to select specific criteria for the setup process.
Click on the column title to change the sort order of the information contained in the browser. Use the Search field to change the starting point of information contained in the browser.
Select the criteria from the browser list by clicking on the data to be included in the timesheet setup. Each selection is highlighted. Hold the Ctrl key and click in the browser to select more than one item. Select the criteria from the browser list by clicking on the selected account(s), earning(s), building(s), department(s), employee type(s), or employee(s). Each selection is highlighted. (To deselect an item, click on the item to remove the highlight.)
OR
Check the Select All box if you wish to set up a timesheet entry for all employees associated with the selected group.
3.
Select the Setup Entries radio button.
4.
Indicate the starting and ending date range. If this option is selected, the system will create a timesheet record for each hourly and per diem employee who does not already have an existing timesheet record. If all timesheet records have been purged, the system will resetup the proper timesheet records from the employee’s earnings screen.
OR
Check the Use Past Payroll Date option to setup employee timesheet records for those employees who were paid in a selected past payroll date. If this option is selected, the system will only setup timesheet records for those employees who had timesheet earnings and were paid on the specified past payroll date. This option can be useful for creating timesheet records for those employees who do not have appointments.
5.
Press the OK button. An Information window displays stating that the setup is complete.
The timesheet entry can be viewed on the Data Entry and Maintenance folders.
Initialize Entries Utility
Initialize Entries Utility
This utility sets all units to zero for selected or all Hourly or Per Diem employees or those associated with selected accounts, earnings, buildings, departments, or employee types.
1.
Use the folders on the left-hand side of the window under Selection Method to indicate which timesheet entries are to be initialized. Employee timesheet records can be initialized in any one of the following methods: by Account Code, Earnings Code, Building, Department, Employee Type, or Employee.
2.
Once the initialization method or group has been specified, use the browser to select specific criteria for the initialization process.
Click on the column title to change the sort order of the information contained in the browser. Use the Search field to change the starting point of information contained in the browser.
Select the criteria from the browser list by clicking on the data to be included in the timesheet initialization. Each selection is highlighted. Hold the Ctrl key and click in the browser to select more than one item. Select the criteria from the browser list by clicking on the selected account(s), earning(s), building(s), department(s), employee type(s), or employee(s). Each selection is highlighted. (To deselect an item, click on the item to remove the highlight.)
OR
Check the Select All box if you wish to initialize the timesheet record for all employees associated with the selected group.
3.
Select the Initialize Entries radio button.
4.
Press the OK button. An Information window displays stating that the initialization is complete.
The Timesheet Pay Entry window displays the Units field as 0.00 for those entries that were selected.
Purge Entries Utility
Purge Entries Utility
This utility removes all timesheet entries for selected or all Hourly or Per Diem employees or those associated with selected accounts, earnings, buildings, departments, or employee types.
1.
Use the folders on the left-hand side of the window under Selection Method to indicate which timesheet entries are to be purged. Employee timesheet records can be purged in any one of the following methods: by Account Code, Earnings Code, Building, Department, Employee Type, or Employee.
2.
Once the purge method or group has been specified, use the browser to select specific criteria for the purge process.
Click on the column title to change the sort order of the information contained in the browser. Use the Search field to change the starting point of information contained in the browser.
Select the criteria from the browser list by clicking on the data to be included in the purge process. Each selection is highlighted. Hold the Ctrl key and click in the browser to select more than one item. Select the criteria from the browser list by clicking on the selected account(s), earning(s), building(s), department(s), employee type(s), or employee(s). Each selection is highlighted. (To deselect an item, click on the item to remove the highlight.)
OR
Check the Select All box if you wish to purge the timesheet entries for all employees associated with the selected group.
3.
Select the Purge Entries radio button.
4.
Press the OK button. A Message window displays asking you to confirm that you wish to proceed with the timesheet purge process at this time. Select YES if you wish to purge timesheet records. Otherwise, select NO.
5.
If you chose to purge timesheet records, an Information window displays stating that the purge is complete.
The selected timesheet records are removed from the Timesheet Pay Entry window.
Back to top
Page 1