Budget Entry – Budget Administrators
The Budget Entry routine allows the Budget Administrator to create and maintain budgets per fund and to add new budget administrators. Once the budget is created, you can add a budget user, rename the budget, remove the budget, export or import the budget, undo the budget export, refresh the budget data, and submit the final budget.
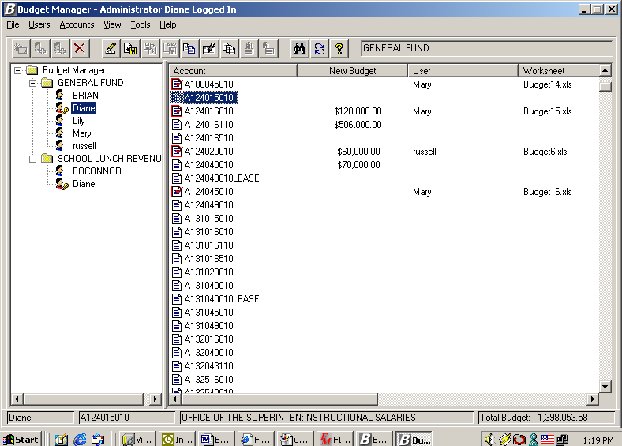
The name of the user who is currently logged in is displayed in the title bar of the window. The name of each budget to which the user logged in has access is displayed on the left-hand side of the window. Under each budget is the name of each user and administrator for that budget. Click on each user to see the accounts linked to that user as created through the User Account Chart Range Maintenance routine. The name of the selected budget is displayed in the top right-hand side of the window next to the shortcut icons. The bottom of the window reflects the name of the budget administrator that is highlighted, the budget account code highlighted, budget account code description, and total budget (the sum of the New Budget amounts). As a budget administrator, you have access to all budgets in Budget Manager.


Accessing Budget Entry Options
There are three ways in which you can access the options available within the Budget Entry routine.
·
Right-click with the mouse to access the options available within each folder.
OR
·
Click on the drop-down menu at the top of the window and select the appropriate option.
OR
·
Click on the icons in the toolbar at the top of the window.
Back to top
General Budget Entry Options
The options contained in the View and Tools drop-down menu can be accessed regardless of whether you are a Budget User or Budget Administrator. These options are described below:
View Drop-Down Menu
NOTE: The options in this drop-down menu can also be accessed by right-clicking anywhere in the white area on the right-hand side of the window.
| Option
|
Action
|
| Sort
|
This option is used to change the manner in which the accounts are displayed on the window. Select Ascending to display accounts in numerical ascending order. Select Descending to display accounts in numerical descending order.
|
| |
|
| Details
|
This option is used to display detail for each account. The detail provided is as follows: new budget amount, budget user name, worksheet, last modified date/time, check out folder, category, and account status.
If Details is checked, the window would look like the following:

|
| |
|
| List
|
This option is used to display accounts in a list without detail.
If List is checked, the window would look like the following:

|
| |
|
| Small Icons
|
This option is used to display small size icons for each account when accounts are displayed in list format. If Small Icons is checked, the window would look like the following:

|
| |
|
| Large Icons
|
This option is used to display large size icons for each account when accounts are displayed in list format. If Large Icons is checked, the window would look like the following:

|
| |
|
| Refresh
|
This option is used to refresh the budget accounts on the right-hand side of the window with the most current data.
|
Tools Drop-Down Menu
| Option
|
Action
|
| Find
|
This option is used to search for a budget account number. The option can also be accessed from the  button in the toolbar. Select the option and type in all or part of an account code. The system will highlight the closest account match based on the search criteria entered. button in the toolbar. Select the option and type in all or part of an account code. The system will highlight the closest account match based on the search criteria entered.
|
| |
|
| Calculator
|
This option provides access to the on-line Windows calculator.

|
Back to top
Add Budget
The Add Budget routine is used to create budgets per fund and account type.
This option can be accessed using one of the following methods:
·
Highlight the Budget Manager folder, right-click and select the Add Budget option from the menu.
OR
·
Highlight the Budget Manager folder and select the Add Budget option from the File drop-down menu.
OR
·
Highlight the Budget Manager folder and select the  button from the toolbar.
The Add Budget window displays.
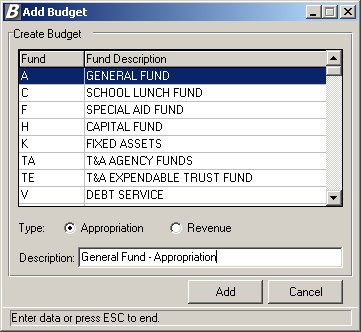
To Add a Budget:
1.
Highlight the appropriate fund.
2.
Select the type of budget – Appropriation or Revenue - by flagging the radio button that corresponds to the type.
3.
Enter the description of the budget. For example: General Fund Appropriations.
4.
Press the Add button.
The system looks at all the accounts associated with the fund and type as defined in Accounting Manager and puts those accounts into the budget. The newly created budget is added under the Budget Manager folder.
Back to top
Add Administrator
The Add Administrator routine is used to define one or more users as budget administrators.
This option can be accessed using one of the following methods:
·
Highlight the Budget Manager folder, right-click and select the Add Budget Admin option from the menu.
OR
·
Highlight the Budget Manager folder and select the Add Administrator option from the Users drop-down menu.
OR
·
Highlight the Budget Manager folder and select the  button from the toolbar.
The Add Budget Administrator window displays.

This window displays a listing of all users of the FM2000 System. Use the window to define one or more users as budget administrators. Any user defined as a Budget Administrator will have access to all budgets and all account codes within Budget Manager.
To Add a Budget Administrator:
1.
Highlight the appropriate user name.
2.
Press the Add button.
The newly added budget administrator can be seen by opening each budget folder. For example, if Carol is added as a Budget Administrator, the user icon to the left of the budget preparer name will reflect a key  , indicating that the individual is a Budget Administrator.
Back to top
Add Budget User
The Add Budget User option is used to give one or more users access to a selected budget.
This option can be accessed using one of the following methods:
·
Highlight the Budget folder, right-click and select the Add Budget User option from the menu.
OR
·
Highlight the Budget folder and select the Add Budget User option from the Users drop-down menu.
OR
·
Highlight the Budget folder and select the  button from the toolbar.
The Add Budget User window displays.

This window displays a listing of all users who are not budget administrators and are not already associated with the selected budget. Use the window to give one or more users access to the selected budget.
To Add a Budget User:
1.
Highlight the appropriate user name.
2.
Press the Add button.
The newly added budget user can be seen under the selected budget folder. For example, if Frank is added as a Budget User, the user icon to the left of the budget preparer name will not reflect a key  , indicating that the individual is a Budget User rather than a Budget Administrator.
Back to top
Rename Budget
The Rename Budget option allows you to change a budget name.
This option can be accessed using one of the following methods:
·
Highlight the Budget folder, right-click and select the Rename Budget option from the menu.
OR
·
Highlight the Budget folder and select the Rename Budget option from the File drop-down menu.
The Rename Budget window displays.

The Rename Budget window shows the existing name of the budget and allows you to change the name of the budget description.
To Rename a Budget:
1.
Type over the existing budget name.
2.
Press the OK button.
The modified budget name can be seen under the Budget Entry main window.
Back to top
Remove Budget
The Remove Budget option is used to delete an entire budget from the system.
This option can be accessed using one of the following methods:
·
Highlight the Budget folder, right-click and select the Remove Budget option from the menu.
OR
·
Highlight the Budget folder and select the Remove Budget option from the File drop-down menu.
OR
·
Highlight the Budget folder and select the  button from the toolbar.
The system asks you to confirm that this is the appropriate action that you wish to take.

If you wish to remove the budget at this time, select Yes. The entire budget is removed from the Budget Manager budget tree.
If you do not want to remove the budget at this time, select No.
Back to top
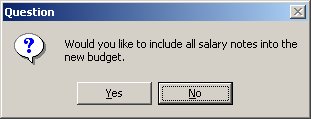
Load Salary Notes
The Load Salary Notes option is used include all salary notes into the new budget.
This option can be accessed using one of the following methods:
·
Highlight the Budget folder, right-click and select the Load Salary Notes option from the menu.
OR
·
Highlight the Budget folder and select the Load Salary Notes option from the File drop-down menu.
The following question is displayed.

Click Yes if you want to include all salary notes in the new budget.
Click No if you do not want to include salary notes in the new budget.
Back to top
Lock Budget User
The Lock Budget User function is used to stop selected budget users from performing any further budget-related transactions.
This option can be accessed using one of the following methods:
·
Highlight the appropriate budget user, right-click and select the Lock Budget User option from the menu.
OR
·
Highlight the appropriate budget user and select the Lock Budget User option from the Users drop-down menu.
OR
·
Highlight the appropriate budget user and select the  button from the toolbar.
A lock is placed next to each account associated with the selected budget user. A lock is not placed on those accounts that have already been checked out.
Back to top
Unlock Budget User
The Unlock Budget User function is used to remove the lock from selected budget users so that they can continue to perform budget-related transactions.
This option can be accessed using one of the following methods:
·
Highlight the appropriate budget user, right-click and select the Unlock Budget User option from the menu.
OR
·
Highlight the appropriate budget user and select the Unlock Budget User option from the Users drop-down menu.
OR
·
Highlight the appropriate budget user and select the  button from the toolbar.
The lock is removed from each account associated with the selected budget user.
Back to top
Back to top
Remove Budget User
The Remove Budget User function is used to remove a selected user or administrator from a particular budget so that they can no longer perform budget-related transactions.
This option can be accessed using one of the following methods:
·
Highlight the appropriate budget and budget user/administrator, right-click and select the Remove Budget User option from the menu.
OR
·
Highlight the appropriate budget and budget user/administrator and select the Remove Budget User option from the Users drop-down menu.
OR
·
Highlight the appropriate budget and budget user/administrator and select the  button from the toolbar.
When removing a budget user, the following question is displayed:

Press Yes if you do not want this user to have access to the selected budget. The user’s name is removed from the selected budget.
Press No or Cancel if you want the user to continue to have access to the selected budget.
When removing a budget administrator, the following question is displayed:

Press Yes if you do not want this administrator to have access to any of the budgets. The administrator’s name is removed from the selected budget.
Press No or Cancel if you want the administrator to continue to have access to all budgets.
Refresh Accounting Data
The Refresh Accounting Data option is used to update the budget data with the latest information from the Accounting Manager module that impacts the budget such as new expenditures, purchase orders placed, etc. If the Export Budget Account routine is performed after the data has been refreshed, the most current figures from Accounting Manager are brought in.
This option can be accessed using one of the following methods:
·
Highlight the Budget folder, right-click and select the Refresh Accounting Data option from the menu.
OR
·
Highlight the Budget folder and select the Refresh Accounting Data option from the File drop-down menu.
Upon execution of the Refresh Accounting Data option, the system displays an hourglass. The hourglass remains on the window until the process is complete.
Back to top
Add Existing Budget Account
The Add Existing Budget Account option is used to import existing active or inactive accounts created through the Accounting Manager Chart of Accounts Maintenance routine. Once the accounts are added, they will display in the account listing within the budget in which they were added. NOTE: If an inactive account code is added to a budget, the account is displayed in the listing for review purposes only. The system prohibits you from making entries to an inactive account code.
This option can be accessed using one of the following methods:
·
Highlight the appropriate budget and budget administrator, right-click and select the Add Budget Accounts option from the menu.
OR
·
Highlight the appropriate budget and budget administrator and select the Add Budget Account option from the Accounts drop-down menu.
The Import/Create Budget Accounts window displays.

To Add the Budget Account:
1.
Select the account codes that you wish to add. You may do one of the following:
- Highlight the account that you wish to add with the mouse.
- Hold the Control (Ctrl) key while clicking with the mouse to select more than one account to be added.
- Check the Select All checkbox if you wish to add all the accounts shown on the browser.
2.
Press the Done button to add the budget accounts. Press Cancel if you do not wish to add the budget accounts at this time.
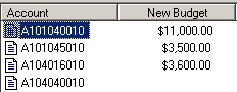
The selected budget accounts can be seen under the account listing on the right-hand side of the window.
Back to top
Create New Budget Account
The Create New Budget Account option is used to add a new budget code that does not already exist in the Accounting Manager Chart of Accounts. Once the accounts are created, they will display on each administrator’s account listing for the selected budget. If you want other budget users to have access to the new budget code(s), the account must be linked to the budget user through the User Account Chart Range Maintenance routine.
This option can be accessed using one of the following methods:
·
Highlight the appropriate budget and budget administrator, right-click and select the Create Budget Accounts option from the menu.
OR
·
Highlight the appropriate budget and budget administrator and select the Create Budget Account option from the Accounts drop-down menu.
The Add Account to Budget window displays.

To Add a New Account Record:
1.
Press the Add button  .
.
2.
Enter the budget account code.
3.
Specify the account code status as either Active or Inactive. Use the drop-down menu to help you select the proper status.
4.
Enter the new budget code name.
5.
Press the Save button  .
.
Repeat steps 1 through 5 until you have added all appropriate account records.
6.
Press the Done button to save the records. NOTE: If you press the Cancel button without pressing Done, the new account(s) is not saved in the system.
To Update a New Account Record:
1.
Highlight the account code that you wish to update.
2.
Press the Update button  .
.
3.
Update the account code, status, and/or budget code name as needed.
4.
Press the Save button  .
.
Repeat steps 1 through 4 until you have updated all appropriate account records.
5.
Press the Done button to save the records. NOTE: If you press the Cancel button without pressing Done, the changes are not saved in the system..
To Delete a New Account Record:
1.
Highlight the account code that you wish to delete.
2.
Press the Delete button  .
.
3.
Confirm that this is the correct account code that you wish to delete.
Click Yes if you wish to delete the selected account code.
Click No if you do not wish to delete the account code at this time.
Repeat steps 1 through 3 until you have deleted all appropriate account records.
4.
Press the Done button to save your changes. NOTE: If you press the Cancel button without pressing Done, the deleted account(s) are not saved in the system.
Back to top
Export Budget Account
The Export Budget Account option is used to export budget information to Microsoft Excel™.
This option can be accessed using one of the following methods depending on how many accounts you are exporting:
Exporting One or More Budget Account
Exporting One or More Budget Account
·
Highlight the budget administrator name or account(s) that you wish to export to Excel, right-click on the selected account(s) and select the Export Budget Account option from the menu.
OR
·
Highlight the budget administrator name or account(s) and select the Export Budget Account option from the Accounts drop-down menu.
OR
·
Highlight the budget administrator name or account(s) and select the  button from the toolbar.
Exporting All Budget Accounts
Exporting All Budget Accounts
·
Highlight and right-click on the budget folder and select the Export All Accounts option from the menu.
The Export Budget Accounts window displays.

Entering Export Options:
1.
Enter the number of years of data to export. Type the number or use the up/down arrows to assist you in finding the correct number.
2.
Specify which years you wish to export for the following:
Budget - Indicate the year(s) for which you wish to include the original budget amount. Select Export All Years to include the original budget amount for each of the number of years specified. Select Export Prior Years Only to include the original prior year budget amount for each number of years specified. Select Export Current Year Only to include the original budget amount for the current fiscal year only. Select Don’t Export if you do not want to include the original budget amount for the current or prior fiscal years.
Adjusted Budget – Indicate the year(s) for which you wish to include the adjusted budget amount. Select Export All Years to include the adjusted budget amount for each of the number of years specified. Select Export Prior Years Only to include the adjusted prior year budget amount for each number of years specified. Select Export Current Year Only to include the adjusted budget amount for the current fiscal year only. Select Don’t Export if you do not want to include the adjusted budget amount for the current or prior fiscal years.
Expenditures - Indicate the year(s) for which you wish to include the expenditure amount. Select Export All Years to include the expenditure amount for each of the number of years specified. Select Export Prior Years Only to include the prior year expenditure amount for each number of years specified. Select Export Current Year Only to include the expenditure amount for the current fiscal year only. Select Don’t Export if you do not want to include the expenditure amount for the current or prior fiscal years.
Projected Expenditures - Indicate the year(s) for which you wish to include the projected expenditure amount. Projected Expenditures represent the Expensed amount plus the Encumbered amount minus the Liquidated amount.
Expensed
Amount
|
+
|
Encumbered
Amount
|
-
|
Liquidated
Amount
|
=
|
Projected
Expenditures
|
Select Export All Years to include the projected expenditure amount for each of the number of years specified. Select Export Prior Years Only to include the projected expenditure amount for each number of years specified. Select Export Current Year Only to include the projected expenditure amount for the current fiscal year only. Select Don’t Export if you do not want to include the projected expenditure amount for the current or prior fiscal years.
Encumbrances - Indicate the year(s) for which you wish to include the encumbrance amounts. Select Export All Years to include the encumbrance amounts for each of the number of years specified. Select Export Prior Years Only to include the prior year encumbrance amounts for each number of years specified. Select Export Current Year Only to include the encumbrance amounts for the current fiscal year only. Select Don’t Export if you do not want to include the encumbrance amounts for the current or prior fiscal years.
3.
Indicate the path and name of the Export file. Use the default path and export file name or enter a new path and file name. Use the browser  to locate the path of the export file.
4.
Place a check in the Open on Export checkbox if you want the routine to open the Excel document upon execution of Export. Leave the box unchecked if you do not want to open Excel immediately upon Export.
5.
Press the Export button.
Below is a sample of the budget Excel spreadsheet.

Upon execution of the Export function, the selected accounts are checked out. The browser displays the name of the Excel spreadsheet. No other user can access these accounts until the budget accounts are imported or the budget export is undone.

NOTE: If you need to undo the budget export, select the account(s) and then select the Cancel Budget Export option.
Back to top
Cancel Budget Export/Update
The Cancel Budget Export/Update routine is used to cancel the export of any budget changes so that they cannot be imported. This cancel process releases the account code(s) that were checked out so that other users may use them.
This option can be accessed using one of the following methods:
·
Highlight the budget account(s) for which you wish to undo the export, right-click on the selected account(s) and select the Cancel Budget Export/Update option from the menu.
OR
·
Highlight the budget account(s) for which you wish to undo the export and select the Cancel Export/Update option from the Accounts drop-down menu.
OR
·
Highlight the budget account(s) and select the  button from the toolbar.
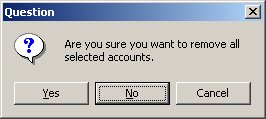
After selecting the Cancel Budget Export option, the below Question box displays.

Confirm that this is the correct action that you wish to perform. Select Yes if you wish to cancel/undo all selected budget accounts. Select No if you do not wish to cancel/undo the selected budget accounts at this time.
Upon execution of the Undo function, the selected accounts are checked back in, the name of the Excel spreadsheet is removed from the browser, and other users can access the selected accounts.
Import Budget Account
The Import Budget Account routine is used to bring in any changes that you made to the Budget Excel spreadsheet.
This option can be accessed using one of the following methods:
·
Highlight the budget account(s) that you wish to import, right-click on the selected account(s), and select the Import Budget Account option from the menu.
OR
·
Highlight the budget account(s) that you wish to import and select the Import Budget Account option from the Accounts drop-down menu.
OR
·
Highlight the budget account(s) that you wish to import and select the  button from the toolbar.
After selecting the Import Budget Account option, the Import Options window displays.

To Set Import Options:
1.
Enter the number associated with the Excel worksheet. Type the number or use the up/down arrows to assist you in finding the correct number.
2.
Enter the letter associated with the column in which the current budget account codes are located. Type the letter or use the up/down arrows to assist you in finding the correct letter.
3.
Enter the letter associated with the column in which the new budget amounts are located. Type the letter or use the up/down arrows to assist you in finding the correct letter.
4.
Press the Import button.
The system displays a message indicating that the Import process is complete. The new budget figures entered in the Excel spreadsheet are displayed for each account number.
Back to top
Update Budget
The Update Budget routine is used to change the budget amounts. NOTE: The system will not allow update of a budget amount for an account that is currently checked out  .
.
This option can be accessed using one of the following methods:
·
Highlight the account code(s) whose budget amount you wish to update, right-click on the selected account(s), and select the Update Budget option from the menu.
OR
·
Highlight the account code(s) whose budget amount you wish to update and select the Update Budget Accounts option from the Accounts drop-down menu.
OR
·
Highlight the account code(s) whose budget amount you wish to update and select the  button from the toolbar.
The accounts that you selected are checked out, meaning that no other user can modify the budget code until you complete your transaction.
Updating Multiple Budget Codes
Updating Multiple Budget Codes
The Update Budget window shown below displays when you have selected more than one budget code. The window displays the account code name, any notes, and the existing budget amount.

To Update Multiple Budget Codes:
1.
In the browser, click on the New Budget field for each account. Enter the new budget amount. NOTE: The New Budget figure may not be less than the sum of the new budget notes.
2.
Use the Enter, Tab or Up/Down Arrow keys to move to the next budget line.
3.
When you are finished entering the new budget figures, press the Done button to save the changes. NOTE: If you press the Cancel button without pressing Done, the changed budget information is not saved in the system.
The check out indicator is removed from each account code that was selected.
Updating Individual Budget Codes
Updating Individual Budget Codes
The Update Budget window shown below displays when you have selected only one budget code.

To Update a Single Budget Code:
1.
Enter the new budget amount. NOTE: The New Budget figure may not be less than the sum of the new budget notes.
2.
Change the account classification category if necessary. The categories are as follows: Administrative, Program or Capital.
3.
When you are finished entering the new budget figures, press the OK button.
The check out indicator is removed from the account code that was selected.
Back to top
Remove Budget Account
The Remove Budget Account routine allows you to remove a selected account(s) from the listing of budget accounts that display on the right-hand side of the window. NOTE: The system will not allow removal of a budget account that is currently checked out  .
.
This option can be accessed using one of the following methods:
·
Highlight the account code(s) that you wish to remove, right-click on the selected account(s), and select the Remove Budget Account option from the menu.
OR
·
Highlight the account code(s) that you wish to remove and select the Remove Budget Account option from the Accounts drop-down menu.
OR
·
Highlight the account code(s) that you wish to remove and select the  button from the toolbar.
The following question displays:
Indicate the action that you wish to perform.
Press Yes if you want to remove the accounts that you highlighted from the right-hand side of the window. NOTE: If you selected an account code that was already checked out, the system will not remove the account.
Press No or Cancel if you do not want to remove the selected accounts at this time.
Back to top
Split Budget Account
The Split Budget Account routine is used to break the budget down into the various pieces that comprise the entire budget. For example, the Salary Budget can be broken down into Salary – Administrators, Salary – Teachers, Salary – Maintenance, Salary – Clericals, etc.
This option can be accessed using one of the following methods:
·
Highlight the account code(s) that you wish to split, right-click on the selected account(s), and select the Split Budget Account option from the menu.
OR
·
Highlight the account code(s) that you wish to split and select the Split Account option from the Accounts drop-down menu.
OR
·
Highlight the account code(s) that you wish to split and select the  button from the toolbar.
The system will not allow split of an account that has notes or that has already been checked out. The account that you selected is checked out, meaning that no other user can modify the budget code until you complete your transaction. The Split Budget Account window displays.

To Add a Split Budget Account Record:
7.
Press the Add button  .
.
The system assigns the next sequential number to the budget line item.
8.
Enter the text that describes the name of the budget.
9.
Specify the reporting category under which the budget is classified. Valid categories are Administrative, Program, or Capital. Use the drop-down menu to help you select the proper category.
10.
Enter the new budget amount.
11.
Press the Save button  .
.
Repeat steps 1 through 5 until you have added all appropriate budget records.
12.
Press the Done button.
The check out indicator is removed from the account code that was selected.
The account code on the right-hand side of the window displays a folder icon  , which indicates that the budget account has been split. Refer to the screen capture below.

To Update a Split Budget Account Record:
6.
Highlight the budget name that you wish to update.
7.
Press the Update button  .
.
8.
Update the name of the budget, reporting category, and/or new budget amount as needed.
9.
Press the Save button  .
.
Repeat steps 1 through 4 until you have updated all appropriate budget records.
10.
Press the Done button.
The check out indicator is removed from the account code that was selected.
To Delete a Split Budget Account Record:
5.
Highlight the budget name that you wish to delete.
6.
Press the Delete button  .
.
7.
Confirm that this is the correct budget entry that you wish to delete.
Click Yes if you wish to delete the selected budget entry.
Click No if you do not wish to delete the budget entry at this time.
Repeat steps 1 through 3 until you have deleted all appropriate budget records.
8.
Press the Done button.
The check out indicator is removed from the account code that was selected.
Back to top
Lock User Account
The Lock User Account function is used to stop selected budget users from accessing a specific account(s).
This option can be accessed using one of the following methods:
·
Highlight the appropriate budget user and account(s), right-click and select the Lock User Account option from the menu.
OR
·
Highlight the appropriate budget user and account(s) and select the Lock User Account option from the Accounts drop-down menu.
OR
·
Highlight the appropriate budget user and account(s) and select the  button from the toolbar.
A lock is placed next to each account associated with the selected budget user. A lock is not placed on those accounts that have already been checked out.
Back to top
Unlock User Account
The Unlock User Account function is used to remove the lock from accounts for selected budget users so that they can continue to perform budget-related transactions for those accounts.
This option can be accessed using one of the following methods:
·
Highlight the appropriate budget user and account(s), right-click and select the Unlock User Account option from the menu.
OR
·
Highlight the appropriate budget user and account(s) and select the Unlock User Account option from the Accounts drop-down menu.
OR
·
Highlight the appropriate budget user and account(s) and select the  button from the toolbar.
The lock is removed from each account associated with the selected budget user.
Back to top
Budget Notes
The Budget Notes routine is used to record notes that specify what the budget is being used for. For example, the Budget can be used to purchase equipment such as Computers, Printers, etc.
NOTE: The system will not allow split of an account that has notes. If you need to add budget notes for a split account, double click on the accounts folder and add/update notes under each individual budget account code.
This option can be accessed using one of the following methods:
·
Highlight the account code for which you wish to add or maintain budget notes, right-click on the selected account and select the Budget Notes option from the menu.
OR
·
Highlight the account code for which you wish to add or maintain budget notes and select the Budget Notes option from the Accounts drop-down menu.
OR
·
Highlight the account code for which you wish to add or maintain budget notes and select the  button from the toolbar.
The account that you selected is checked out, meaning that no other user can modify the budget code until you complete your transaction. The Notes for Budget Account window displays.
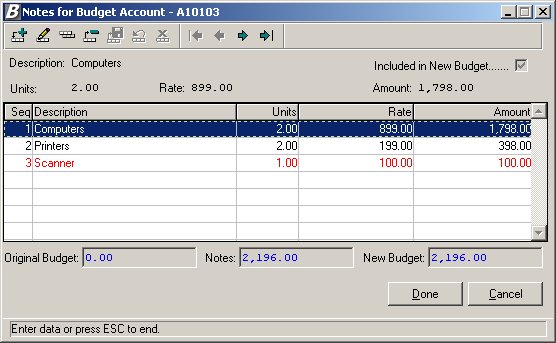
To Add a Budget Note Record:
1.
Press the Add button  .
.
The system assigns the next sequential number to the budget note item.
2.
Enter the text that describes what the budget is being used for.
3.
Check the Included in New Budget checkbox if you want the amount of the note to be included in the new budget amount. Otherwise, leave the box unchecked.
4.
Optionally enter the number of units.
5.
Optionally enter the rate associated with the note description.
6.
If you indicated a number of units and rate, the system calculates the extended amount. If you have not specified units and rate, enter a flat dollar amount.
7.
Press the Save button  .
.
Repeat steps 1 through 7 until you have added all appropriate budget note records.
8.
Press the Done button. NOTE: If you press the Cancel button without pressing Done, the budget note information is not saved in the system.
After pressing Done, the check out indicator is removed from the account code that was selected.
The account code on the right-hand side of the window displays a pencil icon  , which indicates that the budget account has notes associated with it. Refer to the screen capture below.

To Update a Budget Note Record:
1.
Highlight the budget note that you wish to update.
2.
Press the Update button  from the Budget Notes toolbar.
3.
Update the note description, Include in Budget flag, Units, Rate, and Amount as needed.
4.
Press the Save button  .
.
Repeat steps 1 through 4 until you have updated all appropriate budget note records.
5.
Press the Done button. NOTE: If you press the Cancel button without pressing Done, the changed budget note information is not saved in the system.
The check out indicator is removed from the account code that was selected.
To Delete a Budget Note Record:
1.
Highlight the budget note that you wish to delete.
2.
Press the Delete button  from the Budget Notes toolbar.
3.
Confirm that this is the correct budget note that you wish to delete.
Click Yes if you wish to delete the selected budget note.
Click No if you do not wish to delete the budget note at this time.
Repeat steps 1 through 3 until you have deleted all appropriate budget note records.
4.
Press the Done button. NOTE: If you press the Cancel button without pressing Done, the budget note information is not saved in the system.
The check out indicator is removed from the account code that was selected.
Back to top
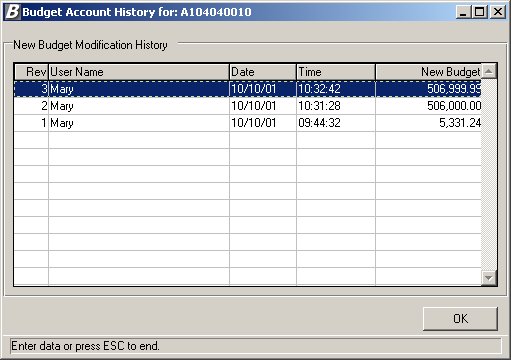
Account History
The Account History routine is used to display the sequence of changes that took place for a selected budget account.
This option can be accessed using one of the following methods:
·
Highlight the account code for which you wish to review history, right-click on the selected account and select the Show History option from the menu.
OR
·
Highlight the account code for which you wish to review history and select the Account History option from the Accounts drop-down menu.
OR
·
Highlight the account code for which you wish to review history and select the  button from the toolbar.
Back to top
The information shown is for review purposes only and cannot be modified on this window. To return to the Account window, press the OK button.
Back to top
Properties
The Properties routine is used to display general information regarding the selected budget, user, or account.
Budget Properties
To display general information for a specific budget, do one of the following:
·
Highlight the budget for which you wish to review properties, right-click on the selected budget and select the Properties option from the menu.
OR
·
Highlight the budget for which you wish to review properties and select the Properties option from the File drop-down menu.
The following window displays:

This window provides the following information: budget name and reference number, budget creation date, name of the individual who created the budget, fund, budget type, last refresh date and time, submit flag, total dollar value of the budget notes, and total budget amount. To exit the window, press OK.
User Properties
To display general information for a specific user or administrator, do one of the following:
·
Highlight the budget user/administrator for which you wish to review properties, right-click on the selected user name and select the Properties option from the menu.
OR
·
Highlight the budget user/administrator for which you wish to review properties and select the Properties option from the Users drop-down menu.
The following window displays:

This window displays general information regarding the budget user or administrator. The information includes the user name, budget reference number, administrator flag, default export folder, and user’s total budget amount. Press OK to exit this window.
Budget Account Code Properties
To display general information for a specific budget account code, do one of the following:
·
Highlight the budget account code for which you wish to review properties, right-click on the selected account code and select the Properties option from the menu.
OR
·
Highlight the budget account code for which you wish to review properties and select the Properties option from the Accounts drop-down menu.
The following window displays:

This window displays general budget account information including the account number, account description, account status, budget reference number, category, last modified date/time, total budget notes, and new budget amount. Press OK to exit this window.
Back to top
Load Salary Notes
The Load Salary Notes routine allows the administrator to move the salary information that was projected through Negotiations Manager into Budget Manager. After salaries are projected, the Budgetary Interface utility in Negotiations Manager must first be used to export the salary information. Once the salary information is exported, the salary notes can be loaded through Budget Manager.
This option can be accessed using one of the following methods:
·
Highlight the budget folder for which you wish to load salary notes, right-click on the selected folder and select the Load Salary Notes option from the menu.
OR
·
Highlight the budget folder for which you wish to load salary notes and select the Load Salary Notes option from the File drop-down menu.
The following question displays:
Click Yes if you wish to bring the projected salaries into the new budget. The budget amount is increased by the amount of the notes.
Click No if you want to bring in the salary notes but not increase the budget amount by the amount of the notes.
If you selected to include salary notes in the new budget, the account code is flagged with a pencil  and the new budget amount is updated to reflect the projected salaries.

Back to top
Submit Final Budget
The Submit Final Budget routine allows the administrator to move budget entries to Accounting Manager.
This option can be accessed using one of the following methods:
·
Highlight the budget folder for which you wish to submit the budget, right-click on the selected folder and select the Submit Final Budget option from the menu.
OR
·
Highlight the budget folder for which you wish to submit the budget and select the Submit Final Budget option from the File drop-down menu.
The system displays a message stating that the selected fund was successfully submitted to Accounting Manager. Upon completion of the routine, the budget folder is flagged with a green check  .
.
The budget entries can be seen on the Opening Budget Entries window that can be accessed from the Utilities drop-down menu in Accounting Manager.
Back to top